Showing posts with label Pam M.. Show all posts

Thursday, April 14, 2022

G'day mate!

 Hello CottageCutz Friends

We have a new release and it is on sale!!

for a limited time...
Australian Friends Release

Save 30% on Individual Designs
14 New CottageCutz Designs

Today, I am using 3 of the new release dies: KangarooKoala Bear w/Floral, and the Cockatoo.
Design Steps:
1.  Using the following dies cut out the little critters KangaroosKoala Bear w/Floral, and the Cockatoo.  Using the following colors of card stock: Three shades of green, brown, tan, gray, black, white, light and dark pink.  Shade the pieces with a variety of ink colors and a small applicator
2.  Use a slimline white base 8 1/2 x 3 1/2.  Cut a piece white card stock 8 1/2 x 3 1/2 with the Circle Window Slimline die.  Cut a piece of DP blue 8 1/4 x 3 1/4
3.  Tape the edges of the blue DP to the back of the white slimline circle piece.  I just taped the edges so I can slip in the little critters and leaves
4.  Arrange your leaves and critters inside each circle and then glue them down
5.  Stamp your sentiment and layer it onto a piece of green card stock.  Then glue your slimline panel to the white card base and your card is complete

CottageCutz Products


We have more inspiration on our YouTube Channel check it out HERE
Thanks so much for stopping by!  And I will see you next Thursday.

Blessings and Take Care


Thursday, April 07, 2022

Black Swan

 Hello CottageCutz Friends

We have a new release and it is on sale!!

for a limited time...
Australian Friends Release
Save 50% on Bundle
Save 30% on Individual Designs
14 New CottageCutz Designs

Today, I am using the new Swan die and I just love how this card turned out!
Design Steps:
1.  Use the Swan die and cut out the pieces: black, blue, white, green, brown, and grey.  Shade the swan and the other pieces with inks and Copic Markers.  Use the Pierced Wide Circle Frame die (the largest) and cut it out of white and black card stock.  Use the center of the white circle and blend in grass and sky using inks
3.  Glue the pieces of the swan, rocks, pond and grasses to the inked circle as shown above
3.  Back the inked white circle with the black circle and glue the black frame on top of the white frame.  I did this for a little more stability 
4.  I used a black A2 card base and some DP cut 4 1/8 x 5 3/8.  Glue the patterned DP to the black card base
5.  Glue the circle to the middle of the DP.  Stamp your sentiment and layer onto black card stock.  Glue the sentiment to the card as shown below and your card is complete

CottageCutz Products


We have more inspiration on our YouTube Channel check it out HERE
Thanks so much for stopping by!  And I will see you next Thursday.

Blessings and Take Care


Thursday, March 31, 2022

Spring Chickee!

Hello Crafty Friends,

So glad you are taking a moment to stop by and check out the Easter card I made today.  This card was made with the Spring Release and is featuring the Spring Chickee in Basket.  If you haven't checked out the new release just click HERE.  It is a very sweet set of dies!


Design Steps:

1.  I used the following dies: Spring Chickee in BasketSlimline Grass and the Spring Sentiments.  I cut them out of navy, pink, orange, yellow and green card stock.  Shade the pieces with ink and assemble with a fine tip glue
2. The base of the card is an A2 navy with a 4 x 5 1/4 white background
3.  Glue the grass and the Happy Easter flat to the card as shown.  I added a second layer of grass and only glued it down at the base of the grass.  By only gluing on the bottom I could then tuck in the basket and eggs 
4.  Add pop dots to the basket and then tuck it into the second layer of grass.  Glue the eggs in the grass as shown below.  Add a few sequins and your card is complete

CottageCutz Products


We have more inspiration on our YouTube Channel check it out HERE
Thanks so much for stopping by!  And I will see you next Thursday.

Blessings and Take Care


Thursday, March 17, 2022

Spring Chicken

 Hello Friends

Happy St. Patrick's Day!! I hope you are wearing green!!

Today, I am making a thank you card because my stash is running a little low.  I decided to use the cute Spring Chicken for my card.  I love the little sign she has with her.  You can really put any sentiment you want on it.


Design Steps
1.  Use an A2 white card stock base and cut a piece of blue 4 1/8 x 5 3/8 run it through a cloud embossing folder
2.  Using the Spring Chicken die and cut the pieces out of tan, rust, brown, pink, yellow, purple, red, and green.  Shade the pieces with ink and glue together with a fine tip glue.  Stamp your sign with Thank You
3.  Cut 3 white frames using the largest of the Pierced Wide Rectangle set.  Glue the frames together.  Use the Spring Grass die and cut it out using green card stock.  Glue the grass to the back of the frames

4.  Layer the back of the frame with dimension tape.  Adhere it to the blue cloud card stock
5.  Glue in the Chicken then the sign.  Finally add in the flower and the white ribbon bow. Glue the blue panel to the white card base and your card is complete

CottageCutz Products


We have more inspiration on our YouTube Channel check it out HERE
Thanks so much for stopping by!  And I will see you next Thursday.

Blessings and Take Care


Thursday, March 10, 2022

St. Patrick's Day Peeker

 Hello Friends,

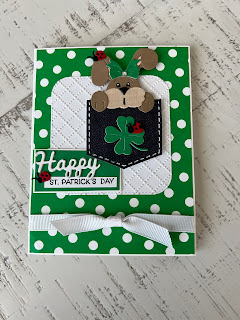
I have one more St. Patrick's Day card to share with you today!  I am using two dies the Peeker Bunny w/Pocket and the St. Patrick's Day Phrase and More.  

The Spring Release has so many adorable dies so don't forget to check it out!


Design Steps:

1.  Use the Peeker Bunny w/Pocket and cut out the pieces in brown, tan, green, black, pink, red and Denim DP.  For the clover use the St. Patrick's Day Phrases die and green card stock.  Assemble the pieces and enhance the stitching with a white gel pen.  I used a black and white gel pen for the eyes and a black gel pen for the mouth
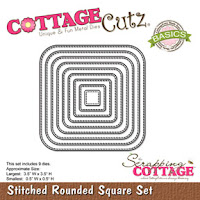
2.  Use an A2 white card base, cut a green dotted DP 4 1/8 x 5 3/8.  Use the Stitched Rounded Square die second from the largest cut on white and run through an embossing folder
3.  Before you attach the green dotted DP to the front of the card add a square knotted ribbon
4.  Glue down the rounded embossed white square to the center of the card just above the ribbon
5.  Use the Happy Expressions die and cut out 3 of the happy pieces.  Glue the pieces together and then glue flat to a piece of green card stock 2 1/8 x 1 1/8.  Stamp the St. Patrick's Day in black and glue it as shown above.  Mount the green rectangle onto a pieces of white 2 1/4 x 1/4
6.  Pop the bunny onto the front of the card.  Glue the sentiment to the left of the bunny as shown below. (I decided to move the bunny up just a little) I made 2 more of the ladybugs and glued one to the ear and one to the sentiment as shown below.  Add a rhinestone to the bow and some glossy accents to the nose and your card is complete

CottageCutz Products


We have more inspiration on our YouTube Channel check it out HERE
Thanks so much for stopping by!  And I will see you next Thursday.

Blessings and Take Care