Showing posts with label Nested Stitched Scallop Rectangle Set. Show all posts

Monday, February 12, 2018

Let's Color Eggs!

Hi, Lois here with another card for Easter.  As a kid, I'm sure we all loved to color Easter eggs.  I know I did.  Using one of the new Easter/spring dies from CottageCutz, I made a card reminiscent of that fun experience.  The CottageCutz die I used on my card is Egg Painting Bunny.


I wanted to make my egg-painting bunny the star of the show, so I made a relatively monochromatic background for him, using various purple papers.

To start my card, I die-cut the pieces from white cardstock.


Leaving the pieces on my sticky foam mat, I colored them using my favorite coloring medium -- my Copic markers -- using the packaging as a guide.   After I colored the pieces, I constructed the bunny and his paint can.


I then cut my cardstock and patterned paper:

Purple card base - 8 1/2" x 5 1/2"
Pale violet patterned paper - 4" x 5 1/4"
Die cut purple cardstock with largest Nested Stitched Scallop Rectangle Die
Die cut pale violet cardstock with largest Nested Stitched Scallop Rectangle Die, trimmed at the stitch lines


Constructing my card was simple.


I added some small foam pop dots to the back of the bunny and the eggs and adhered them to my card.


I then stamped the sentiment, and I was finished.


Be sure to check out the CottageCutz store because these Easter/spring dies (as well as some cute stitched dies) are currently 25% off.

CottageCutz dies used on my card are:

http://www.scrappingcottage.com/cottagecutzeggpaintingbunny.aspx


http://www.scrappingcottage.com/cottagecutznestedstitchedscalloprectangleset.aspx


Sunday, October 29, 2017

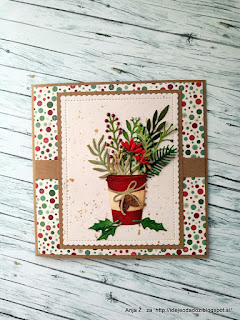
A Cup of Christmas Florals

Hi!

This is Anja again. Red and green are two of the traditional Christmas season colors. Today I pulled out all the red and green shades of Distress Inks I have and used it to make a cup of florals. I love coloring greenery and flowers so I die cut a little more and made a card and a smaller circle that can be used as a tag if we make a hole trough it.


For this project I used:
- Cottage Cutz dies (Christmas Floral, Nested Stitched Scallop Rectangle Set, Nested Stitched Scallop Circle Set, Pierced Circle Set, Sweet Spring Kitty),
- Distress Inks (Barn Door, Fired Brick, Vintage Photo, Walnut Stain, Peeled Paint, Forest Moss, Mowed Lawn, Pine Needles, Antique Linen, Bundled Sage, Shabby Shutters),
- craft paper base (13,5x13,5 cm),
- white and craft paper for die cuts,
- Nuvo Crystal Drops (Autumn Red),
- Liquid Pearls (White Opal),
- paper glue,
- design paper (13x13 cm),
- gold pigment ink,
- gold acrylic paint.

I cut a piece of design paper and two strips of craft paper. 


Then I die cut two circles and rectangles. I spritzed the lighter ones with gold acrylic paint.


I glued all the card and tag bases together.


Then I die cut all the other pieces from white card stock and colored it with Distress Inks.


I die cut all the florals in two pieces. First I colored every piece with lighter shade of ink and then put a darker shade around the edges.


I made 3D effect with liquid pearls in red and white and let it dry.


 When everything was colored and dried I glued all the floral pieces together.

And this is my final result from a bit closer.


Enjoy your Sunday and have a nice week.

Anja Z. 

Cottage Cutz products I used:


Monday, August 28, 2017

Wedded Bliss Club

Hi, Lois here with my Monday post.  August has always been a month for weddings for me.  My late husband and I were married in August fifty-five years ago.  So I'm bringing you another card made with the newly-released wedding series of dies from CottageCutz.  This time that cute little owl couple, as well as the stitched rectangle scallops..


I cut the many pieces for my little scene from various scraps of colored cardstock.


I added some additional color to some of the pieces to give them a bit of dimension.


Purple is one of my favorite colors, and my card reflects that.  Both the card base and the patterned paper accent are in shades of purple.  The card base is 5 1/2" x 8 1/2", scored in half; the patterned paper is cut slightly smaller.  My scene will appear on a piece of pale blue cardstock glued to the largest stitched scallop rectangle die cut.  In addition I cut a 1" x 4" piece of black cardstock for the road and tore a narrow strip of green for the grass.


I constructed the background for my focal panel, as shown.  I "borrowed" an idea from my fellow DT member, Pam, and drew a broken white line down the center of the road.  I had seen that on a card that she made a few weeks ago.  Thanks, Pam for the idea!


Then came the fun part of putting the bicycle and owls together.  


I stamped the sentiment, punched it out, and finished my card.


I realize purple is not most people's first choice for a wedding card; but, as I mentioned, I love that color!  And I think it goes well with the whimsical bride and groom owls.

CottageCutz dies used on my card are:

http://www.scrappingcottage.com/cottagecutztandembike.aspx

http://www.scrappingcottage.com/cottagecutznestedstitchedscalloprectangleset.aspx

http://www.scrappingcottage.com/cottagecutzspringgrasselites.aspx


Tuesday, August 15, 2017

Happy Wedding

Hi, Janja here!

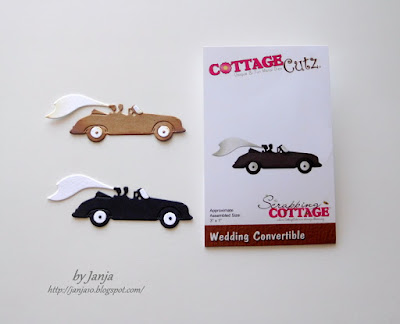
Today I share with you a wedding card, created with the new Wedding CottageCutz dies.
Usually my cards are in vibrant colors, but this time I decided for natural colors.
Let's see how it is made.


Supplies:
- CottageCutz dies: Wedding Chapel, Wedding Convertible, Rose With Wedding Rings, Love Bow and Arrow, Nested Stitched Scallop Circle Set, Circle Set, Nested Stitched Scallop Rectangle Set, Mail Tag Set
- white card base: 4.1 x 5.4" (9,5 x 12,7 cm), folded
- white cardstock: 4 x 5.2" (10 x 13,2 cm)
- white and kraft cardstock
- Distress ink: Antique Linen, Vintage Photo
- ColorBox pigment frost white

Prepare all the pieces for wedding chapel and wedding convertible. Distress them with Distress inks and glue them together.


Trim white cardstock and cut out circle with the seventh die in a row from the middle of the set.
Also trim a rectangle from kraft cardstock. Create an embossed background with embossing folder.


Shadow kraft cardstock with a sponge and white pigment.


Cut out frame from kraft cardstock with dies: nested stitched circle set (4th die), and circle set (7th die).
Cut the frame and fasten it on a white cardstock.


Now cut out two strips from white and kraft cardstock as shown.


Stamp "Happy Wedding" and add two small hearts.


Completed card.


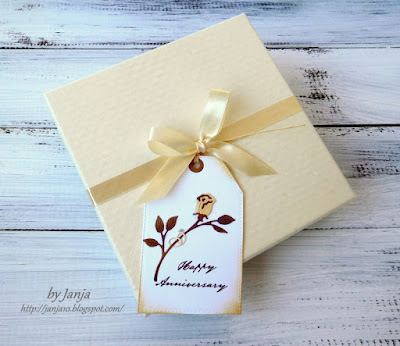
I also prepared a tag for the wedding anniversary that may be added to the gift.


I used rose with wedding rings die and the biggest die from mail tag set.


Thank you for coming over and have a lovely day.