Showing posts with label Nested Stitched Scallop Oval Set. Show all posts

Thursday, March 19, 2020

Buzzzzy Bee!

Hello Scrapping Cottage Friends

It is Pam sharing with you on the blog today.
In South Carolina all the Azaleas are beginning to bloom!  The pink, white and red flowers are gorgeous.  Along with the flowers comes the bees.  So with that being said this wonderful time of the year is my inspiration for this cute card.

Design Steps:
1.   Using the Busy Bee die cut out the pieces in white,  yellow, and black card stock

2.  Use a clear Wink of Stella to give the wings some shimmer
 3.  Shade the bee parts and then assemble.  Use tiny rhinestones for the bee's eyes
 4.  Cut out a black oval using the Scalloped Oval second from the largest.  Cut out a DP oval using the Pierced Oval die.  Use an A2 white card stock base, a piece of yellow card stock just slightly smaller then the card front by an 1/8 inch,  next cut a striped black and white piece of DP 4 x 5 1/4
 5.  Using the Spring Blooms die cut out 3 yellow flowers and 2 green leaves. Shade the flowers
6.  Glue the striped black and white DP to the yellow card stock.  Glue the black oval down and then the DP oval. Next add the black ribbon and then mount to the card base

7.    Pop up the bee and the flowers and add the rhinestones

CottageCutz


Hope things are going well for you and just think Spring is almost here!!
Blessings
Pam

Tuesday, March 03, 2020

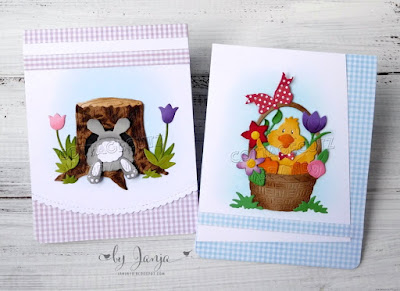
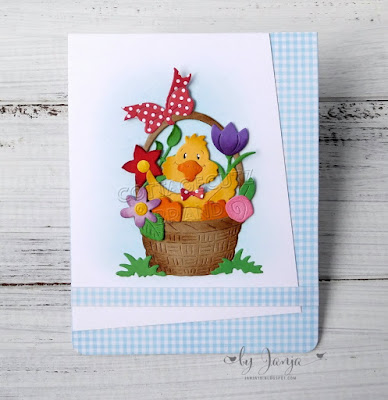
Spring bunny and duck

Hi! Janja here with you.
I made two spring cards for today's post. Let's look at them.


- CottageCutz dies: Hide & Seek Bunny, Duckling in Easter Basket, Nested Stitched Scallop Oval Set
- blank card: 4 1/4 x 5 1/2" (10,8 x 14 cm), folded
- gingham pattern paper
- colored cardstock
- colored ink pads
- colored markers
- glue, double-sided adhesive tape, self-adhesive foam pads

I started making cards by die-cutting all the pieces for both main motifs out of different colored cardstock. For more depth, I shaded all the pieces with ink pads.


For both cards, I used gingham pattern paper in two colors. I trimmed both papers to the size of a base card and attached them to the front.
For the background I used white cardstock that I cut out as shown. I lightly shaded the background with ink pad and brush.


The bunny and duck are attached to the background with foam pads.


To complete the cards, I trimmed two paper strips and arranged them as in the photos, slightly above and below the central motifs.


Have a nice day.
Janja


Tuesday, November 19, 2019

Warmest Wishes

Hi! Janja here with you.
For today, I made a quick and easy Christmas card.


- CottageCutz dies: Sweet Christmas Reindeer, Nested Stitched Scallop Oval Set
- blank card: 4.25 x 5.5 "(10.8 x 14 cm), folded
- patterned paper: 4 x 5.2 "(10 x 13.2 cm)
- colored cardstock
- colored ink pads
- clear embossing ink pad
- white embossing powder
- heat tool for embossing powder
- glue, double-sided adhesive tape, self-adhesive foam pads

Start by cutting sweet reindeer out of colored cardstock. Color the edges with colored pads.


Trim the selected patterned paper.
At the bottom, cut a semicircle with the largest die from the set as shown. Before cutting, mark where you will finish cutting.


Paste another patterned paper at the bottom to get the right size.


Heat emboss the sentiment in white on red cardstock.
Cut a strip and attach it to your card just a little way up from the bottom of the card.


Have a nice day.
Janja


Sunday, July 21, 2019

Make A Wish


Hi!

It's Anja here. I got a package of new Birthday dies this week. And got so exited I decided to make two cards for this week's post.


For my project I used:
- Cottage Cutz dies (Birthday Hedgehog, Birthday Cake with Pedestal, Nested Stitched Scallop Oval Set, Fairytale Birthday),
- Distress Inks (Broken China, Faded Jeans, Chipped Sapphire, Black Soot, Twisted Citron, Peeled Paint, Pumice Stone, Mustard Seed, Spiced Marmalade, Seedless Preserves, Brushed Corduroy, Vintage Photo),
- white card base (2; 15x15 cm),
- white card stock for die cuts,
- patterned paper (2; 14x14 cm),
- black pen,
- white pen,
- paper glue.

First I cut and colored the hedgehog and the cake.


Next I cut and colored the sentiment. I made two.


And then I cut patterned paper and two ovals from white paper.


When I had all the pieces ready I combined it in two cards.


Hope you like the project I did for today.

Before I go want to remind you to check the store for some lovely discounts of Christmas dies.

Have a nice Sunday.

Anja Z.


Cottage Cutz dies I used for this project:


Friday, May 03, 2019

Once Upon A time there was a girl...and a boy...

Happy Friday Cottage Cutz fans!  It's Jeanne today with a wedding (or engagement) card using the Magical Fantasy dies.  My family has a big wedding coming up this summer and there are lots of activities scheduled so I need a few cards.  When creating this one I certainly had Joe and Abi in mind.
This card can be personalized with the couple's wedding colors for a truly special card.

The card base, oval and sentiment are a pearlized white card stock which makes for an elegant card.  I started by cutting the sentiment from this card stock, the rings from gold and the flowers from plain white card stock.
I used a self adhesive backing on the rings and the sentiment.  When using a self adhesive backing the die often cuts through the card stock but not the backing, making it very easy to lift the die cut piece up off of the backing.

Next, I used sponge daubers and colored the roses using a soft yellow, pink and green.
I often use a silicone mat when I am gluing die pieces together.  While the pieces dry they do not stick to the mat.
Then I cut an oval from the pearlized white and three from pink card stock. 
I stacked and glued them together adding the sentiment and entwining the rings on the sentiment.
I glued this to the card base and added the roses to the sides.
 Finally I added a small rhinestone to one of the rings.
Although this card is mostly white, it has a hint of color in the stacked ovals and the flowers set off the sentiment.

Dies used:
http://www.scrappingcottage.com/cottagecutzlittleprincessandroses.aspx

http://www.scrappingcottage.com/cottagecutzonceuponatime.aspx
http://www.scrappingcottage.com/cottagecutznestedstitchedscallopovalset.aspx

http://www.scrappingcottage.com/cottagecutzrosewithweddingrings.aspx

Thanks for joining me today.  Make sure to visit the store where the Magical Fantasy dies are 25% off for a limited time.  They are a wonderful collection and offer so many creative possibilities!

 I hope you have a relaxing and creative weekend!