Showing posts with label Mountains & Trees Slimline. Show all posts

Thursday, October 28, 2021

Ride On Gnomie Santa

 Hello Friends

Guess What!! It is New Release Time!  The collection is Christmas Part 2!  There are are 19 new designs just as adorable as the Christmas Part 1 release.  For a limited time you can save 55% off the entire bundle or 30% off individual dies.  You can check all of these fantastic dies out right HERE!

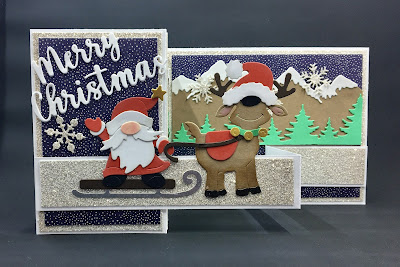
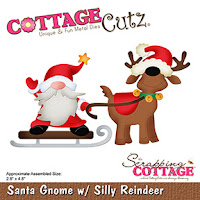
Today my Z-Fold card is using Santa Gnome w/ Silly Reindeer. There are several gnomes in this release and who doesn't love gnomes!!


Design Steps

1.  Cut the pieces out using the Santa Gnome w/Silly Reindeer and red, brown, dark brown, gold, silver, white green, tan and black

2.  Shade the pieces and assemble with a fine tip glue

3.  For the card base cut white card stock 4 1/4 x 11. Fold in half and then fold the front fold in half again.  Cut 2 pieces of silver glitter paper 2 7/8 x 4 1/8 and 2 pieces of navy dotted DP 2 1/2 x 4.  Next cut a silver glitter piece 5 1/4 x 4 1/8 and a piece of navy dotted DP 5 x 3 3/4
4.  Glue the silver layer down first and then the navy dotted DP down next
5.  For the Z- Fold arm cut a piece of white card stock 11 x 1 fold in half.  Then fold in half one of the flaps again.  Before attaching it to the card front cut silver glitter paper 3/4 x 5 1/4 and two pieces of glitter paper 3/4 x 2 1/2 and glue to the arm.  Glue the strip to the card front as shown above and below

6.  Using the Merry Christmas w/Shadow die cut out two in white card stock and glue them together
7.  Glue the Merry Christmas to the card front.  I decided I needed a little interest in the background. So I used the Slimline Mountain and Trees die and cut out the snowcapped mountains and the tree line.  I then cut them to fit the large background panel and the small side panel.  Then glued them down.  I glued down the gnome and reindeer on the front arm of the z-fold.  I also used the Snowflake Background Slimline to cut out a few snowflakes glued them down and the card is complete

CottageCutz Products


Thanks so much for stopping by and make sure to check out this latest Christmas release.  I will see you next Thursday!

Take Care and Blessings
Pam


Monday, October 11, 2021

Layered Slimline

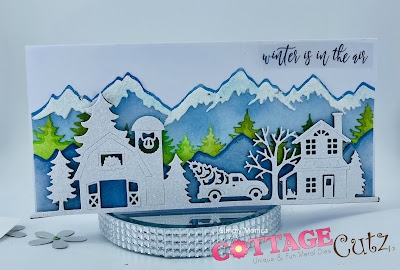
Hi everyone Happy Monday.  Today I am back sharing a layered slimline Christmas card that I will be sending to a friend.  This year I vow to mail Christmas cards to everyone on my list!  So, I created this card using Mountains & Trees Slimline and Christmas on the Farm dies from The Scrappin Cottage.


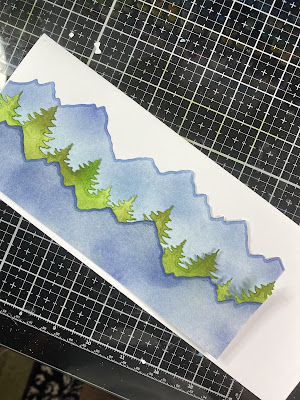
I first die cut the different layers from the Mountain & Trees using watercolor paper.  I used  Mowed Lawn distress ink for the tree line as seen below 


Next I cut 2 layers of Mountains and colored them using some Chipped Sapphire and Tumbled Glass

Once I was done I put the tree line between my two colored mountains to offset the colors
I used my glue pad to apply glue to the snow top layer and added some art glitter to give it a look of snow.


I diecut the Christmas on the Farm scene in white glitter paper and adhered it to the top of the 
I glued all my layers together for my final completed look below.  

I hope everyone enjoyd my post and Be sure to head over to the Cottage Cutz You Tube Channel where some of the designers will be posting videos! Make sure to come back by each day for some more great crafty inspiration from the super talented team. Until the next time, have a wonderfully crafty day!


PRODUCTS USED:


Sunday, September 26, 2021

Furever Friends

It's Anja here for my last Sunday post. Before I show you my latest card I have an announcement to make. After four and a half years as a Cottage Cutz Design Team member I decided to take some time away from crafting. There's a new exacting role waiting for me in the next weeks and I'll have a lot less time for crafting. 

It was so much fun making all the cards and paper projects using Cottage Cutz dies. Thank you to The Scrapping Cottage team for giving me this opportunity. This dies are forever going to be my favorite dies to work with. And I hope that in between diaper changes and all the feedings I'll still be able to follow all the new releases and projects from the talented ladies on the team. And maybe also make a card or two :)

And now to my last card. I again combined a set of stamps and slimline dies. This time I made a bunch of furry friends with a scenic background.

For this card I used:

- Cottage Cutz dies (Lil' Bluebird Designs Forest Friends Stamp Set, Lil' Bluebird Designs Forest Friends Die Set, Mountains & Trees Slimline),

- Zig watercolor brushes (010, 029, 040, 041, 047, 052, 060, 061, 062, 063, 065, 066, 069, 070, 071, 072, 091, 093, 096, 099, 260),

- Distress Inks,

- watercolor paper for stamping,

- white card stock for die cuts and background (9,5x20,5 cm), 

- white card base (21x10 cm),

- black pigment ink,

- acrylic block,

- watercolor brush,

- washi tape,

- paper glue. 


First I stamped and colored all the images. I made more to have more options to make a scene in the end. This time I used watercolor brushes for coloring.  

Next I made all the background pieces. I used Mountains & Trees Slimline and it's so easy to make a beautiful background scenery with it. I just colored all the pieces with Distress Inks and glued one on the top of another. Then I glued this paper sandwich to the card base. 

Before adhering the last piece I stamped the sentiment in the right corner. 

Last I added all the animals and colored pieces and adhered it on the background scene. And my card was done. 


Thank you for visiting the blog and leaving all the comments. I hope that my projects gave you some crafty inspiration over the years.

I wish you all a nice Sunday and all the best in the future.

Anja Z.


Cottage Cutz stamps and dies I used: