Hello
Scrapping Cottage Fans! Thanks for taking the time to stop and visit with us. It's
Mary Marsh here bringing you the Wednesday edition of the Blog. Today, I am giving you a sneak peak of some new brand new dies that will be coming to the shop later this week.
I have been asked how I start my cards or where I get the ideas for my layout. It's always a bit different for me. Sometimes I have the card layout in mind and I just start creating. And, then sometimes I have a particular theme in mind.
Today, my card started with my layout. There are many places on the web that provide card sketches. I used a sketch from Splitcoaststampers. So let's get started with the card details.
Card Base: 8 1/2" x 5 1/2" and scored at 4 1/4" to make an A2 card (4 1/4" x 5 1/2")
Patterned Paper: 4 1/8" x 5 3/8"
Large Rectangle Layer: 5" x 2" and white layer is 4 7/8" x 1 7/8"
Small Rectangle Layer: 3 3/4" x 2 1/4" and white layer is 3 5/8" x 2 1/8"
Green Background Panels: 1" x 4 1/8" and embossed with a flower pattern.
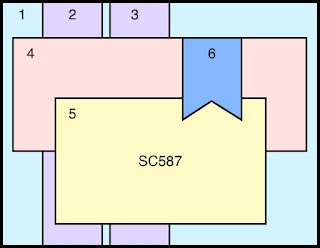 |
| My Card Layout |
After I decided on this sketch, I chose my patterned paper and that helped me decide on my card colors. Since the paper colors are a deep raspberry and olive green color, I stayed with that palette for my die cut flowers and leaves.
The flowers and leaves are the sneak peek I mentioned to you at the beginning of the post. The flowers are the
"doodle flower set 1". They come with a background die and also the doodle flower die. Aren't they just the cutest little things?
I cut the background in the deep raspberry shade and decided to use some patterned paper to create a bit of contrast. I used dimensional adhesive and attached them to my card. To attach the doodle part of the flower I used multi-matte medium. It's a strong adhesive like glossy accents but it dries clear.
The leaves are also a new set of dies and come with a background and pattern die. They are the new
leaves & stems dies. I cut them in olive green and then a celery green shade. If you look close, you will see that on one set of the leaves I used light and then dark for the top layer. I just switched it around on the other set of leaves for interest.
I used the
Mushrooms & Flowers die for the 2 small flowers on the card. I cut those in the deep raspberry shade and used the same patterned paper for the flower centers.
Since I used flowers, I decided to make it a Mother's Day card. We will be celebrating on Sunday, May 8 here in the U.S. I stamped my sentiment, added a couple of enamel dots in the raspberry color and I added a flag cut in the deep raspberry shade to complete my card.
Well friends, that's it for me for today. Hope you enjoyed the little peek I gave of the upcoming release. Also, did you know that we are having a challenge for our fans and followers to display the cards you have made with CottageCutz dies? There are prizes to be won as well.
Click here for all the details and the linky to submit your entry. So until next time......inky hugs!


