Showing posts with label Fancy Pocket Plus. Show all posts

Wednesday, July 06, 2016

~Framed Sofa & Chair Scene~


Hello Scrapping Cottage friends! Thanks for taking the time to stop and visit today. It's Mary Marsh here bringing you the Wednesday edition of the Blog.

Today for your viewing pleasure, I am featuring several new dies set from the June "Home Sweet Home" release. This release is chock full of dies that are all about the home. They can be used in so many creative ways as the Design Team has been showing you for the past 2 weeks.
 
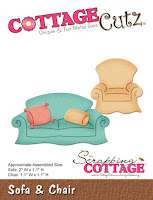
Today, I thought I would make a card to send to a friend who has had some stressful days at work. We all need to take time to relax a bit. Don't you agree? The sofa & chair dies were so perfect for my card idea. So let's get started with some card details.
 
Card Base: 5 1/2"  x 4 1/4" - used a Caribbean Blue shade of cardstock.
Embossed Paper Layer:  5 3/8" x 4 1/8" - used a vanilla cardstock
 
Step 1.  Created the background texture using an embossing folder and my BigShot machine.
 
 
Step 2. I wanted this panel raised from the card base. The card has nice dimension that's not picked up in these photos. I decided not to use mounting tape. Instead I has some fun foam which works quite nicely. I only had blue but once it's on the blue card base you can't really see it. It gives about an 1/8" lift to the panel.


Step 3. I die cut my frame using the Pierced Wide Rectangle Frame set and attached it to the embossed layer. Added some pearls to the frame corners. I die cut my sofa and chair in a medium brown cardstock and the sofa pillows with a striped patterned paper. This card could also work for a guy just eliminate the pearls.
 
Since I don't have the floor lamps, rugs and plant dies, I punched an oval for my rug and used the flower pot from the Garden Accessories and the leaves from the Fancy Pocket Plus to create my plant. Just another way to get more use out of the CottageCutz dies you own.  I attached the dies with a variety of adhesives - double sided tape, glue dots and multi-matte medium.
 
 
Step 4. To complete my card, I stamped my sentiment on a die that is also part of the Fancy Pocket Plus set. I added a bit of thick baker's twine that matches my cardstock color. I decided to add a couple of cats to this scene because my friend likes cats and that finishes off the card. 
 
Well friends, that's it for me for today, so until next time.......inky hugs.


http://www.scrappingcottage.com/cottagecutzsofaandchair.aspx
http://www.scrappingcottage.com/search.aspx?find=fancy+pocket+plus
http://www.scrappingcottage.com/cottagecutzgardenaccessories.aspx
http://www.scrappingcottage.com/cottagecutzpiercedwiderectangleframesetbasics.aspx
 
 
  .

Friday, June 24, 2016

Card with the Pocket - VIDEO


Hi, is Vladka and welcome to my new post where I will show you how to create this card with the Pocket, using CottageCutz dies.


Here is list of all supplies I used:
Cardstock: White Cardbase (4 1/4 x 6 inches) and additional piece of white cardstock and Kraft paper to cut out the pocket and both rectangles
CottageCutz Dies: Listed Below
Other: copic markers (YG95, G99, E37, E77), Tumbled Glass Distress ink, Paint brush, Scissors, Sizzix machine, water, glue

This card has many layers, but this makes it interesting, don't you think? It is really easy to make it. Check it out in the video:


I just can't stop to work with dies from This N That release. They are beautiful and really useful too.


Thank you for stopping by and for checking the video. 
And don't forget, third CottageCutz challenge is waiting for you. This time theme is POCKET. You can linked your project here. And please, use only Scrapping Cottage dies.

Wednesday, June 08, 2016

Fancy Pocket Plus Father's Day Card


Hello Scrapping Cottage friends! Thanks for taking the time to stop and visit today. It's Mary Marsh here bringing you the Wednesday edition of the Blog.

Today for your viewing pleasure, I am featuring a new die set from the May release. I have used the Fancy Pocket Plus die along with dies from the March Nautical release and created a Father's Day card. This big day is approaching quickly so time to get busy making a card for your Dad, hubby, sons etc.

I started my card this week with the idea of using the Fancy Pocket Plus die and from there my Father's Day card developed. So let's get started with some card details.

Once I decided on a nautical theme, I looked through my patterned paper stash to see what would work best. I already had my color scheme somewhat figured out.  Then I found this great paper that had a map on it and one of the colors I wanted to use. This was a good start.

Card base: 4 1/4" x 5 1/2"
Patterned paper: 4 1/8" x 5 3/8"

 
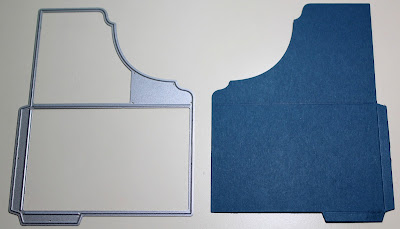
Once the base and layer panels were cut, I started on my pocket. This new fancy pocket plus die makes it so easy to create a pocket for your card. No more measuring and scoring, It's all figured out for you with this die.


Once it's cut all you have to do is fold on the score lines and then tape together. Easy Peasy! I used Scor-tape to secure it. It's a strong double sided adhesive so you don't have to worry about the pocket coming apart.


assembled pocket

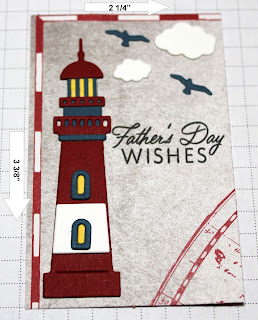
Now that I had my pocket assembled, I cut more of the patterned paper to make an insert for the pocket. This piece is 2 1/4" x 3 3/8". I decorated this with the lighthouse w/clouds die and stamped a Father's Day sentiment. 

 
The outside of the pocket is adorned with the pelican die and some starfish cut with the paddles & rope ladder die. I added a small clip to the insert to make it easy to remove from the pocket and for added interest.
 
 
I taped this pocket to the front of my card base along with a sailboat. Used the sailboat large die and cut with a deep red cardstock to complete the front of my card.
 
 
Stamped another sentiment on the inside and also decorated it with the rope from the paddles & rope ladder die and a crab using the crab die.
 
 
And, that's it for me for this week. But wait, last week I promised a giveaway if you left me a comment with other ways to use the garden friends die set. I liked the idea that Karen Briguglio gave me. She suggested using the dies as a topper for canning jars. She would make some trail mix and give it to someone going camping. Creative idea!
 
Well, Karen I will be sending you the extra set of card elements I cut out last week. Get in touch with me at mrmarsh917@msn.com and give me your mailing address. I will get it out to you in the mail.
 
So friends until next time........inky hugs!!!
 
http://www.scrappingcottage.com/cottagecutzfancypocketplus.aspx
http://www.scrappingcottage.com/cottagecutzlighthousewclouds.aspx
http://www.scrappingcottage.com/cottagecutzpelican.aspx
http://www.scrappingcottage.com/cottagecutzsailboatlargeelites.aspx
http://www.scrappingcottage.com/cottagecutzcrab.aspx
http://www.scrappingcottage.com/cottagecutzpaddlesandropeladdernet.aspx


Tuesday, June 07, 2016

Tri-fold card with rose corner

Hi everyone, Janja here!

For today's post, I prepared a tri-fold card with a bookmark. I used a part of the new release of CottageCutz dies - This N That.
Let's see how it is made.


For the card we need:
  • white card base: 12.75 x 5.5", folded at 4.25 and 8.5"
  • patterned paper: 4 x 5.2" (6 pieces)
  • white cardstock: 3.7 x 5"
  • brown cardsrock
  • white pearl cardstock
  • cord and wooden beads
Fold the card base 2 times. With the largest die from rectangle set, cut corners on one side of the card base.


Cut out the patterned paper and roses with the dies: English Rose Corner and Victorian Rose Vine.

First make the interior of the card. The best way to cut the flap from patterned paper is if it is placed on a white card base and draw edge. 

Repeat the process on the outer side of the card. Cut out words - best wishes, and attach it together with the rose corner to the card.

For closing the card use self adhesive round pads. On is covered with tiny loops and the other with tiny flexible hooks. 

As a small attention we add a bookmark in the pocket. Cut it out of pearly paper with the die Fancy Bookmark and decorate it. Insert the rope and add wooden beads. 
We decorate same way the pocket for the bookmark, which was cut out from the patterned paper with the Fancy pocket plus die.


For the end I would like to remind you on our 

Ejoy and have fun.
Janja 

List of used dies: