Showing posts with label Fairytale Castle. Show all posts

Friday, August 06, 2021

It's a Princess Party

Happy Friday!  It's Jeanne today with a card featuring some images from the new release of Lil' Bluebird Designs stamps and dies at the Scrapping Cottage.  These adorable stamps and dies are new line being carried at the online store.  Be sure to check them out.

I was attracted to this set in particular.  I think it is because I have two daughters and although they are grown now, it brings back memories of princess parties when they were little.  It is so perfect for a young girl!

I started by coloring the princess and pony using Spectrum Noir alcohol markers.  These markers come with three shades of the same color in one marker and have bullet nibs.


There are two photos as I used quite a few on this card because I wanted my pony to be rainbow colored.  It reminds me of My Little Pony so I had to use a rainbow!

Next I cut the castle from white cardstock using the Fairytale Castle die.  I used Distress Oxide inks and blending brushes to color it.  I used the Citrus marker to color the windows.

For my background I used two of the slimline dies - the Clouds and the Hills Slimline dies.  I cut stencils using the clouds and then stenciled a sky on a white A2 panel.

 For the grass, I cut panels 4 1/2 inches wide so that I could adjust where I wanted the curves.  I trimmed the sides flush with the sides of the panel.

After I adhered both layers of grass I stamped my sentiment in the upper left.

I decided to use the cloud with the castle.  Originally I was just going to nest the castle in the grass but I thought this looked more magical.

The princess is popped up using foam dots and I added some sequins for sparkle.  After all, what's a princess card without sparkle?


Thanks for visiting today.  I hope you have a fun and creative weekend!


Tuesday, June 16, 2020

Beach Huts

Hi Janja here with you. Welcome to the blog today.
In the beginning, I intended to prepare a greeting card on the topic of gardening.
However, since summer is almost here, I changed my mind and turned the garden shed into a beach hut.


- CottageCutz dies: Potting Shed, Puppy in Garden Cart (parasol), Fairytale Castle (flags), Camping Trailer (flags garland), Seagull (sand dunes)
- blank card: 5 7/8" x 5 7/8" (15 x 15 cm)
- white cardstock: 5 1/2" x 5 1/2" (14 x 14 cm)
- patterned papers
- different colors of brush markers
- different colors of ink pads
- glue, double-sided adhesive tape, self-adhesive foam pads

Cut the beach huts out of striped papers. Also cut out three parasols.


Use white cardstock for the background. Shade it with different colors of ink pads. For a sandy beach, use a stamp or simply add dots with a marker.


Now attach all the elements to the prepared background with glue and self-adhesive foam pads as shown. Attach the parasols to small sand dunes.


Thank you for stopping by.
Janja


Saturday, May 25, 2019

Princess Birthday

Hello Scrapping Cottage friends! Thanks for taking the time to stop and visit with us today. It's Mary Marsh here bringing you the Saturday edition of the Blog.

We are still featuring cards using the new Magical Fantasy release.  If you haven't seen the Magical Fantasy release yet, you have to drop by the online store and check it out. These new dies are all so cute and whimsical. There are 27 new designs, and I am in love with everyone of them. They are currently on a Memorial Day sale at 25% off.

Today, I am featuring the new Fairytale Castle + Little Princess & Roses dies to create a birthday card for a little girl. The princess theme is so popular with little girls, and I have plenty of friends with little girls and friends with granddaughters. I used a inlay technique for this card. So let's get started with some details on how I created it. 

Step 1: I selected some patterned paper that had a cloud like background. I used a white card base to keep it neutral since its going to a little girl.
card base: 4 1/4" x 5 1/2"
designer paper layer: 4 1/8" x 5 3/8"

I used the 2nd largest stitched circle die (3 3/8") to cut my circle in the designer paper.
I built my castle on the die cut circle. Used the colors on the packaging because they were perfect for this card. 
Stamped the birthday sentiment in grape ink. I knew I was going to angle the Princess sentiment so the card corner was the best spot.
I decided at this point to start some card assembly. I used a double layer of mounting tape on the back of the image panel. I wanted it to be raised up enough so the castle image would sit flat against the card base. 


I cut the Princess phrase in pink cardstock using the Little Princess & Roses die. I cut 2 phrases to make it stand out more on the designer paper. 
I adhered this to image panel with Ranger multi matte medium. I also used the crown that is part of the Princess die. The Princess wand is from the Once Upon a Time Die. 
Well that's it for me for this Saturday. I hope you enjoy the holiday weekend and that there are some fun plans in your schedule. See you next time!

dies I used to create card:


Tuesday, April 23, 2019

Knight and Dragon

Hi, Janja is here with you.
Above the dragons and knights, boys are always excited. I made two cards for all the little boys who dream that they are brave knights who overcome the dragon.
I used dies from the new release - Magical Fantasy.


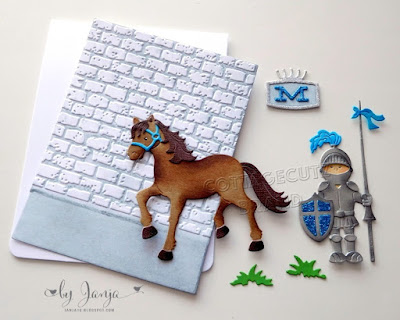
- CottageCutz dies: Knight, Royal Horse, Magic Dragon, Fairytale Castle, Rainbow With CloudsRetro Alphabet
- white card base: 4.25 x 5.5" (10,8 x 14 cm), folded
- white cardstock: 4 x 5,2" (10,2 x 13,2 cm)
- scrapbooking glitter paper
- colored cardstock
- colored ink pads
- embossing folder
- glue, double side adhesive tape, self adhesive foam pads

For the first card, cut out the knight and horse. Then darken all the pieces with colored ink pads along the edges and fasten them together.


For the brick wall use embossing folder and distress ink - Iced spruce.


The first letter of the boy's name is cut out of blue and silver scrapbooking glitter paper.


Completed card.


Repeat the process on the second card and cut out the central motive first. 
Cut the hill with scissors.


I used an oval brush and a plastic stencil for the cloudy background. Very simple and the result is flawless.


Now we have everything ready. We finish the card as shown.


Have a nice day.
Janja