Hi, Janja here!
Teddy bears are so popular toys. They are so soft to touch and ideal for cuddling.
On a gate fold card, that I share with you today, I put a lovely bear on cloud.
Supplies:
- CottageCutz dies: Bear On Cloud and Moon, Baby, Nursery Furniture, Elephants on Parade, Baby Diaper Pins, Stroller mini, Baby Carrier mini, Bathtub mini, Fancy Victorian Frame, Cross-Stitched Square set, Stitched Wide Oval Frame set
- white cardstock for card base: 11.4 x 5.7" (29 x 14,5 cm)
- patterned paper
- white and colored cardstock
- light pink organza ribbon
For card base trim white cardstock and fold it at 2.85" and 8.55 " (7,25 cm and 21,75 cm)
Trim patterned paper. First, attach organza ribbon on card base, and then cover the base with patterned paper. Use two-sided adhesive tape.
Cut out a square from patterned paper with the largest die from cross-stitched square set. Place it on to a little larger square from white cardstock.
Also cut out frames from white and patterned paper. Cut them in half with scissors, and attach to the back of the square.
Place square over the center fold. Take care that the adhesive is applied only to one-half of a square.
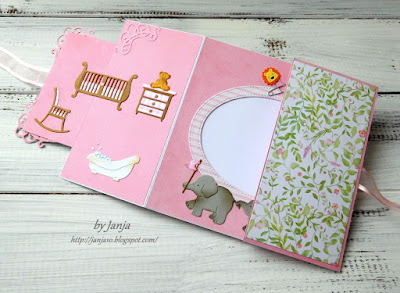
Add selected patterned paper also on the inside of the card. In the middle add space for text. Use the largest die from stitched wide oval frame set.
Cut out with dies all pieces, and assemble them into a whole.
To complete the card, mount all motives as shown, using glue and self-adhesive foam pads.

Teddy bears are so popular toys. They are so soft to touch and ideal for cuddling.
On a gate fold card, that I share with you today, I put a lovely bear on cloud.
- CottageCutz dies: Bear On Cloud and Moon, Baby, Nursery Furniture, Elephants on Parade, Baby Diaper Pins, Stroller mini, Baby Carrier mini, Bathtub mini, Fancy Victorian Frame, Cross-Stitched Square set, Stitched Wide Oval Frame set
- white cardstock for card base: 11.4 x 5.7" (29 x 14,5 cm)
- patterned paper
- white and colored cardstock
- light pink organza ribbon
For card base trim white cardstock and fold it at 2.85" and 8.55 " (7,25 cm and 21,75 cm)
Trim patterned paper. First, attach organza ribbon on card base, and then cover the base with patterned paper. Use two-sided adhesive tape.
Cut out a square from patterned paper with the largest die from cross-stitched square set. Place it on to a little larger square from white cardstock.
Also cut out frames from white and patterned paper. Cut them in half with scissors, and attach to the back of the square.
Place square over the center fold. Take care that the adhesive is applied only to one-half of a square.
Add selected patterned paper also on the inside of the card. In the middle add space for text. Use the largest die from stitched wide oval frame set.
Cut out with dies all pieces, and assemble them into a whole.
To complete the card, mount all motives as shown, using glue and self-adhesive foam pads.
Thank you for coming over. Have a nice day.


