Showing posts with label Cottage Cutz Cross-Stitched Circle Set. Show all posts

Thursday, April 19, 2018

Sticky Note!

Hello Scrapping Cottage Friends!

It is Pam creating with you today!
Thanks for taking time to stop by today!  We have a brand new release of Llama & Botanical dies available in the online store.  And the dies are currently on sale for a limited time at 25% off the retail price.

The new dies have a couple of super cute Llama images as well as cactus and other succulents.  And don't miss the sweet hummingbird and garden bird too!  This new release is so versatile!  They can be used for all kinds of cards and other projects!

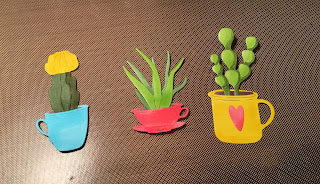
Now let's get on with today's project!  I chose to use the little Teacup Garden die and they are just so cute! In fact I just love the whole release so don't miss out!

Design Steps:
 1.  Using the Teacup Garden die cut out all of the pieces in white.

 2.  Color the pieces using copic makers
3.  Assemble the teacups with the succulents glued inside of the cups
 4.  Use an A2 white card base cut a slightly smaller piece of coral card stock and then an even slightly smaller piece of cactus DP
 5.  Using the Cross Stitched Circle set cut out 3 white circles and glue to the card as shown
6.  Pop up the teacups on top of the circles and add the sentiment

Cottage Cutz Products


As always thanks so much for stopping by and make sure you take some time to get crafty!!
Blessings
Pam

Thursday, December 21, 2017

Snowman Shaker!


Hello Scrapping Cottage Fans!

It is Pam sharing with you today!  This is my last post before Christmas so I wanted to wish you all a very blessed Christmas and a Happy New Year! Let's hope 2018 will bring good health and happiness to all!

Now it is time to share my card!

I can't get enough of this adorable Sweet Snowman die so I made this last Christmas card into a fun shaker card! And actually it could be used for a winter birthday card too!

Designer Steps:

 1.  Use an A2 white card base and cut a slightly smaller piece of purple card stock then set aside.
 Next cut a piece of fun foam and designer snowflake paper 4 x 5 1/4.  Run both the foam and DP through the die cutting machine with the 3rd to the largest Cross Stitched Circle dies in the upper center of the paper and foam.  This will create the opening for the shaker card
2.  In between the foam and the DP sandwich a piece of acetate
3.  Next cut out a Stitched Scallop Circle 3rd from the largest in white.  Then lay the same Crossed Stitched Circle die you used to cut the opening onto the scalloped circle and cut.  This will make a nice frame for the opening


4.  Place a small pile of turquoise sequins and snowflake sequins onto the purple paper directly under the acetate opening
5.  Place glue on the back of the foam all around the opening and the entire back then lay it centered over the opening on the purple card stock.  Attach the white scalloped from to the front to frame the opening of the shaker
6.  Using the Sweet Snowman die cut out all of the pieces using, purple, turquoise and white card stock
 7.  Assemble the snowman I colored the branch arms and carrot nose with copic markers
 8.  Pop dot the snowman to the front of the card, add the ribbon, cotton ball on the hat and sentiment
9.  And finally attach the purple card stock to the white card base and your card is complete

Cottage Cutz Products


Don't forget to visit our store for any last minute shopping!!
MERRY CHRISTMAS!!

Blessings
Pam

Thursday, November 02, 2017

Let it Snow!!

Good Morning Scrapping Cottage Family!

It is Pam crafting with you today! Cottage Cutz has released a number of wonderful stamps sets.  And I decided to work with the Snowglobe Fun set which has a tiny snowglobe and little images to go inside the globe plus some small sentiments.


Design Steps:
1.  Using the Snowglobe Fun set stamp the images with an ink that works great with Copic markers.  I used Memento Tuxedo black.  Color the images with your markers

2.   Use the coordinating dies from the Snowglobe set to cut out the images.  Use the Cross Stitch Circle dies to cut out 2 blue card stock circles.  Stamp the smaller circle with the sentiment
3.  Cut two strips of DP 1 inch and the other 1/2 inch.  Cut a 4 x 5 1/4 piece of designer paper and 4 1/8 x 5 3/8 piece of blue card stock.  Glue the DP to the blue card stock then mount on an A2 white card base.  Add the strips and circles as shown.
4.  Pop up the stamped images onto the larger circle and add the sparkle ribbon

Cottage Cutz Products Used:

I hope you get a chance to be crafty this week and we would love to hear your comments!

Blessings

Pam

Thursday, September 14, 2017

Chickadees!

Good Morning Scrapping Cottage Friends!

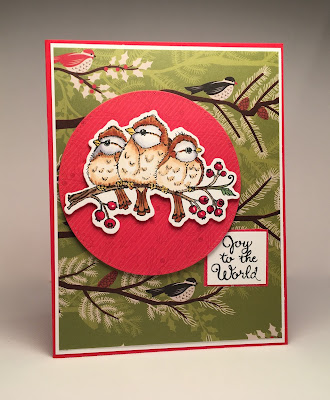
I am giving you a peek at one of the new release birds.  They are the cutest little group of birds I have ever seen!  I chose to make a card using the Chickadee!


Design Steps
 I stamped and colored the birds with copics: E00, 30, 31, 34, 35, 37, 39, 44, 49 - Y21, 26 - G24 - R00, 46, 59.  I used the coordinating die set to cut out the birds
 Use an A2 red card base, cut a slightly smaller piece of white card stock and glue to card.  Cut a piece of DP to layer onto the white.  Use the Cross Stitch Circle set to cut out a 3 1/4 inch DP circle

 Glue all the layers to the front of the card then pop up the circle to the left side of the card and pop up the birds on top of the circle.  Add a sentiment and the card is complete
Cottage Cutz Products


Just a note about our store!  We are moving to a bigger locations so the ordering for these cute birds will be available Sept. 20th

Thanks for stopping by

Blessings
Pam

Thursday, July 13, 2017

Sweet New Baby!

Good Morning!

Hello Scrapping Cottage friends! It is Pam sharing one of our recently released baby dies.  And I am pairing it with a new release Expressions Word die.  The baby dies make such sweet cards it is hard for me to give them away!


Design Steps:


1.  Use an A2 white card base.  Cut two pieces of designer paper 5 x 3 3/4 and stagger them then glue  to the front as shown
 2.  Using orange, white, grey and blue DP cut out the Cottage Cutz Stork with Baby

3.  Use copic markers to add highlights and color baby's face.  Glue all the pieces together
 4.  Cut the Cottage Cutz Tea Time Doily out of white card stock and cut DP with the Cottage Cutz Cross Stitched Circle die then glue together
 5.  Put dimensional squares on the back of the stork and pop it to the center of the circle

6.  On white card stock using Cottage Cutz Expressions Plus Sweet die, cut out the word sweet three times and glue them together
7.  Glue the word sweet to the card and stamp new baby in blue ink mat then glue under sweet

Cottage Cutz Products


I hope you give this card a try.  It was simple and fun plus you could make a girl or a boy baby card just by changing up the papers!

Blessings and Thanks for Stopping By!

Pam