Showing posts with label Clouds Slimline. Show all posts

Sunday, June 19, 2022

You Sweet Thing - Gumball Shaker


Happy Sunday ~ it's Kris here with a "sweet" gumball shaker card!  I set out to make simpler card this week but I just couldn't help myself when I pulled out this Candy & Gumballs die - I just HAD to make it into a shaker card, so I hope you'll shake it up with me! ☺   

Products used on my card:
Other:
acetate
patterned paper
shaker elements
foam Tape
glue

*NOTE:  You can swap out some of the circle or cloud dies for other CottageCutz dies you have on hand!  I just used what I had. 

Design Steps:

1.  Cut a card base from thick white cardstock at 4-1/4 x 11"
      -  score at 5-1/2"
      -  round bottom corners (I used envelope punch board)

2.  Cut a patterned paper at 4" x 5-1/4" (I used some from Queen & Co. called Candy Land)
      -  round bottom corners
      -  attach to card front

3.  Cut (2) coordinating pieces of patterned paper at 2" x 4"
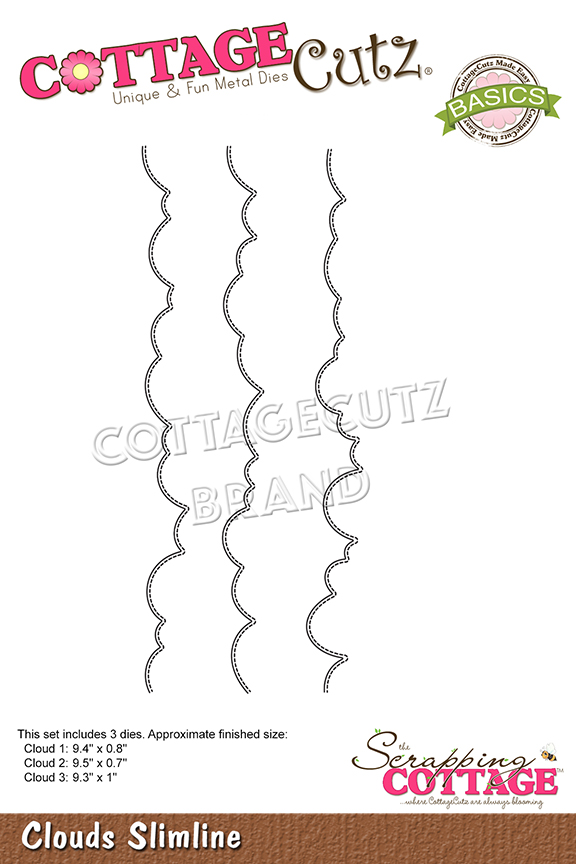
      -  cut each piece with one of the Clouds Slimline dies.
      -  attach to card front so that one is slightly longer than the other.


4.  Die-cut pieces of your gumball machine.  (I originally cut mine from pink foiled cardstock, then switched it out for a solid pink.)

5.  Lay out your dies onto a piece of white cardstock as shown below with the smallest of the Pierced Wide Circle Frame Set, and the 2nd from the largest of the Nested Wacky Stitched Circle Set so that the gumball machine is centered (not the circle!)


6.  Tape the dies in place with a low-tac tape and remove the gumball machine pieces.
      -  run through die-cut machine


7.  I used that first doughnut as a template to create 6 or 7 more (can do less if you're using a thicker cardstock) by placing that doughnut onto another white cardstock and lightly trace inside of smaller circle with pencil and place a dot in the middle.  
      -  remove that doughnut and place your small circle in place & tape with low-tac tape. 

8.  Set aside ONE of your doughnuts.  

9.  Working with 2 doughnuts at a time, place one on top of the other and move them around in a circle motion using your thumbs to feel when the small holes are lined up exactly.  
      -  tape the 2 together with low-tac tape in just one spot  
      -  lift up the open end and glue together.  Remove tape and and add glue so it's all adhered
      -  repeat using all doughnuts except the one you put aside.
      -  run your bone folder over it to flatten any glue bumps after adding each doughnut


9.  Cut a small piece of acetate a li'l larger than the small circle opening and glue it to the top of your doughnut stack.

10.  Glue your last doughnut to the top of your stack to cover up the edges of acetate
      -  be sure to line up the small circles!
      -  be sure to not get glue on your acetate! 

11.  Turn your stack upside down and add your shaker elements in the center.  If your stack isn't tall enough to let your elements "shake", you can cut more doughnuts and add to the bottom of your stack.

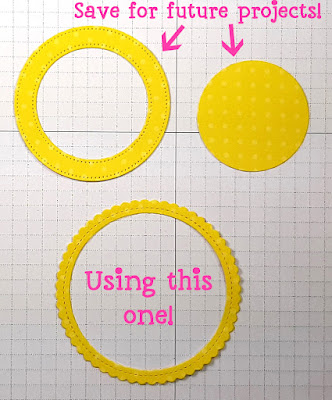
12.  Die-cut a white circle using the same size (2nd from largest) of the Nested Wacky Stitched Circles set ---- but don't cut the smaller circle from the middle!

13.  With your stack still upside-down. add glue to all the white area and add your solid circle centered to the top and set aside to dry a little. 


14.  Next, cut a scalloped frame for the front by placing the 2nd from the largest of the Nested Stitched Scalloped Circle set  on a piece of patterned and place the middle die from the Pierced Wide Circle Frame set evenly in the middle and taped both with low-tac tape.
      - run through die-cut machine


15.  Glue frame onto the front of your doughnut.

16.  Glue your gumball machine die-cut pieces to the front as shown:


17.  Attach your shaker to card front and finish off with a sentiment and embellies!  
      *Note:  the bow in top corner is from this Candy & Gumballs die!


Here are the products I used on my card today:


Thanks so much for taking a peek!  
I hope you'll SHAKE IT UP with your next card!  

Have a Blessed Sunday!
~Kristine

Sunday, June 12, 2022

Ice Cream Truck Slider

Hello Scrapping Cottage Friends!  

Kris here with my debut as Guest Designer!  With the arrival of summer, I'm excited to be working with this new Sweet Treats release as there are so many occasions for these dies!  

I made a super easy Pull Tab Slider card using Ice Cream Truck.  


You find the list of products I used linked to the store at the end of my post.  But for ease sake I'll list them here along with some other tools needed for this project:

Products:                                            
•  Ice Cream Truck die                         
•  Sweet w/ shadow die                        
•  Happy Birthday w/ shadow die     
•  Wishes w/ shadow die                      
•  Clouds Slimline die                                                
•  Hills Slimline die
•  Pierced Circle Frames die
Other:
•  stamps of your choice  
•  patterned paper                  
•  ruler                                              
•  paper trimmer
•  foam strips/tape
•  low-tac tape     

As always... if you need to see my photos up closer, just click on them for a larger size.

Design Steps:  
  • We all know it's more fun to eat our dessert first.... so I started this project with the FUN stuff!  That is... cutting and piecing together my Ice Cream Truck!  I had this fun paper with blue and pink ice cream trucks, so I matched it.  
  • Next, I cut my main pieces of cardstock.  
    • Card base (grey) is cut at 6" x 12" and scored at 6"
    • Another piece in the same color as base cut at 4-1/2" x 5-3/4"
    • and a dark pink cut at 6" x 6" 
  • To make the frame on the front, I measured in 1/2" on every edge (near the corners) and placed a light pencil mark.  You'll end up with 4 "X"s  near each corner.  (if you don't have an "X" then you might need to extend your 1/2" marks/lines a bit until they intersect with the one parallel.)  I then used my paper trimmer to CUT between each of those "X"s to end up with a frame.  
    • Erase mark lines or turn it over to the other side ☺
  • I cut a piece of white to 2" x 5-3/4" and cut the very bottom using one of the Clouds Slimline dies.
  • I then cut (2) pieces of coordinating designer papers at 2" x 5-3/4" and cut the very top of each with one of the Hills Slimline dies.
  • You want to add glue to the (front) sides and top (NOT the bottom)  of your cloud border and attach BEHIND your frame at the top as shown below.
  • Next, we need to cut a notch out of our frame for our pull tab. (You could do this step before attaching your clouds - I just forgot to do it prior).   I used a small circle from the Pierced Wide Circle Frame Set to cut a PARTIAL CIRCLE from the LEFT edge of your frame as shown below.  It's important that you cut from the left side because it you do it on the right, your truck will be driving backwards!  ☺ 
  • Now we need to cut the same notch out of our card base in the exact spot we cut the frame.  SO... you want to lay your notched frame on top of your CARD BASE making sure everything lines up and fold is at the top, then lightly draw the outline of your notch onto the card base and cut the notch using the same circle die as we did in the previous step.
  • I then taped my 2 pieces of patterned paper together and added adhesive to the (front) sides and bottom (NOT the top!), then placed BEHIND my frame at the bottom ***NOTE:  lay your truck in the middle first so you know how far down to attach your patterned papers.  
  • Next, I placed my 4-1/2" x 5-3/4" grey slider piece behind my frame, but FLUSH with the left hand side and centered between the top and bottom.  You can write or stamp "PULL" where the tab dips down, OR draw an arrow going to the left to let your recipient know to pull.  
  • Now remove your slider piece and set it aside.
  • Reminder - our frame is just sitting on our card base - it is not attached yet!  
  • Decide what you want to have revealed when the truck is being pulled!   I stamped a "YUMMILICIOUS" sentiment and some confetti .  To find the placement, I laid my truck onto my card and off to the left - see photo below for placement.  Now you can see how much space you have and decide what you want to fill that space with!  ***It's best not to have too much dimension as it may prevent the truck from sliding back into place.  Flat stamped images are best!

  • Now we can add our foam tape to the back.  Again, line up the slider (from the front) so that your arrow or "PULL" is lined up in the center of your notch and the edge of slider is flush with edge of frame... and the whole piece is centered between the top and bottom edges of card on the back.  To keep it in place, I added some purple low-tac tape.
  • To the BACK of your frame, add foam tape to the 3 sides close to your slider, but not TOO close or it won't slide well.  (Don't tape the edge where your notch is cut out.)  
  • And now we can add our truck!  You'll want to pop it up with foam strips/tape so it goes over our frame on the edge.  Start your strips in a li'l ways as shown below so that our truck will go over the frame a li'l bit.  That way we know it will reveal our whole stamped image.
  • Attach your truck to the far RIGHT of your card but make sure your foam strips/tape does not go onto the frame! I added some fairly flat sprinkles to fill the space on front and added my "Sweet Birthday Wishes" using the words with shadow dies (linked below).

Here are the products I used on my card today:


Click the pic below to shop the whole release!


I hope my card inspires you to create your own interactive card or something else using the fun new release!   I'll be back next week with a simple-but-cute card :)  
Have a CRAFT-astic day!

~Kristine

Sunday, March 27, 2022

When Skies are Gray

Hello CottageCutz friends! Thanks for taking the time to stop and visit with us today. It's Mary Marsh here bringing you the Sunday edition of the Blog.

The Spring Release with 20 new designs is in the online store. There is a nice combination of both religious and whimsical designs. So perfect for all card makers out there.

And there is still plenty of time to order and get them for your Easter cardmaking. Today for your viewing pleasure, I am featuring the new Spring Showers Mouse die and created a thinking of you card for my precious little granddaughter. 

I used the colors from this week's Splitcoaststampers color challenge #888. We were to use daffodil delight, calypso coral and magenta madness for our color trio. 
daffodil delight, magenta madness, calypso coral

I used all the challenge colors for the mouse raincoat and umbrella. I took advantage of the allowed neutrals for my stormy background. I found a navy designer paper in my collection and then stenciled raindrops on the paper with a clear gloss gel.

The clouds are cut from the clouds slimline die in a gray cardstock and sponged the edges with navy and gray inks for a storm cloud look. I stamped my sentiment on the clouds. 

I cut the rain puddle out of the same designer paper as my background. The puddle is from an older retired die Rainy Day Duck. But you could also use the ice pond from the Ice-Skating Kids die or any of our snowbank dies to create a puddle.  

Well, that's it for me for this post. See you next Saturday!

dies I used to create card:


Tuesday, February 01, 2022

Easter Village


Good morming Cottagecutz fans I hope your week is going well so far. It's Wendy bringing you the blog today.

So the card I'm posting today includes a light tutorial as my Friday posts are full tutotrials

So to begin with I took a white slimline card and used the 'Clouds Slimline' as a stencil. So you cut the die in white card and you can use this to ink onto your card. I start part way down the card and then move up the card. As the die is so long you really change the way the clouds sit on your card.

I then cut the 'Grass Slimline' twice. I mae sure that there were 2 different layers to make it look more realistic. I stuck the first piece down with glue and the second layer with 1mm 3D foam pads.

Next I cut out the three houses. the 'Carrot House' the 'Hello Spring Bunny Cottage' and finally the 'Spring Gnome Cottage. I assembled all elements from the dies. The dies as I have mentioned before are so intuitive it makes it easy to put together your houses. I made sure that I gave the houses some 3D elements by using 1mm foam pads on the windows, doors, and of course that cute little grey bunny in the 'Hello Spring bunny' house. Once assembled I added them to the card with 3D foam pads.

I took some elements to finish off the card as follows:
- Tulips from 'Spring sheep die'
- Chick from 'Miss Spring Bunny die'
- Sign from 'Spring Chicken die' - I stamped a sentiment on this
- Sun from 'Campin Out Sun and Moon'

I do hope you like the card. This took me less than an hour to pull together so I hope you will give it a try. Remeber to add some 3D elements such as small flat back pearls for eyes, noses and flowers. It just makes the card extra special. i wish you a wonderful week and I will see you Friday with another Easter inspired card.


Dies I have used:


Please don't foget to check out our YouTube Channel for more great designs