Showing posts with label Christmas Trailer. Show all posts

Sunday, December 22, 2019

From Our Home To Yours


Hi!

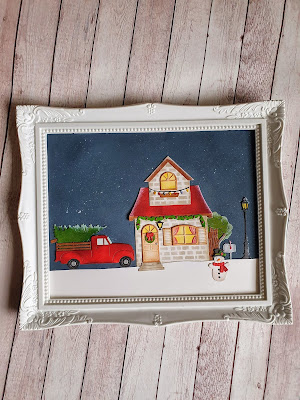
It's Anja here. Today I have a bigger project for you. As one of the last projects for this year I made a Christmas scene that will decorate my craft room in this holiday season. I had a frame in my shelf for quite some time and decided to use it for my project and give it a winter touch.


For this project I used:
- Cottage Cutz dies (Farm Truck w/Tree, Build A House Set 2, Build A House Accessories, Tree, Christmas Trailer, Fireplace w/ Accessories),
- Distress Inks and Oxides,
- black card stock for background (26x21 cm),
- white card stock for die cuts,
- white acrylic paint,
- brush,
- sponge,
- plastic stencil (bricks),
- silver pigment ink,
- white pigment ink,
white picture frame (20x25 cm),
- pencil,
- black pen,
- scissors,
- paper glue.

First I cut all the pieces. I cut additional pieces for the inner side of the windows and door. I colored it with yellow.


Next I colored the parts of the house. I used plastic stencil to make it look as it's build out of bricks.


Then I colored all the other pieces and glued it together. I used white acrylic paint and a sponge to color around the edges to look like snow (not photographed).


The I made the background. I used black cardstock and colored it with blue Oxide inks and white pigment ink. For the finish I splashed it with acrylic paint to look like snow is falling.


And then I cut the bottom part of the scene. I cut the snow ground out of the white card stock. In the end I just adhered all the pieces together and inserted the scene in the frame.
 

And my project was done.


That's all from me for today. I wish you all a Merry Christmas. I hope you can spend it with people you love.

See you again next Sunday for my last project in 2019.

Anja Z.


Cottage Cutz dies I used for this project:


Sunday, November 05, 2017

Holiday Car and Trailer

Hi!

It's Sunday again and I'm (Anja) back with my new post. It's been a busy few weeks for me at work and crafting really helps me to relax after a stressful day at work. And I'm still testing all the beautiful Christmas themed dies that are available in the Scrapping Cottage store. This time I tried two new dies that can also be used after the Holiday season.


For both cards I used:
- Cottage Cutz dies (Vintage Holiday Car, Christmas Trailer),
- Distress Oxides (Fired Brick, Black Soot, Worn Lipstick, Lucky Clover, Peeled Paint, Broken China, Faded Jeans, Seedless Preserves, Intense Violet, Antique Linen, Spiced Marmalade, Ice Spruce),
- white card base (2 13x13 cm),
- craft paper (2 12x12 cm),
- white card stock for die cuts,
- silver pigment ink,
- Versafine Onyx Black ink pad,
- white acrylic paint,
- heat gun,
- sponge,
- acetate foil,
- roller,
- paper distresser,
- Zig brush (flesh tone),
- black pen,
- foam adhesive pads,
- sentiment stamp.

First I die cut both motives and colored them with Distress Oxides. I colored all metal pieces with silver pigment ink for additional shine.


For the little elf I used Zig brush and black pen to finish his face.


Then I started with the backgrounds. I put some acrylic paint on to acetate foil. I used two pieces of foil and squashed the color between it.


Then I put one foil on top of craft paper and transferred the color with a roller.


I got two different patterns. With a sponge I put a little more color to the edges of both papers. I dried the paint with my heat gun and then added a bit more interest to the edges, using my paper distresser. 


I stamped the sentiment on a strip of white paper. Again I distressed the edges.


I adhere the sentiment and the motives on the background with foam adhesive pads to give it a bit more dimension.


And these are my finished cards.


Thanks for stopping by. I'll be back soon. Have a nice Sunday.
Anja Z.


Cottage Cutz products I used: