Showing posts with label Bunny Gnome 1. Show all posts

Saturday, May 15, 2021

To My Favorite Gnomie

Happy Saturday!  It's Jeanne today with a card for you and your favorite gnomie.  I love the new Slimline dies - they offer such fun options for card layout.  I've used dies from both Slimline and Spring release on this card.

To begin this card I cut the gnomes and flowers from white cardstock using the Bunny Gnome 1, Bunny Gnome 3, and Spring Bloom Cottage dies from the Spring release.  I used Distress Oxide ink to colors the images.

I cut the back panel using the largest of the Nested Rectangle dies and the scalloped panel using the largest of the Scalloped Stitched Rectangle dies.

For the scene panels I cut two rectangles from white and a green pattern using the third largest of the Nested Rectangle dies, and a frame with the Windows die.

I made a stencil with the Cloud dies to ink the blended sky.  For my ground, I cut a gentle curve using the Hills dies on the green patterned paper. 

 I then assembled all the layers and stamped my sentiment in the center panel.

After all my panels were assembled I added my gnomes and a few 3D flowers.  A fun card to let friends know you care!

I hope you've enjoyed my card today!  Be sure to visit the online store where the Slimline dies are on sale right now for a limited time!  Slimline cards are really on trend and now is a great time time to add to your stock of basic dies!

Products used:


Thanks for visiting today.  I hope you have a wonderful weekend!


Thursday, May 06, 2021

Birthday Garden

 Hello Scrapping Cottage Friends

It is Pam creating with you on the blog today!

I am using one of our new slimline dies today and a variety of dies from our Springtime Release.  I have a number of birthdays coming up in the spring and summer months so I am getting a head start.


Design Steps:
1.  Begin by using a blue slimline card base and set aside.  Use the second from the largest Slimline Stitched Rectangle die and cut out 2 (one for the inside) using white card stock.  On the white rectangle for the front of the card use a blue ink and blender brush add some sky in the three spots as shown above
2.  Use the Victorian Fence die and cut out 3 pieces of fence on kraft card stock.  Using the Spring Grass die cut out 3 pieces of grass on green card stock.  Trim down the grass and fence then glue the grass to the bottom front of the fence.  Glue the fence bottom only to the card front in the area where you inked.  The reason you only glue down the bottom is so you can tuck in the flowers behind the fence
3.  Use the Spring Flower PotBunny Gnome 1Cat w/Spring Bird, Spring Bloom CottageBird w/ Bluebells, Mouse w/Flower Cart for all of your garden pieces.  I used 2 shades of green, purple, yellow, pink, tan, gray, black and vellum


4.  Assemble your flowers, watering can, birds, and bees.  Glue the flowers behind the fence as shown.  After your flowers are tucked in glue the top part of the fence down.  Pop up the watering can, bunny and bird as shown.  Glue the bees in place as shown,  add little pearls to the inside of your flower then stamp and add your sentiment. Your card is complete

CottageCutz Products


I got a lot of use out of the Spring Release collection with different pieces from a variety of dies.  And I just love how it turned out.

Blessing and Take Care

Pam


Wednesday, April 14, 2021

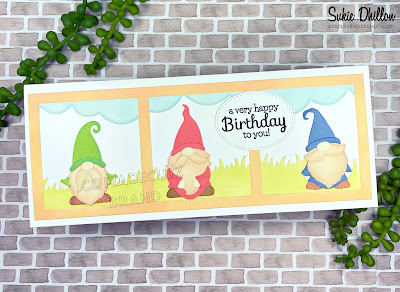
A Very Happy Birthday to You!

Hello!  This is Sukie and today I have a sweet card to share. I'm showcasing several of the newly released Slimline dies which are currently on sale.

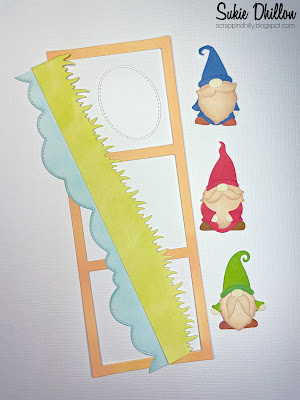
The die cuts for my card are from the: Windows Slimline, Clouds Slimline, Grass Slimline, Bunny Gnome 1, Bunny Gnome 2, and Bunny Gnome 3 die sets.  Even though the gnomes are an Easter die cut, simply eliminating their bunny ears makes them perfect for this birthday card.  All of the pieces were cut from white card stock and shaded with Oxide Inks for a soft appearance.

To create my card, I adhered the grass inside the window and trimmed off the ends a bit, ensuring a perfect fit.

Next, I affixed the clouds along the top edge of the window with the clouds peeking through. The slimline window was then adhered onto a white card base.
Each of the gnomes were nestled inside their own windows, making sure there was enough space for the birthday sentiment tag.
Here are the die sets used on my card, available in the store:

Sunday, March 21, 2021

Happy Easter

Hi!

It's Anja here. I have an Easter card for you today. I used this cute bunny gnome dies for today's card. 

For this project I used:
- Cottage Cutz dies (Bunny Gnome 1, Bunny Gnome 2, Bunny Gnome 3),

- Distress inks,

- white card base (15x15 cm),

- white card stock for die cuts,

- black pen,

- plastic stencil (clouds),

- paper glue. 


First I cut and colored the gnomes.

Next I wrote the sign. 

Then I did the grass. I colored directly on the card base. 

After that I added the cloudy sky.


Last I arranged all the pieces on the card base and adhered it with the glue. And my card was done. 


And that's all from me for today. Have a nice Sunday and see you again next week. 

Anja Z. 


Cottage Cutz dies I used for this card: