Sunday, December 15, 2024

Silent Night

Hello Friends 

It is Pam sharing with you on the blog today.

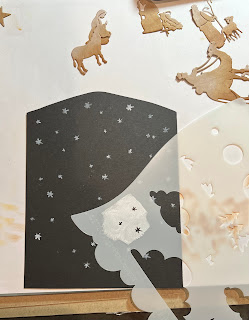
I am using some gorgeous dies today.  They represent the true meaning of Christmas. The dies are Nativity Stable, Shepherd & Animals:  Nativity Camel, Palm Tree & AngelNativity Holy Family & Wise Men.  This is my last card of the season and it will be my template for my cards next year!

Wishing you all a very Merry Christmas and a blessed Happy New Year!!


  Background Photo by Freepiks

Design Steps:

1.  Using a white piece of card stock measuring 8 1/2 x 5 1/2 score at 2 1/8 and 6 3/8.  Bend the card directly in half and cut at an angle.  Open it up and round off the center point.  Use the card base as a template for the black pieces.  I cut 4 side panel pieces and one middle piece
2. Use the Nativity Stable, Shepherd & Animals:  Nativity Camel, Palm Tree & Angel: Nativity Holy Family & Wise Men and cut on Kraft card stock.  Next use white ink and blend the tops of all the pieces.  Use the Vintage Photo ink for the bottom of each piece

3.  Use a stencil and add all the tiny stars in the sky with white ink.  Do this on all of the black anels


4.  Add a strip to the bottom measuring 1 1/4 inches and tear it at the top.  Ink with white ink on the top and Vintage Photo on the bottom.  Place the manger with Mary, Joesph and Jesus in the center panel

5.  Add the Shepard and palm tree to the left side panel.  Then add the 3 wise men to the right side panel
6.  Glue the panels to the inside of the card and then add the sentiment

7.  To decorate the front glue your star black panels down.  Add the sandy ground, sentiment and the camel.  Your card is complete 


Thanks so much for stopping by! 

Blessings and Take Care


Head over to Cottage Cutz and do a little shopping today!

Get Social With Cottage Cutz

Sunday, December 08, 2024

Deer Family in Forest

Hello Friends

I am finishing up my Christmas cards.  I have just a few more to make.  The one I made today is realitivily simple so I am going to make multiples.  I am featuring the following dies: Merry Christmas w/Deer Family, the Pine Tree Slim and the Pine Tree Full.

 Background Photo by Freepiks

Design Steps:

1.  White card base 5 x 5, DP 4 1/2 x 4 1/2, white card stock 4 1/4 x 4 1/4  with a circle cut out of the center (I used the largest pierced circle die) then I ran it through a snowy embossing folder and finally a piece of white glitter card stock 4 1/4 x 1 1/2 cut with the Hills Slimline die 
2.  Using the Pine Tree Slim and Full cut out the snow with white glitter card stock and the tree with dark green card stock.  Using the Merry Christmas w/Deer Family cut out the deer in brown.  I inked the deer with TH Vintage Photo and then colored the hoofs and nose in black.  I also added some small white dots to the fawn

3.  Glue the DP to the card base then glue down the white card stock with the cut out circle

4.  Next glue down the glitter snow bank making sure you do not put glue on the top of the bank so you can tuck in the trees.  Place the full tree first and then tuck the slim one behind it as shown above


5.  Add the deer and Merry Christmas and your card is complete


Thanks so much for stopping by! 

Blessings and Take Care


Head over to Cottage Cutz and do a little shopping today!

Get Social With Cottage Cutz

Thursday, December 05, 2024

Joyful Snowman


Hi friends, Marla here with a fun and festive Christmas card featuring the Joyful Snowman die.  Not only do I love how much cheer this snowman brings to a card, I also appreciate that the die comes with a second focal image, a wreath.  You can go from cute to elegant with two passes of this die.  Let's talk about how this card was made.
I created my background using layering stencils and cutting the finished panel to 4" x 5.25.  I chose Catherine Pooler inks in Rose Petal, Stone Blue, Spruce, Pebble and Clay Mask.  Next, I tore a piece of vellum to fit over the center of the stenciled panel then scored the sides so it would wrap around the panel. I used a tape runner to adhere it to the back.  Next, I wrapped rustic cotton thread around the vellum and secured it with more tape. Then I mounted it onto an A2 top folding card base that had a forest green panel adhered to the front.

Moving on to the main focal point.  I ran the Joyful Snowman die through my die cutting machine three times using white card stock.  I inked up the letters using Catherine Pooler's Stone Blue ink and spattered water droplets on top.  Then, while it was still damp, I placed it inside a woodgrain embossing folder, and I ran it through my die cutting machine, using the appropriate sandwich. Next, I inked the edges, using a small detail blending brush and Catherine Pooler's Juniper Mist ink.  Then I used liquid adhesive to glue all three die cut layers together for dimension.  I also colored the holly and berries using Catherine Pooler's Rose Petal and Spruce ink.


Moving on to my snowman.  I added Catherine Pooler's Rose Petal ink to the hat and mittens. Then, Pebble ink to the scarf.  I colored the buttons with a W9 Copic marker and used Clay Mask ink for the carrot nose.  Finally, I used Macchiato for the twig arms and assembled my cute snowman.


Before adding my focal pieces to the card, I tied a bow and adhered it to the far-right hand side of the vellum.  Then I adhered the Joyful Snowman die cut pieces.  I added additional details with a white gel pen and Diamond Stickels to the scarf and fur area of the hat. Finally, I added the holly leaves and berries to both the J and the Y to complete the card.  


If you haven't shopped the Scrapping Cottage Blowout sale yet, you don't want to miss it.  This Joyful Snowman die is currently 50% off.  What a great deal.  Until next time.... Marla


Head over to Cottage Cutz and do a little shopping today!

Get Social With Cottage Cutz