Tuesday, December 31, 2024

Hello Valentine!

Hello Friends

It is Pam sharing with you today. I hope you had a wonderful New Year's celebration! Our after Christmas Sale is still going until January 3rd!  Stop by now for terrific savings HERE!

One of my crafting new year's resolutions is to use up some of the supplies I have on hand.  I am really bad at throwing scraps away especially designer paper.  So today I am using up some of my scraps with these background designs.  They are not new in fact I see them all over YouTube but it gets the job done and makes a really fun background. 

I am working on my Valentines.  I used two really cute and fast dies for the cards.  They are the Typewriter and Telephone.

  Background Photo by Freepiks

Design Steps:

1.  Cut up your scraps in a variety of widths making sure they coordinate with each other 
2.  I had some old Full Sheet Clear Labels that were turning yellow so I put them to use.  Cut the 8 1/2 x 11 sheet into 4 pieces measuring 4 1/4 x 5 1/2
3.   Use one of the pieces and peel the backing partially off.  Begin to layer your strips at an angle as shown above
4.  When the sheet is completely covered flip it over
5.  Cut around the edges and it will look like the picture below

6.  Use a deep red A2 card base.  Cut the diagonal DP piece down to 4 x 5 1/4.  Cut a piece of white card stock 4 1/8 x 5 3/8.  Glue the white to the card base and then glue down the DP piece to the white
7.  Use the Typewriter die and cut it out of gray, white, red, light blue and white.  Use the Telephone die and cut out hello in pink.  Glue the pieces together as shown above.  Cut a red scalloped square and a slightly larger scalloped white square
8.  Glue the red and white scalloped squares together.  Then pop up the typewriter on the square.  Stamp Happy Valentine's Day on white and layer it onto deep red.  Pop up the sentiment and your card is complete

Here is another card made with a very similar background and the Telephone die


Thanks so much for stopping by! 

Blessings and Take Care


Head over to Cottage Cutz and do a little shopping today!

Get Social With Cottage Cutz

Wednesday, December 25, 2024

Huge After Christmas Sale!

 Hi Friends

I hope you had a wonderful Christmas celebration!

It is Pam just dropping in to let you know CottageCutz is having a HUGE AFTER CHRISTMAS SALE which starting today! Check it out HERE!! And I also wanted to wish you a Happy New Year!  I made this card with a couple of the adorable dies that are featured in the sale!! Shop early to get the best selections!

         Background Photo by Freepiks


Thanks so much for stopping by!   And shop early to get the best selections!

Blessings and Take Care


Head over to Cottage Cutz and do a little shopping today!

Get Social With Cottage Cutz

Sunday, December 15, 2024

Silent Night

Hello Friends 

It is Pam sharing with you on the blog today.

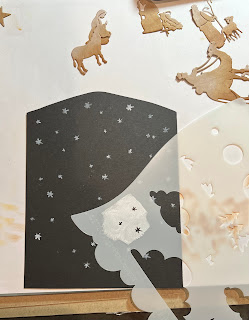
I am using some gorgeous dies today.  They represent the true meaning of Christmas. The dies are Nativity Stable, Shepherd & Animals:  Nativity Camel, Palm Tree & AngelNativity Holy Family & Wise Men.  This is my last card of the season and it will be my template for my cards next year!

Wishing you all a very Merry Christmas and a blessed Happy New Year!!


  Background Photo by Freepiks

Design Steps:

1.  Using a white piece of card stock measuring 8 1/2 x 5 1/2 score at 2 1/8 and 6 3/8.  Bend the card directly in half and cut at an angle.  Open it up and round off the center point.  Use the card base as a template for the black pieces.  I cut 4 side panel pieces and one middle piece
2. Use the Nativity Stable, Shepherd & Animals:  Nativity Camel, Palm Tree & Angel: Nativity Holy Family & Wise Men and cut on Kraft card stock.  Next use white ink and blend the tops of all the pieces.  Use the Vintage Photo ink for the bottom of each piece

3.  Use a stencil and add all the tiny stars in the sky with white ink.  Do this on all of the black anels


4.  Add a strip to the bottom measuring 1 1/4 inches and tear it at the top.  Ink with white ink on the top and Vintage Photo on the bottom.  Place the manger with Mary, Joesph and Jesus in the center panel

5.  Add the Shepard and palm tree to the left side panel.  Then add the 3 wise men to the right side panel
6.  Glue the panels to the inside of the card and then add the sentiment

7.  To decorate the front glue your star black panels down.  Add the sandy ground, sentiment and the camel.  Your card is complete 


Thanks so much for stopping by! 

Blessings and Take Care


Head over to Cottage Cutz and do a little shopping today!

Get Social With Cottage Cutz