Wednesday, June 26, 2024

Red, White and Boom!!

Hello Friends

It is Pam sharing with you today! 

We are soon approaching our Independence Day celebrations so I have been making some fun cards for friends and family!  Today,  I am featuring Gardening TomtePatriotic Car and Firecrackers.


         Background Photo Freepiks

Design Steps:

1.  Using the Gardening TomteFirecrackers and Patriotic Car dies cut out the following colors of card stock: Kraft and black (cart), white, tan, navy, star DP and kraft (Tomte), red, white, navy, black and gold (fireworks)
2.  Assemble the Tomte and cart as shown above.  Assemble the firecrackers as shown below
3.  Using the second from the largest Pierced Rectangle die cut out a blue rectangle.  Assemble the Tomte, cart and fireworks on the rectangle as shown above
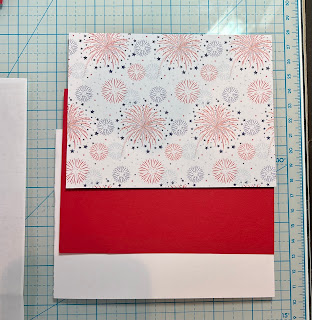
4.  The base card is A2 white, 4 1/8 x 5 3/8 piece of red, and a 4 x 5 1/4 DP fireworks paper
5.  Glue the red to the white card base then add the DP.  Add a red and blue Rik Rak border
6.  Pop up the blue rectangle to the center of the card.  Add a few stars and the sentiment your card is complete


Thanks so much for stopping by! 

Blessings and Take Care


Head over to Cottage Cutz and do a little shopping today!

Get Social With Cottage Cutz

Thursday, June 20, 2024

Beach Bum in Training

Hello crafty friends! 

We're having a SUMMER SALE that ends tomorrow, Friday June 21st!  Save up to 75% 

Kris here, sharing a summer beach card featuring the Sandcastle, Surf Mobile and the surf board from the Surfer Van


The Surfer Sloth is one of my own drawings (Imagine That! digis by Kris) and the sentiment is also from the same digi set that I printed out and colored sloth with my Copic markers.  


I cut 2 pieces of white cardstock 3-1/2" x 8-1/2".  On one, I ink blended Salty Ocean & Uncharted Mariner Distress Oxide ink to the top portion.  On the other, I sponged Tea Dye ink and spattered some Copic ink for sandy effect.  I then ripped the paper so it left a white jagged edge, resembling the ocean foam on the sand. 


I attached the sand to the bottom of the ocean layer.  I then die cut the whole piece using the largest Nested Stitched Rectangles Slimline die.  


I die cut the Beach elements and assembled, then adhered to card front.  


I cut my card base 8-3/4"c 7-1/2" and scored at 3-3/4" - then I mounted my card front to the base and added my sentiment with foam tape.  

The beach is calling - and I must go!!   I hope you have a fun relaxing summer!

~Kristine


Head over to Cottage Cutz and do a little shopping today!

Get Social With Cottage Cutz

Tuesday, June 18, 2024

Ink Blend an Enchanted Evening Sky


Hello, my crafty friends, it's Marla here with a new CottageCutz YouTube videoCottageCutz YouTube video featuring the oh so cute, "Mama Goose" die.  I wanted to create a card that had a storybook scene appearance. I used a few dreamy ink colors to help me achieve the look.

I paired these adorable geese with several different dies in the CottageCutz collection giving my scene the hint of an evening bayou vibe.  I've linked all of the products I used below for easy shopping.  You can find more specific card details by heading over to the YouTube ChannelYouTube Channel.  Until next time... Marla


Head over to Cottage Cutz and do a little shopping today!

Get Social With Cottage Cutz