Monday, February 28, 2022

Easel Card


Hi welcome to the Scrappin Cottage blog.  Today I have an circle easel card to share with everyone.
To make my easel card I used the Pierced Circle die and Pierces Frame to  reate the base for my easel.
 
Once done I diecut these gorgeous wildflowers and colored them with copics pens.  The color variation I used was 
RV61, 63, 66,69 for the wildflowers my leaves were colored using YG05,07,17 and G28
Next I added some water drops and added a chip border to finish the look


Sunday, February 27, 2022

Happy Easter


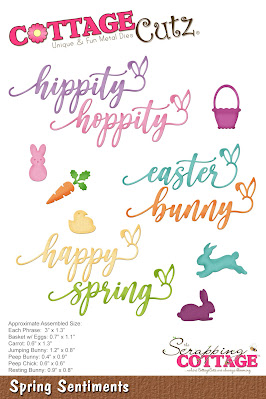
 I really appreciate all of the details found in CottageCutz dies.  I talk about this a lot in my videos.   The "Spring Sentiments" die is no exception. I used two of the sentiment words, on my card, from this die in my last video.  When I shared the die, I mentioned that it would also be great for creating a background. What do you think?  Was I right?

I couldn't pass up the opportunity to highlight another use for this die, so I am sharing this card on the CottageCutz YouTube Channel. I also think you will love the inking technique I share to bring this card some wonderful spring colors.

 You have a chance to win this die for yourself.  Head over to the channel to see what you need to do to enter the GIVEAWAY and to find out who the winner was from my last video. 

Until next time.... Marla


Friday, February 25, 2022

Bunny Cottage

Hello CottageCutz friends! Thanks for taking the time to stop and visit with us today. It's Mary Marsh here bringing you the Wednesday edition of the Blog.

IT'S NEW RELEASE TIME! The Spring Release with 20 new designs is in the online store. The individual dies are currently at 30% off. There is a nice combination of both religious and whimsical designs. So perfect for all card makers out there.

And the dies don't have to be used strictly for Spring or Easter. The team has done Valentine, Birthday and Thinking of You cards with these new dies. Take a look back on the Blog for lots of ideas.

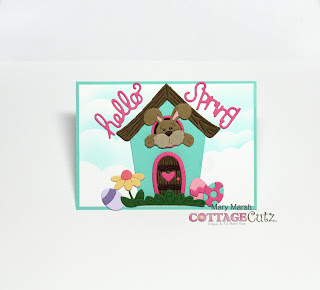
Today for your viewing pleasure, I have a whimsical Easter card using the cute Hello Spring Bunny Cottage. So, let's get started on some details of how I created this card. 

Design Steps:
Since I knew the die, I was going to use, I looked for a layout that would allow the image to be front and center and also use some designer paper. I found this sketch online from the Tuesday Morning Sketches Blog and thought it would work well. 
Then I looked through my paper collection for something to coordinate with the playful image. I found these papers with a stripe, a geometric pattern and one that had an ombre appeal. 

Card Base: 4 1/4" x 5 1/2"
Background designer paper layers: 2" x 5 3/8"
Angled border layer: 2 3/8" x 4 1/4"
Designer paper angled layer: 2 1/4" x 4 1/8"
Image panel border: 3 7/8" x 2 3/4"
Image Panel: 3 3/4" x 2 5/8"
Next, I cut my images in shades of cardstock that matched the designer paper. 
Now that my card elements are prepared, I am ready to start card assembly. I attached the background layers to the card base with double sided tape. 
The images were attached with glue dots and Glitter Art adhesive (dries clear). I stenciled some clouds on the white panel with salvaged patina distress ink. I used dimensional adhesive to lift it off the background layers slightly. 
And that's my card for this week. I will stamp an Easter greeting on the card inside.  I hope I have given you an idea of a way to use this ever so cute Bunny Cottage die. See you next Saturday. 

Reminder: Our YouTube channel is active again. Check out the latest video from Marla, and we are having a giveaway for subscribing, liking the video and giving it a thumbs up. Click here. 

die I used to create card:


Thursday, February 24, 2022

Munching Bunny!

 Hello Everyone!

Last chance to save at our Presidents Day Sale!  The sale has discounts of up to 60% off.  So don't miss out it ends at 9:00 PM Pacific time today!

Save up to 60% on CottageCutz Dies
Save 60% on CottageCutz "Stamp & Die" Sets
Save 60% on CottageCutz Slimline Dies
Save 60% on Little Bluebird Designs (Stamps & Dies)

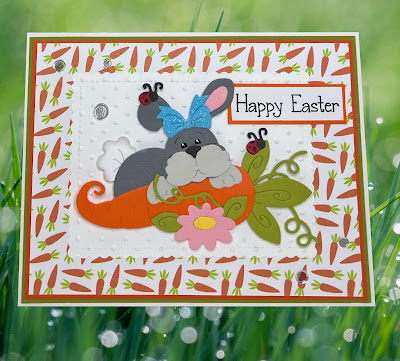
Today, I have another cute little Easter card for you.  I am using Spring Bunny w/Giant Carrot.


Design Step:

1.  Using the Spring Bunny w/Giant Carrot cut out the pieces using: green, orange, pink, yellow, blue, light gray, dark gray, white, red and black card stock.  Assemble the bunny and carrot with fine tip glue.  Add a little Wink of Stella to the bow for some sparkle
2.  Use a whtie A2 card base,  cut a piece of green 4 1/8 x 5 3/8, orange 4 x 5 1/4 and Carrot DP 3 7/8 x 5 1/8.  Use the Scalloped Rectangle die second from the largest and cut it out of white.  Next run the rectangle through an embossing folder.  I used swiss dots
3.  Glue the green to the white card base, next glue the orange and then the carrot DP
4.  Glue down the white embossed rectangle to the middle of the card front.  Place pop dots onto the back of the bunny and add it to the center of the white rectangle

5.  Last stamp your sentiment and layer onto orange card stock add your little sequins and your card is complete

CottageCutz Products


As always thank you so much for stopping by today!  I look forward to seeing next Thursday!
We have more inspiration on our YouTube Channel check it out HERE

Blessing and Take Care


Wednesday, February 23, 2022

Easter in the Netherlands!


Hello CottageCutz friends! Thanks for taking the time to stop and visit with us today. It's Mary Marsh here bringing you the Wednesday edition of the Blog.
 
IT'S NEW RELEASE TIME! The Spring Release with 20 new designs is in the online store. The individual dies are currently at 30% off. There is a nice combination of both religious and whimsical designs. So perfect for all card makers out there.

And the dies don't have to be used strictly for Spring or Easter. The team has done Valentine, Birthday and Thinking of You cards with these new dies. Take a look back on the Blog for lots of ideas.

We are celebrating President's Day here at the Scrapping Cottage with a huge sale with up to 60% off selected dies. It ends on Thursday night so don't delay. 

Today for your viewing pleasure, I have a card that is celebrating Easter and tulips. The background designer paper reminds me of the tulip fields in the Netherlands. Never been there just have seen photos. And I remembered that we had a windmill die that would work perfectly for my idea. 

The card colors are from this week's Splitcoaststampers color challenge. I am the hostess of the challenge and for my color trio I chose pumpkin pie, so saffron and highland heather. Optional is to use any designer paper. 
pumpkin pie, so saffron, highland heather

The windmill is from the Barn & Windmill die. I used so saffron & highland heather cardstock to cut the image. It's currently on sale at 50% off.   

The Easter phrase is from the new Spring Sentiments die. This die has 6 phrase words and 6 Easter or Spring images.  I cut the phrase 3x for more definition and then sponged with the highland heather ink to darken it a bit.   

To finish off this card I stamped a sentiment on the front panel and added a few Spring tulips. The tulips are from the Spring Sheep die. 
That's it for me for this post. I will be back again this weekend with another card sample for you from the Spring collection of dies. 
Reminder: Our YouTube channel is active again. Check out the latest video from Marla, and we are having a giveaway for subscribing, liking the video and giving it a thumbs up. Click here. 


dies I used to create card:


Tuesday, February 22, 2022

Easter Card and Mini Basket Set

Happy Terrific TuesDIE Scrapping Cottage friends!
Melinda here with you today. My project for today features more sweet dies from the new SPRING RELEASE! Here's what I created.
This super cute card and mini basket Easter set.

I started by creating this basket template. I used my electronic cutter to cut it out. However, you could cut it out by hand with some scissors.

I created some layers for the basket sides and used some white cardstock with some printed paper layered onto the cardstock. I then used my bone folder to create a bit of a curl to the paper. This is to "train" the paper so that it will naturally want to form a circle/sphere type shape without creasing.

I then attached the layered mats onto the body of the basket. You can put some on both sides if desired. I then put some adhesive on the tabs and then went around and attached them to the inside of the basket walls.

Here's a look at the assembled basket. I used my hole punch to punch a hole on the sides. I used a pink brad and adhered the handle to the body. The cute little flower is a die cut from the Peeker Bunny w/ Pocket Die.

I then turned to the sweet Spring Chickee In Basket die. I cut out all my pieces in white cardstock and then set about to coloring them all. I adhered it all to a stitched scallop rectangle base. I cut a piece of patterned paper for the background. It is the same as the mat on the basket.

I attached the mat with the Spring Chickees onto a Nested Rectangle Scallop Die. I cut out a patterned paper mat from the same paper pad. 

Once I adhered all that to my horizontal card base. It is horizontal and top folding. I added a mat of white cardstock along with a mat of the same patterned paper. I added some foam tape to give the layers a little extra lift. I also added the word Easter and then some letters in my stash for the word Fun.

Next I cut, colored and assembled this sweet Bunny with Carrot die.

I added that to a double stitched rectangle mat. I also used the smallest version for the bunny to hold as a sign. I added the To and From part. I also added a couple of Orange gems by the stems. I just wanted to give them a little extra sparkle! I wrote To and From on the tiniest double stitched rectangle. It was perfect to nestle between the bunny and carrot.

Here's a look at the basket with the cute little tag hanging. I just used some twine to attach it.

Here is one last look at the set. Just waiting form me to sign the card and fill the little basket with some fun treats!


The Dies I used to create this project:


I used the Stitched Scallop version. That one is currently unavailable, but this is an excellent alternative.


In case you didn't hear, The CottageCutz YouTube channel is up and running.  Head over and check out the latest video! There is a giveaway for subscribing too!

Well that about covers it for today! Until the next time, have a wonderfully crafty day!
Melinda Beltran