Monday, July 30, 2018

What a Fox!

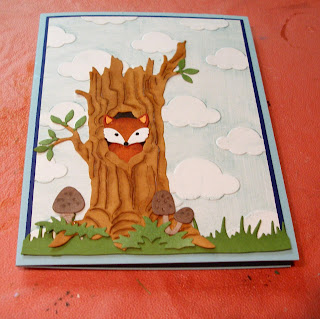
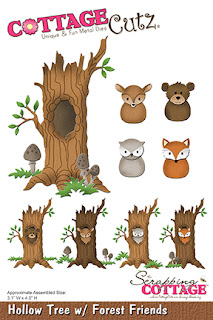
Hi, Lois here with my Monday card.   While the CottageCutz design team waits for the new release dies, we're having a month of "throwback" cards -- using previously released dies to show them off once again.    My card today uses Hollow Tree w/Forest Friends and Spring Grass.


To start my card I die cut the tree and animals from white cardstock and the grass from green cardstock.


I then colored the pieces with Copic markers and sponged some darker green ink onto the grass piece -- and then constructed the tree.


The card base consists of light blue cardstock 5 1/2" x 8 1/2", scored at 4 1/4"; the navy piece is 4" x 5 1/4", and the white piece is 3 7/8" x 5 1/8".


I swiped a light blue ink onto one side of a cloud embossing folder and then ran the white cardstock through my Cuttlebug.  This technique allows portions of the embossed piece to be blue, while leaving the clouds white.


I then constructed my card base.


The green strip of grass was placed along the bottom of the card base, covering the navy mat piece and then the tree was added over the grass, trimmed at the edges.


 Several weeks ago, when I was in Hobby Lobby, I saw some really cute fox buttons that I thought would look good on a card at some time.  Today was the day.  I placed one of the buttons sitting on the grass next to the tree.


I had a sentiment that would work for this foxy card, so I stamped it on white cardstock, cut it into a banner, and mounted it on a strip of navy.  I placed this at the top of the card.


And my card was now finished.


CottageCutz dies used on this card are:

http://www.scrappingcottage.com/search.aspx?find=Hollow+Tree

http://www.scrappingcottage.com/cottagecutzspringgrasselites.aspx

Sunday, July 29, 2018

Home

Hi!

This is Anja. Just a simple card for today. I'm away on work holidays, having fun with the kids in the summer camp. We're a few days from going home. We're having ton of fun, but when you're tired, sometimes home sounds like the best idea :)


For this project I used:
- Cottage Cutz dies (Puppy w/ Heart, Stitched Alphabet),
- Distress Ink (Spun Sugar, Pumice Stone),
- craft card base (10,5x15 cm),
- white card stock for die cuts and background (9,5x15 cm),
- patterned paper (9x15 cm),
- black pen,
- white pen,
- paper glue.


First I cut the paper for the background. I colored the edges of white paper with Spun Sugar Distress Ink. I glued both papers on the card base.


Then I die cut the puppy and colored it with Distress Inks. I used black and white pen for he eyes. I cut one more puppy and used its head to layer it on top of the whole puppy to add some dimension.


Next I cut the letters and colored the edges with Distress Ink.

And then I just glued the puppy and the letters to the card base. And this i my finished card.


Have a great Sunday and see you again next week.

Anja Z.


Cottage Cutz dies I used:


Saturday, July 28, 2018

Penguin Bringing Christmas Greetings

Hello Scrapping Cottage friends! Thanks for taking the time to stop and visit with us today. It's Mary Marsh here bringing you the Saturday edition of the Blog.

Hope you are enjoying your summer. It's been so hot and humid here in the Pittsburgh area. So I thought I would cool things done a bit and bring you a Christmas card. My favorite TV shopping channel is having a big Christmas in July event. And, of course, I already started my Christmas shopping. 
Since, I am in the Christmas spirit I am featuring the Penguin With Presents and the Christmas Greetings dies.


Let's get started with some details on how I created this card.
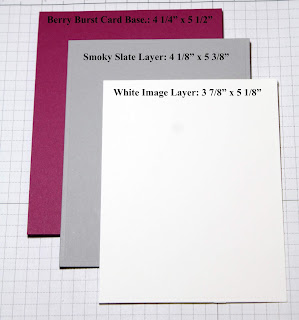
Step 1: This week I started with my card colors. I used the colors from the Splitcoaststampers color challenge #697 which are berry burst, granny apple green and smoky slate to create my card. The optional twist was to create a Christmas card. I love making Christmas cards in non-traditional colors.

berry burst, granny apple green, smoky slate
Step 2: I started my die cutting with the penguin and present. I used the berry burst for his hat, scarf and bow. The granny apple green makes a great color for a present. Don't you think?
Next, I cut the pine tree for my wintry scene. Since the penguin is 2 1/4" high I needed a slightly larger pine tree so I selected the one that is in the Campsite collection. I cut from mossy meadow cardstock.

My last die cut is the Christmas sentiment that I cut in the berry burst cardstock. I wanted a bold color on the snow bank. I cut it out 2x to give it more dimension on my card.
Next I embossed the white image panel with a snowfall embossing folder.
Step 3: All my card elements are ready so time to start card assembly. I secured the panels with double sided tape. I cut a snowbank and added some chunky glitter to the top. Used dimensional adhesive to attach to smoky slate layer. The Christmas Greeting sentiment was attached with Ranger Multi Matte Medium.
Finished building my little scene by adding the penguin and the pine tree. I attached both with dimensional adhesive. I thought the top of the card looked a little bare so I cut 3 small snowflakes from the Snowglobe, Winter Accessories die in a white glitter paper to make them standout. Only 2 worked at the top so I used the 3rd to highlight the sentiment.
Well that's it for me for this week. I hope I have given you some inspiration if you have these dies. If not, and you would like to purchase they available in the online store. See you next Saturday!!!

dies I used to create card:
http://www.scrappingcottage.com/cottagecutzchristmasgreetingselites.aspx

http://www.scrappingcottage.com/search.aspx?find=penguin+with+presents


http://www.scrappingcottage.com/search.aspx?find=campsite