Monday, January 31, 2022

Slimline Shaker

Hi, everyone it seems like the weekends go by so quickly as Monday is here again.  Today I am sharing a slimline window shaker card with two of the new release from the January 2022 release!  Peekers Bunny w/Pocket and Spring Kitten w/Envelope how cute?!! 
CARD

1.  I took the slimline window die and cut it using patterned paper.  I couldn't decide between red and teal so I actually cut it out twice
2.  I then cut two layers of the window using foam so that I could add height for my shaker window.  I added some acetate for the window and then adhered all the layers together

3.  I used some flock paper I had to cut out the bunny and cat to make them more life-like or give them a better look of fur and I love how it turned out.  

I glued all the layers together and added some sequins to my shaker window to complete the look of my card and I hope everyone enjoyed my shaker card and see you next Monday same time same place!

In case you didn't hear, The CottageCutz YouTube channel is up and running.  Head over and check out the latest video! There is a giveaway for subscribing too!

Sunday, January 30, 2022

Bunny Peeker Treat Box w/ Bonus Card

Happy Sunday Scrapping Cottage friends!
Melinda here with you today. It's another Sunday Funday and I hope you are enjoying some crafting! I am sharing a little more spring inspiration featuring dies from the new SPRING RELEASE! Today's project is a super cute little box with the adorable new Peeker Bunny w/ Pocket Die for the front!

The new Peeker Bunny w/ Pocket Die is part of the fantastic new Spring Release! I started by cutting out my die pieces in white cardstock. I then colored my various pieces in with my markers. I did also cut out the pocket piece in blue cardstock as well as a patterned paper for the sides of the box mats from my Doodlebug paper pad.


I decided to make my Peeker Bunny w/ Pocket the front of a cute little treat box, instead of a card. The box size I ended up using comfortably holds 3 Ghirardelli Chocolate Squares with some tissue. That's the perfect amount for a little gift for your co-worker's, teachers, etc. this spring season.

Box Assembly
I settled on starting with a piece of paper 5.25 x 5.25 size.


I scored all four sides at 1 5/8th. That is the next 1/8" line past the 1/2" mark.

Here is what it looks like when scored. It is not a perfect square size. I settled on this size to match the width of the pocket piece as close as possible.

Next you will want to cut it as shown. The easiest way to remember how to do this is just cut the line of the outside score to the first cross line. Then do a quarter turn and repeat. Do this all the way around. You will also want to cut a little slice out so that it makes assembly easy.

This photo shows you where to apply your adhesive. You will put it on the "top" of each of the four corner tabs you created. Once you do this, simply fold up the box and adhere the sides.

Here is what it looks like assembled.

This is a slight segue. I wanted to share all the various size boxes I worked up before I settled on my size. I wanted to come up with one that was as close to the width of the pocket without making it too complicated. Can you tell I am not the greatest at math?....LOL!

Here is one more look at the finished box. After I assembled it and took my photos, I realized I left off the sweet little ladybug that sits on top of the flower!!!! UGH! SOOOO.... I had to get it on somewhere!!! 

So I whipped up this cute card. I had extra pieces, so this came together easily. 
My finished card size is a 5x5 top folding card. I used a piece of white cardstock for my base. I then used the same blue cardstock for the pockets as a base mat. On top of that I layered some Doodlebug patterned flowers paper, a strip of some of the bright green paper in the same pad. I then used the Wacky Stitched square for another base and then some more Doodlebug patterned paper for a mat. I set my sweet little bunny in her pocket on top of that. I did add a little foam tape to the back of the die cuts to give them just a bit of lift and dimension.

Here is a side view. You can see that sweet little ladybug on top of this flower. 


Here you can see I used the double stitched rectangle and the hello and spring words from the Hello Spring Bunny Cottage.


The Dies I used to create this project:


In case you didn't hear, The CottageCutz YouTube channel is up and running.  Head over and check out the latest video! There is a giveaway for subscribing too!


Well that about covers it for today! Until the next time, have a wonderfully crafty day!
Melinda Beltran

Saturday, January 29, 2022

Easter Cross (new die)

Hello CottageCutz friends! Thanks for taking the time to stop and visit with us today. It's Mary Marsh here bringing you the Saturday edition of the Blog.

IT'S NEW RELEASE TIME! The Spring Release with 20 new designs is in the online store. The individual dies are currently at 30% off.

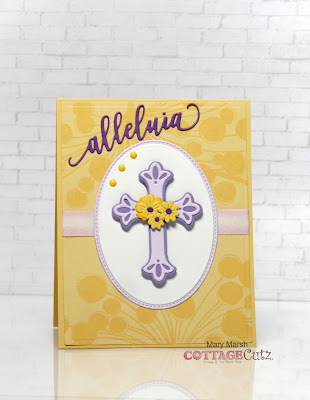
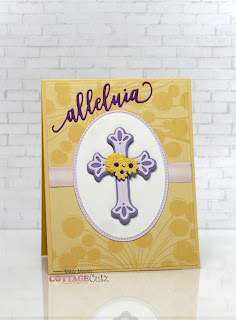
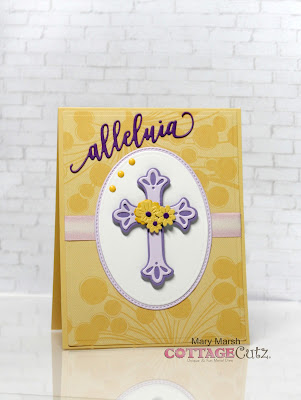
There is a nice combination of both religious and whimsical designs. So perfect for all card makers out there. I do a combination of both designs for my Easter cards. Today, I have a religious one for you using the 
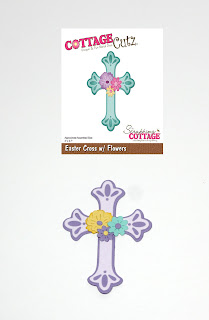
Easter Cross w/Flowers die. Which, I believe, is the reason we celebrate Easter. So, let's get started with some details of how I created my card.

Design Steps:

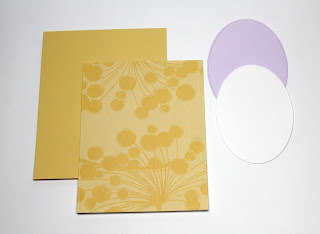
Since I knew what die I was going to use to create my card and I sort of had a layout in mind, I looked for a subtle designer paper that would work. I wanted paper that wouldn't overtake the cross. I found this one with a floral image on it. 

Yellow Card Base: 4 1/2" x 5 1/2"
Designer Paper Layer: 4 1/8" x 5 3/8"
Light Purple Oval: 3rd largest from the Stitched Oval 
White Oval: 3rd largest from the Oval Set. 
Next, I cut the cross and flowers in colors that complemented the yellow papers.
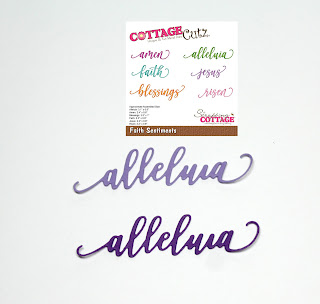
I wanted to use one of the new phrase sentiments that were just released. I chose the alleluia phrase from Faith Sentiments die. I cut it in 2 shades of purple because I wasn't sure which one to use. My cards are always a work in progress. 
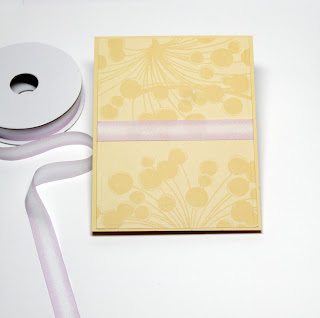
Now that all my elements are prepared, I am ready to start card assembly. I decided to use some ribbon on my card that matched one of the shades of purple on the cross. I attached that to the designer paper and then that layer to the card base with double sided tape. 
For the cross, I used dimensional adhesive to slightly lift it off the oval background. At this point I decided to change the flower colors. I made them all yellow, and I liked that better. I added the alleluia phrase. I went with the darker purple one. I thought that made more of a statement on the card. 
To finish off my card, I added a few yellow enamel dots. And that's my card for this week. I hope I have given you an idea for a way to use this new Easter cross. 

Reminder: Our YouTube channel is active again. Check out the latest video and we are having a giveaway for subscribing, liking the video and giving it a thumbs up. Click here. 


Dies I used to create card:


Friday, January 28, 2022

Sweet on you easel card


Happy Friday, It’s Wendy bringing you the blog today. I hope you’ve all had a wonderful week and have plenty of time planned for crafting this weekend.

Today, yes I’m bringing you another easel but I really think they have a super impact for the recipient.

This is a Valentines card and I was really inspired by Pam’s colour on her card yesterday. What an impact red, black and white can have

Anyway, right to the card. I’m not going to show you every item I’ve die cut as I think that technique is more important. I die cut all the elements from the ‘Sprint Bunny Baker’ die and assembled. Here she is in her crowning glory. I thought the mixer looked very much like my cake mixer so used the colours from mine. Don’t you just love the little bow. I couldn’t help but pop a gem on the top. I also gave her pink cheeks with some chalk


Next I took the largest ‘Stitched Rectangle’ in white card. Once cut I wanted to add some brickwork to the background, to I took a stencil and added some ink with a brush. I have a tool that allows me to pop the stencil on the card with magnets so the card doesn’t move. I wasn’t fussed whether the ink was darker in some places so just take your time and find your happy design


Once inked, here is the finished piece of card 


Next I took the largest of the ‘Stitched Scalloped Rectangles’ in red card and attached my piece of inked card to it with 1mm foam pads. I also attached my assembled bunny to the card with 1mm foam pads


Next I took a piece of black card measuring 10” x 4” and scored in hall. I also cut another piece of black card measuring 5” x 4” for the front of the card. You’ll notice that I scored the front of the main card in half and then attached my other piece if card to the bottom part only to get my easel


To finish I attached my other piece of completed card with the bunny to the front. To keep my easel standing up I used the flower from the ‘Bottoms up Bunny Baker’. I cut it 3 times and layered it up to keep the card standing up.

I added some extra embellishments like a pice of white card on the bottom card with a stamped sentiment. I also went through my stash of Cottagecutz dies and found a suitable heart and popped this on the bunny’s hat, the mixer and then next to the sentiment and we are all done!


I really enjoyed making this card and I hope that you like it and it’s given you some inspiration to make your Valentine’s cards.

So I wish you  a wonderful weekend of crafting happiness and I will see you on Tuesday for another project.
Hugs, Wendy


Dies I used:


Please don’t forget to check out our YouTube page as there are designs being added frequently