Thursday, September 19, 2024

Trio of Ocean Critter Wobblers

Hello and Happy Thursday!!

It's Kris sharing with you today.  I've got a set of 4x6" super quick and easy cards as a last hoorah to summer (Sunday is the first day of Fall)! 

 These 3 cards are also interactive as all the ocean critters are on wobblers!  I've used the Jellyfish, Octopus and Seahorse dies.  


Here they are in action:

DESIGN STEPS:


The patterned paper is called Summer Vacation (from La-La Land Crafts) and I thought it was the perfect backdrop for these ocean critters!

All of my card bases are 4x6" (cut at 6" x 8" and scored at 4") and the mats on the jellyfish and seahorse cards are about 3/16" smaller.  The patterned paper is cut 1/8" smaller than the mats. 

The mat and patterned paper on the Octopus card are cut a bit shorter as that particular paper had 2 design strips on one side, so I cut it apart and mounted it towards the top which left a nice spot at the bottom to add my sentiment strip.  

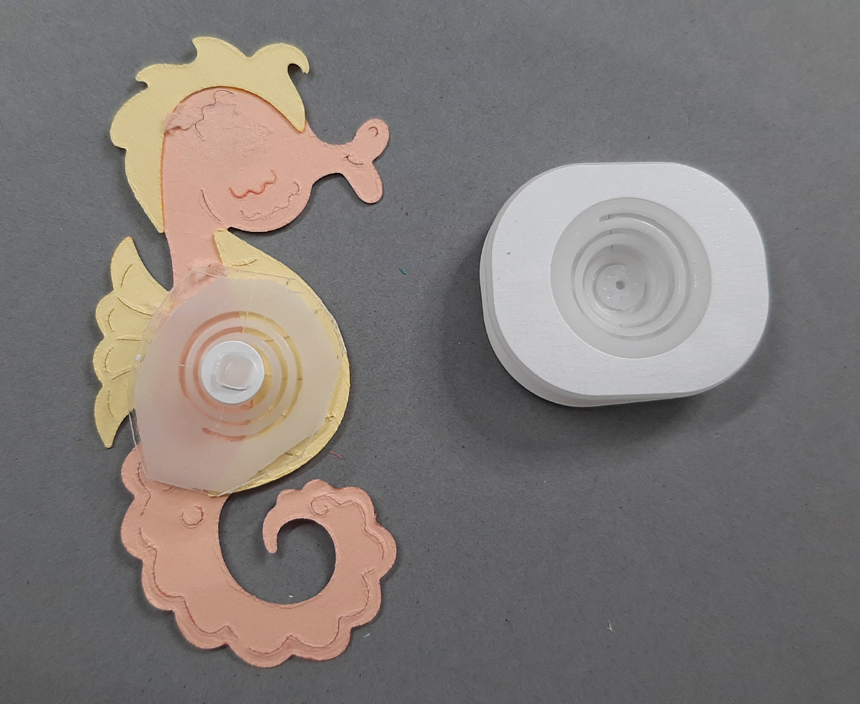
I die cut the critters from colored cardstock, then added shading with Distress Oxide inks and Copic markers.  Then I cut my wobblers down to fit the largest section of each critter and mounted to the backs.  


The seahorse was my first card, and I originally added dimension dots to the back when I realized I had these wobblers in my drawer!  So the cardstock did rip a tad when I peeled the foam dots off ---- but nobody will see the back!  ☺ 

For the Octopus, I decided to add some wiggly eyes.  


I printed my sentiments from the computer and cut them in ways I thought would work best on each card.

Here's a better look individually...


I hope you enjoyed these cute and easy cards today and are inspired to create your own!  Enjoy what's left of SUMMER as Fall is just around the corner!

~Kristine


Head over to Cottage Cutz and do a little shopping today!

Get Social With Cottage Cutz

Monday, September 16, 2024

Fall in Pink!

 Hello Friends

It is Pam sharing with you today.  I am stepping outside of my comfort zone using color.  I saw a darling card online by Spellbinder (sorry the Artist wasn't mentioned) and thought I would give it a try using CottageCutz dies.  The dies I am using are the Fall Scarecrow and the Harvest Pumpkin.


                            Background Photo by Freepiks

Design Steps:

1.  Use a A2 cream card base and a piece of cream card stock cut 4 1/8 x 5 3/8.  Run the piece of card stock through an embossing folder.  I used a leaf folder and used ink to blend in a little pink

2.  Use the Fall Scarecrow and cut the following colors of card stock: pink (pants) polka dot pink DP (shirt) black (shoes, eyes, nose, shoes and the words Happy Fall) brown (sign) yellow (straw) cream (face)
Glue the pieces together to create the sign and scarecrow
3.  Use the Harvest Pumpkin and cut the following colors of card stock: orange (pumpkin, leaves and flower) yellow (leaves and flowers) green (stems and leaves) cream (pumpkin, flowers and leaves) Glue the pumpkins together and the flowers
4.  Arrange the pieces onto the card.  Pop up the scarecrow plus the orange and cream pumpkin.  All the other piece glue flat


We have more inspiration on our YouTube Channel check it out HERE

Thanks so much for stopping by! 

Blessings and Take Care


Head over to Cottage Cutz and do a little shopping today!

Get Social With Cottage Cutz

Wednesday, September 11, 2024

Winter Whimsical Village


Welcome back, friends. Marla, here today and I thought I would pop in to share this adorable Christmas card I created using "Winter Whimsical Village" from CottageCutz.


I began by using the "Winter Whimsical Village" die to cut out all of my images using Accent Opaque 100 lb. card stock. I was careful to place all of the pieces for each house in their own little pile, before I got to work on inking.


I am a superfan of Catherine Pooler's inks and especially adore the "Spa Collection" colors. For my project, I used "Buttercream, Seafoam, Sage, Hot Tub, Stone Blue, Peppermint Scrub, Pink Champagne and Clay Mask." I also used the neutral tones of "Slate, Over Coffee and Macchiato." I enjoy ink blending, so this is typically my go to for die cuts to customize the images. After I completed the coloring process, I assembled all of my pieces and added foam tape to four of the five houses and the deer.


I considered inking a background but settled on a simple white one. I did want texture, so I used a retired Simon Says Stamp 3D embossing folder to add texture to my card. Any snowy embossing folder would work. I love the clean and simple appearance, and I think it keeps the focus on my scene.


After searching through my dies, I thought the CottageCutz "Tis the Season" die was the perfect sentiment for my card. The playful font worked well with my whimsical village. I die cut it twice from the white cardstock and once using a sage green polka dot patterned paper from my stash. I stacked and glued the white layers together and offset the sentiment cut from patterned paper.


Finishing off the card, I adhered my embossed panel to an A2 top folding card base. I laid out my design and adhered all of the piece to the card front. For a touch of sparkle, I added Nuvo "Fresh Snowfall". I love how small touches, such as this, add so much charm to the design.


Thank you so much for joining me today. I hope this jump start to Christmas gave you some motivation to get inside your craft room. Until next time.....Marla


Head over to Cottage Cutz and do a little shopping today!

Get Social With Cottage Cutz