Wednesday, October 31, 2018

Introducing A New Guest Designer

Hello Scrapping Cottage friends! Thanks for taking the time to stop and visit with us today. We have a new guest designer with us for November and December. Let me introduce to you Sukie Dhillon. Here is a brief bio that will give you some information about Sukie.

"My name is Sukie Dhillon and I was born and raised in Northern California.  The most important thing in my life is my family.  I'm a proud Mom to 2 wonderful children who are both away in college. I've been married to my biggest fan and supporter for 27 years.  When I'm not working, I take cover in my craft room.  Creativity is an escape from my busy life.  I love being crafty and am passionate about creating cards, tags and scrapbook pages.  Creating with vibrant and bright colors brings me so much happiness.  I love to embellish my creations.  It's the simple things in life that bring me joy and playing with dies and paper is one of those things"!

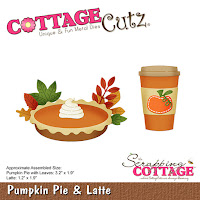
Today we thought we would give you a sneak peek of what's to come from our guest designer. Sukie is a talented scrapbooker. She has created a great layout today using some of the newest Autumn dies. CottageCutz dies are so perfect to use as embellishments and added accents to your layouts.  Her layout is featuring the Pumpkin Pie & Latte, Fall Phrases, Stitched Circle and Mail Tag dies.

Here are some other views of her layout.


Sukie will be posting her work each Wednesday in November and December. And, there will be details showing the steps of her work. Welcome Sukie. It's nice to have you as part of the CottageCutz team.
 
dies used to create layout:
http://www.scrappingcottage.com/cottagecutzfallphrases.aspx
 
http://www.scrappingcottage.com/cottagecutzpumpkinpieandlatte.aspx
 
 
http://www.scrappingcottage.com/cottagecutzmailtagset.aspx

http://www.scrappingcottage.com/cottagecutzstitchedcirclesetbasics.aspx


Tuesday, October 30, 2018

Husky with Christmas gifts

Hi, Janja is here!
As you probably already know, at the Scrapping Cottage blog this week is intended to present the Dakota Husky die. It's only available on their website.
Let me show you my card.


Supplies:
- CottageCutz dies: Dakota The Husky, Jolly Santa Claus (gifts), Snowy Tree
- white card base: 5,3 x 5,3" (13,5 x 13,5 cm), folded
- paterned paper: 4,5 x 4.5" (11,4 x 11,4 cm)
- white and colored card stock
- colored ink pads
- glue, double-sided adhesive tape, foam tape

First prepare a white card base, a stitched wide square frame and a hill. Cut the square from a patterned paper.


Cut out Dakota Husky, two gifts and snowy trees. 


Mark the inner part of the frame on the patterned paper with a pencil. Paste three snowy trees.
On the back side of the frame attach a hill and two snowy trees.
Fix the frame with a foam tape on the background. 


Finally, paste the Husky and gifts.


Happy Halloween! Have a lot of fun!  


Monday, October 29, 2018

Merry Christmas from Dakota

Hi, Lois here with my regular Monday post.  The Scrapping Cottage (CottageCutz) has a die in its new Christmas release that is available ONLY on their website.  It will not be available from any other outlets.  Called Dakota the Husky, some of the design team members will be featuring him on our cards this week.  He is really cute!


I used the version of Dakota wearing his Santa hat on my card -- along with some new Christmas plaid paper I just bought last week.


I started my card by cutting out the die pieces from white cardstock.


I then colored him with Copic markers and put him together.


My cardstock measurements are as follows:

White - 5 1/2" x 8 1/2", scored at 4 1/4"
Red - 5 1/4" x 4"
Plaid - 5 1/8" x 3 7/8"


I then cut three ovals using the Cross-Stitched Ovals set.  To save cardstock, the red oval was cut from the center of the 4" x 5 1/4" layering piece.  The plaid oval came from a scrap.


I constructed my card, layered the ovals together, and placed some adhesive foam circles on the back of the oval and Dakota . . .


. . . placing them on the front of the card.


Using a Merry Christmas phrase, I cut the sentiment from dark green cardstock.


After gluing the sentiment on the popped-up oval element, my card was complete.


CottageCutz dies used on my card are:

http://www.scrappingcottage.com/cottagecutzdakotathehuskyexclusive.aspx

http://www.scrappingcottage.com/cottagecutzcross-stitchedovalsetbasics.aspx

http://www.scrappingcottage.com/cottagecutzexpressionsmerrychristmas.aspx

Sunday, October 28, 2018

Chickens & Eggs

Hi!

This is Anja. I've made a different kind of project today. My mother has a coop full of chicken at her small farm. And sometimes she gives eggs to someone as a small gift. And that's how I got and idea for using one of the new dies. I decorated a box for eggs.


For this project I used:
- Cottage Cutz die (Chicken & Coop),
- Distress Inks (Barn Door, Fired Brick, Wild Honey, Aged Mahogany, Tea Dye, Pumice Stone, Vintage Photo, Walnut Stain, Black Soot),
- white card stock for die cuts,
- scissors,
- black pen,
- black brush pen,
- paper glue,
- corner punch.

First I cut and colored the chickens and the coop. I used black pen for the eyes.


Then I measured the paper for the box. I made two 2,5x8cm strips and one 7x8 cm rectangle. I rounded the corners with the punch. I colored the edges from lighter to darker colors.


Then I first decorated the box and then glued the chickens on top of it. I used brush marker to write the words.

And this is my finished egg box.


Have a nice Sunday and see you again next week.

Anja Z.


Cottage Cutz die I used:


Saturday, October 27, 2018

Stitched Snowman

Hello Scrapping Cottage friends! Thanks for taking the time to stop and visit with us today. It's Mary Marsh here bringing you the Saturday edition of the Blog. 
We have a new release of dies over at the online store. Our Autumn 2018 dies are here with 10 new designs. They are currently 25% off for a limited time.

Today's card is from the Christmas Release Part 3. There are 14 new designs in this release and any of them would be so perfect for your Christmas card making. I used the Stitched Snowman die to create a Christmas card. So let's get started with some details on my card.
Step 1: I wanted to make a card that would be easy to recreate for multiple cards. With that in mind, I kept the layout relatively simple and not as many layers as I like to use. I also wanted traditional Christmas red and green. I chose my patterned paper with these colors in mind. 

red card base: 4 1/4" x 5 1/2"
patterned paper layer: 3 7/8" x 5 1/8"
green stitched oval: used the 2nd largest die from the stitched oval set.
white oval: used the 2nd largest die from the oval set

Step 2: In keeping with my traditional colors, I used green cardstock for the snowman's ear muffs and gloves and red for the heart. Sponged a bit of soft blue around the snowman and snowbank.
I wanted the sentiment on the image panel so I stamped it with the help of my MISTI.
Then I used a snowfall embossing folder to add some background snow.
Step 3: Now that all my elements are ready, I started card assembly. I decided I wanted to add some ribbon to my card. I like using it on Christmas cards. But you could certainly skip this step to make mailing easier.
Attached my snowman image to the oval panels using dimensional adhesive. The slight lift off the background creates nice depth.

Attached this image panel to the card base. Again I used dimensional adhesive. My intent was to add a bow but I didn't like the look of a bow with this particular ribbon.
To finish off my card I added a few sequins. This was just for more of a festive look. Well that's my card for this week. I hope I have given you an idea for a way to use this super cute Stitched Snowman die. See you next Saturday.
Next week the DT will be showcasing the exclusive Dakota the Husky die in our posts. So hope you will come back and take a look at the different ways to use this new die.

Dies I used to create card:


http://www.scrappingcottage.com/cottagecutzstitchedsnowman.aspx
http://www.scrappingcottage.com/cottagecutzstitchedovalsetbasics.aspx

http://www.scrappingcottage.com/cottagecutzovalsetbasics.aspx