Thursday, March 25, 2021

Spring is Here!

 Hello Scrapping Cottage Friends,

It is Pam creating with you on the blog today!

I am so glad spring has sprung!  Even though I live in Arizona and it never really gets cold I love the spring flowers.  We have a huge variety of cacti and some of the flowers on these plants are just gorgeous!  

The card design I am using today was inspired by a card I made in a class with Donna West.  I loved the card so much I wanted to create one of my own.

This card can be used for a spring hello card or for an Easter card which by the way is right around the corner.  


Design Steps

1.  Using the Bunnies in Pots die cut out all of the pieces using rust, brown, pink, and blue card stock
2.  Shade the pieces with a variety of inks and then assemble with a fine tip glue
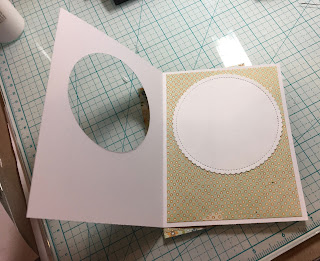
3.  For the card base I used a white A2 card and cut a circle in the middle using the 3rd from the largest Pierced Circle die.  Inside is a 4 x 5 1/4 piece of dotted DP, the front flowered DP is 4 x 5 1/4 cut with the second from the largest Pierced Circle die.  Next cut a white piece of card stock using the largest Stitched Scallop die.  Last cut a strip of dotted DP 4 x 1 1/4
4.  Glue the 4 x 1 1/4 inch dotted DP to the lower half of the front of the flowered DP.  Add the twine to the middle of the strip as shown.  Then glue the panel to the front of the A2 white card base
5.  On the inside Glue the dotted piece of 4 x 5 1/4 DP.  Next glue down the scalloped circle lining it up with the front circle

6.  Create the clouds with a sencil and some blue ink.  Using the Spring Grass die cut a strip of grass.  Cut a small piece of the grass off and then glue it to the scalloped circle making sure you card see it when the card is closed.  Cut a sun using the The Rooster and Chick die then glue it as shown.  Add the pots with the bunnies.  Using the die Hugs cut it out of white 3 times.  Glue them together and pop dot to the front of the card. To complete the card and add the twine bow

CottageCutz Products


Thanks so much for stopping by today!  I hope this new season brings you much joy!  

Blessings and Take Care

Pam


Wednesday, March 24, 2021

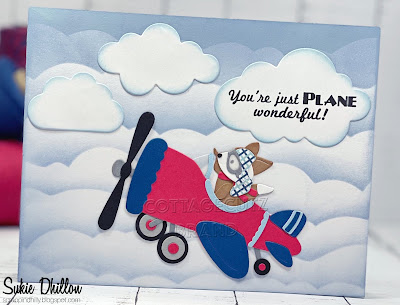
You're Just Plane Wonderful!

Hello!  This is Sukie and I have an all occasion card to share today. I used a die set from the new Springtime die release for my card.  The new dies are definitely perfect for those all occasion cards.

I used basic card stock to cut out the Fox in Airplane and the Clouds & Sun.  A bit of ink was used around the edges of the clouds for some dimension.
The background for my card was created with a cloud stencil and some Oxide Ink.  I spritzed the clouds with some water for a softer appearance.
Once my cloudy background dried, I adhered the airplane as the focal point of my card.
Next, I adhered the two smaller clouds amongst the cloudy sky leaving enough space for the larger cloud.
I stamped a sentiment on the largest cloud and affixed it in the empty space above the airplane.
This card will be fun for several occasions including a birthday celebration or congratulatory event.
Here are the die sets used on my card, available in the store:

Tuesday, March 23, 2021

Potted Bunnies

Happy Tuesday!  It's Jeanne today with a fun spring card using the Bunnies in Pots die from the new Spring release along with a few older dies that you may already own.  I love coordinating old dies with new ones.  It opens up so many possibilities.

The new Spring release is on sale for a limited time and features some adorable images including bunnies, gnomes, flowers and more!

This card was fun to put together and allowed me to use up some of my scraps!  Always a good thing.  I decided on terracotta pots and a wood sign.  Then I just picked various warm colors for the flowers and sentiment.  I thought this sentiment from Garden Phrases went perfectly with the scene.  

I cut lots of lowers and an extra pot.  I wanted to make it look as if the bunnies had upended the flowers from the pots.  The cloudy sky is stenciled using Distress Oxide Tumbled Glass ink. I used the Spring Grass border die, partially cut to get the varying height rows of grass.  Using a sponge dauber and DO Vintage Photo, I edged the sign and bunnies to give them some shading.  I also edged the grass in Garden Green dye ink.


Dies used:


I hope you've enjoyed my card today.  Have a great week!


Sunday, March 21, 2021

Happy Easter

Hi!

It's Anja here. I have an Easter card for you today. I used this cute bunny gnome dies for today's card. 

For this project I used:

- Cottage Cutz dies (Bunny Gnome 1, Bunny Gnome 2, Bunny Gnome 3),

- Distress inks,

- white card base (15x15 cm),

- white card stock for die cuts,

- black pen,

- plastic stencil (clouds),

- paper glue. 


First I cut and colored the gnomes.

Next I wrote the sign. 

Then I did the grass. I colored directly on the card base. 

After that I added the cloudy sky.


Last I arranged all the pieces on the card base and adhered it with the glue. And my card was done. 


And that's all from me for today. Have a nice Sunday and see you again next week. 

Anja Z. 


Cottage Cutz dies I used for this card: 


Saturday, March 20, 2021

Some Bunny Loves You

Hello Scrapping Cottage friends! Thanks for taking the time to stop and visit with us today. It's Mary Marsh here bringing you the Saturday edition of the Blog.

We have a brand new release of dies in the online store. It's our Spring Release with 22 new designs. Everything you need to create Spring, Easter, Birthday, Mother's Day, Father's Day, Thinking of you cards and so much more.

The Design Team has been showing samples using these new dies. So if you haven't seen them check back on the blog for lots of great ideas. The dies are currently on sale at 25% off so check all the new designs in the online store for some great selections. The Safari & Circus releases are still available at 25% off as well.

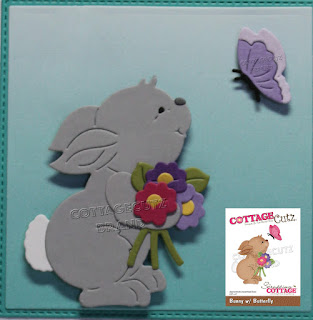
Now onto my card for today. I am featuring the new Bunny w/Butterfly die and created an Easter card for the two little ones that live next door to me. So let's get started with some details on how I created my card. 

Design Steps:
 I started my card this week with my layout. I found this sketch #845 over on Splitcoaststampers and decided to use it. The layers would allow me to use designer paper to create a festive Spring card. 
I looked through my designer papers and decided on these two coordinating patterns. I used the largest Stitched Square die for layer #2 and the largest Square die for layer # 3. For the background layer #1 I found this piece of light card patterned paper. I cut it to 4 1/4" x 5 1/2" and secured it to a white card base. 
For layer # 4, I used the 3rd largest stitched rectangle die. The width was fine but the height needed to be re-sized to 1 3/4".  I forgot to take a photo during the cutting process of the designer paper. So I repeated the process for you to see with cardstock. I cut the shape first 
and then measured at the 1 3/4" mark 
and placed it back in the die and ran it through my BigShot.
Here is the finished size. 
For layer #5 I used this piece of light purple cardstock and resized it to 3/4" x 3 1/2"using the same method.  I stamped my sentiment in a grape ink on this panel using my Stamp-a-ma-jig to get the placement.  
Next, I cut the bunny and butterfly images. I used colors that complimented my designer paper.
Now that all the card elements are prepared I am ready to start assembly. I secured the gray patterned paper to the card base first with double sided tape. Next, I attached layers 2, 3 and 4 secured to the card base. 
Added the sentiment strip with double sided tape.
I attached the bunny image using dimensional adhesive. I scattered a few enamel dots to finish off this card. 
I hope I have given you an idea with the image + the sketch for this new die.  See you next Saturday!

dies I used to create card: