Sunday, October 06, 2013

Dear Santa....

Hello again!
It's Simona with you today.


Isn't this teddy bear from the 


Here is how I used the teddy bear on the card. I cut all the dies
once out of white cardstock and colored all the pieces with
Distress Inks - Walnut Stain, Vintage Photo, Tea Dye, Antique Linen,
Barn Door, Fired brick, Peeled Paint, Pine Needles and
Black Soot. To stamp the snowflakes for the background and
on the inside of the card, I used Weathered Wood.
I only stamped snowflakes at the top of the background and 
at the sides. Then I placed the paper into the brick embossing
folder and dry embossed it only there, where I didn't stamp
the snowflakes. Once I did that I used Weathered Wood 
Distress Ink and just lightly brushed it across the embossed area.


The sentiment "Dear Santa" is also from the 
Homemade Christmas Gift Set. I used the hot embossing
technique with a fine gold embossing powder.


And here is a closer look at the teddy bear, 
dreaming about Santa... :). 


Thank you for stopping by today!
Hope you all have a great Sunday!

Hugs,
Simona

The dies used:


Saturday, October 05, 2013

Happy Holidays Set

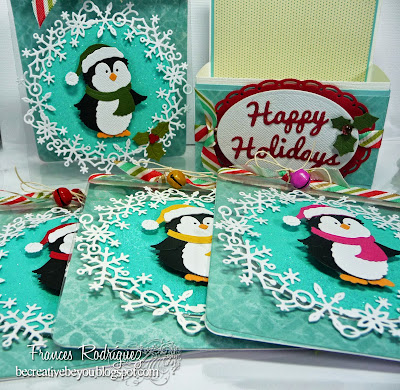
Hello, Everyone! Here's a lovely Christmas Card Set
featuring some great CottageCutz dies!
Take a look:

 For this set I used  the CottageCutz Jolly Penguin, 
also the sentiment is from the 


another view:


a look at the inside:


These are the dies that I used:


Thank you for looking and have a lovely day!
Hugs to all,

Thursday, October 03, 2013

Winterland Village card

Hello Everyone from Olena

Today, I am sharing a Beautiful 3D Dimentions Winterland Village card 
I created with Beautiful NEW Winter CottageCutz Collections 2013.


For this card I used NEW "Winterland Village" die.


 First, I created a background, using snowflakes and tree stamp images. Then, I cut Winterland Village" out 2 times. Decorated Village with glitter and flocking powder 
(You can see these on picture).


 I, also, decorated windows and doors using craft card stock. 
Just glued under windows and doors spaces small pieces of papers (yellow and brown).


 After this, I glued first image on background of card. The second image I glued using foam squares on first image.  Decorated card with pearls.

For this project I used:


Wednesday, October 02, 2013

Dear Santa


Happy Wednesday everyone!

Kathy with you and today I have a card using the Homemade Christmas Gift Set and Elegant Flurry Snowflake Die.  This time I'm using the deer die cut from the gift set for my main image...so cute!


Also from the set, I included one of the bows and "Dear Santa" die cuts using red cardstock and one of the setiment stamps. On the top left corner, is a little piece of the Elegant Flurry Snowflake Die from the Winter Wonderland Release cut with white cardstock...what a stunning die this is!

Here's a little close up of the deer scene for you.


To make my card, I cut the deer die with white, green, grey, kraft, and red using little pieces/scraps. The deer and wood post are made with kraft cardstock and shaded with Jumbo Java Ink. I added the hooves with black cardstock and used a black marker for the eyes and spots. The mailbox is grey cardstock shaded with black ink and a red flag. The wreath is green and red cardstock dotted with a white gel pen. The letter and snow are white cardstock shaded with Iced Blue Ink and a red stamp for the letter.

This cute little scene is popped on a blue Christmas designer paper piece that is stamped with the sentiment using black ink. I glue this piece on a white mat embossed with a snowflake folder and popped it all on a red cardbase. To finish the card, I added a bow and "Dear Santa" die cut both in red.

Here are the dies I used for this.


Monday, September 30, 2013

CottageCutz Jolly Penguin Tag


Hello everyone, Cheryl here with a CottageCutz Jolly Penguin Christmas Tree Tag, using the Tree & Stamp from the CottageCutz Homemade Christmas Gift Set Box, and then the Penguin from the "Christmas Cheer" Release found HERE!


The CottageCutz Jolly Penguin was cut using all white card stock, then colored with copics. Next I used some Flower Soft in Polar white for his Santa Cap.

The Christmas Tree tag is from the Homemade Christmas Gift set Box and  was cut out using green scrap piece of card stock, then I distressed the edges, and used the To: and From: stamp also from the Homemade Christmas Gift Set Box . I then added some twine, and a gingham bow to the top.

CottageCutz photo's below are LINKED to the Scrapping Cottage Store for easy findings :)
Just CLICK on the photo below


 I left the string long enough to tie to a present for Christmas! Love how EASY this was to make! Perfect too for all your gifts!!!

Thank you for looking and have a lovely day!
Hugs to all,
Cheryl

Sunday, September 29, 2013

Winterland Village Tag Holder Box

 Hello everyone and welcome to my CottageCutz Design Team project.  It is Carol here today and I have  a four matchbox drawer tag holder.  For the focal point, I used the Winterland Village Die, for the bottom lace, Fancy Lace Border, and for the accent under the pointsettia, Crystal Flurry Snowflake.
 The Winterland Village was distressed with Tea Dye Distress ink and then glitter with a pretty shiny glitter.
 The poinsettia are from the Michael's Dollar bin from last year.  I put a little extra stickles on them.  The Pearl bling is from Want2Scrap.
 This measures 9-3/4" x 3-1/2 inches.  For the top and bottom use some light chipboard such as cereal boxes to give a bit of strength to your project.  Be sure to cover both the bottom of the top cover and the bottom of the project.   This box was inspired from a pin from this site.
 The drawers are filled with tags from the Homemade Christmas Giftset.  Here are the Gingerbread, distressed with Tea Dye Distress Ink and holding a little Recollection HoHoHo sign.  Aren't they cute!
 In this drawer there is a set of mittens with a little Holly accent.  The mittens were cut with red cardstock and then little scraps were cut again to make the cuffs.
 In this drawer are the snowman.  They have been accented with little Recollection Snowflakes.  The hats were cut with scrap black cardstock and adhered.
In this drawer are the sweet Christmas Trees.  They have a little seam binding bow tied at the top.  In each drawer there is a set of 4 tags, but it could easily fit more.
  Don't you think this would make a fantastic gift to a special friend.  Fill it with these adorable tags and she will love you for taking care of her gift wrapping needs.   The tags are housed in such a pretty container that can be used over and over again.  Thanks so much for viewing my project.  I really appreciate it.  See you soon.
Here are the dies used: