Tuesday, October 24, 2023

Easy Snowman Die Cut DIY Card

Happy Tuesday crafty friends,
Today I am sharing a cute, quick and easy card you can easily recreate. It features a super cute snowman die cut from the new Cottage Cutz release. Here is my card.
It is a standard top folding A4 card. It is a very easy card that you can recreate and make several for the upcoming holiday season.
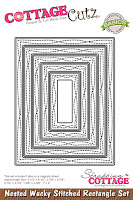
I started by cutting out some base dies and some corresponding mats from some patterned paper. The paper is from an Echo Park 6x6 paper pad. I used the Pierced Circle Die set and the double stitched rectangle die set for the die cut bases and then cut some mats from the patterned paper to fit. For the circle, I used the next size down in the die set. The base of the card is a white cardstock cut at 4.25 x 11 and folded at the 5.5 mark to make it a top folding card.


I then went to work on that super cute snowman. I cut him out in all white cardstock. My typical MO. I then colored him in with corresponding colors to the papers I chose. I love doing this method so I can come close to the colors and not have to have so many different paper colors. After coloring the snowman, I assembled him and added him on to the card top I then cut out the stay warm from one of the pieces of paper, You could just as easily  use a stamp or another die cut for a sentiment.

Here's a view of the card standing up and slightly angled. I think it turned out super cute and very clean.


Winter Snowman


Double-Stitched Rectangle Set


Pierced Circle Set

Well that about covers it for today. Be sure to keep stopping back by for some more creative inspiration and the holiday crafting season gets heated up! Also, stop back by this Wednesday as I showcase a super cute project I created for an Instagram Hop I will be participating in! You don't want to miss it!

YOU WILL WANT TO JOIN THE FUN!
You could win 1 of 2 great prizes!
1 $50 Prize from La-La Land Crafts
1- $50 Prize from Cottage Cutz!
Winners will be chosen over on Instagram.

I will also have a full post on my blog with deets on my project! I can't wait to share what I created!

Until then, have a wonderfully crafty day!
-Melinda

Sunday, October 22, 2023

Gingerbread Cottage Fun Fold

Hello CottageCutz friends! Thanks for taking the time to stop and visit with us today. It's Mary Marsh here bringing you the Sunday edition of the Blog. 

It's new release time!!! We have our Christmas 2023 release in the online store that has 40 designs. It's an old-fashioned Christmas theme. You can pick up the individual dies at 30% off for a limited time.

We also have a new Fall 2023 release in the online store with 15 designs. You can also pick up these individual dies at 30% off for a limited time.

Today for your viewing pleasure, I am featuring the new Gingerbread Cottage Die and created a center step fun fold.  So, let's get started on some details of how I created my card. I have another sample at the end of the post using this same die. 

Design Steps: 

I started my card this week using the colors from the Splitcoaststampers color challenge #970. We were to use real red, pool party, lemon lolly and old olive for the color combo.
real red, pool party, lemon lolly, old olive

I had this center step fun fold card in my stash. I bought these premade. They are an A2 size card and fold flat for mailing. Here is a link to a tutorial that gives exact measurements on how to cut your cardstock. 
This premade base is ivory, and I wanted it to be the pool party shade. So, I cut cardstock and pool party designer paper to cover the ivory completely. I wanted to tone down the designer paper a bit, so I added a layer of vellum paper to each panel. 

Pool Party Cardstock Center: 3 1/4" x 4 1/2"
Designer Paper Layer: 3 1/8" x 4 1/4"
Side Panel Pool Party Layer: 1 1/8" x 4 1/2"
Designer Paper Layer: 1" x 4 1/8"
Next, I cut the Gingerbread Cottage in the challenge colors plus a few allowed neutrals. It's such a cute die. I love it as a Christmas card. 
Now I am ready to start my card assembly. I first attached the cardstock and designer panels to the center step card. 
I wanted a bold Christmas sentiment and decided to use the Merry Christmas w/Shadow phrase (Christmas 2021). I cut it in red cardstock 2x and added it to a white glitter cardstock panel. Looks like this is retired but here is another phrase that would work as well. Merry Christmas Phrase w/Tree (Christmas 2022)
To finish off my card, I attached the gingerbread cottage to the center panel with dimensional adhesive. I cut the pine trees that are part of this die in the old olive shade. 
That's it for me for this week. See you again next Saturday. 

Reminder: Marla has a new video and a giveaway on the CottageCutz YouTube channel. Click here.

Here is the other card I made using these same colors. It's an A2 card as well. 


Friday, October 20, 2023

Vintage Holiday Lantern

Welcome friends!

Thanks for dropping in today ☺  Kris here to share some Friday inspiration with you!


Today's card features the new Vintage Holiday Lantern from the CHRISTMAS 2023 RELEASE!

DESIGN STEPS:

I die cut the Vintage Holiday Lantern from white and gold foil cardstock, then I colored up the white ones with Copic markers and distress inks.


I used patterned papers from the Cozy Winter pad (P13).  I cut and die cut my layers and stacked them from bottom up as follows:

White card base = 6" square top folding
Green patterned paper = 6" square
Gold foil cardstock = 5-13/16" square
White pinecone paper = 5-11/16" square
Green patterned paper = die cut largest Nested Wacky Stitched Rectangle 
Gold Foil cardstock = 3-1/16" x 4-1/16" 
White star patterned paper = die cut 2nd largest Nested Wacky Stitched Rectangle


I attached the layers as shown below, then I popped the lantern on foam dots.


I then stuck the greenery around the top of lantern and glued in place.  

As a last finishing touch, I decided to die cut the pinecones from the Holiday Deer die, colored them with markers and added to the left corner.  Then I popped on a gold hot foiled sentiment.


I hope you've come away with something that inspired you today to get crafty with your favorite CottageCutz dies! 

Ink Something Crafty 
~Kristine

Thursday, October 19, 2023

Hot Cocoa Christmas Themed Box Idea

Happy Thursday Crafty friends,
I hope your day is going well so far. I normally post on Tuesdays, however I had to trade days with one of my teammates. So today I am sharing a fun hot cocoa container I created. I used some of the cute new Christmas Cottage Cutz dies. Here is what I created.
I created this cute little hot cocoa gift box giftable box.

I measured a hot cocoa envelope and then created my box from there. I messed up a few pieces of paper before I got it down. Here is what my measurements and template look like.
This is the piece when it has been cut and scored.


Here is what it looks like when it has been folded.

Here is a pic of the side view.

One I figured out my little box, I added some mats. I then cut out some of the double stitched mats and deed some mats to those as well.

I then went to work cutting out the sweet little mouse with candy cane die and the kitty christmas tree die. I cut them out with white cardstock and then colored them in. I then assembled them and then added them to the front and back of my cocoa box.
I also cut out a square double stitched mat and then added a mat with. Button and bow. The weight of this keeps the flap closed.
I added a rectangle mat and then wrote the to and from and tucked it partially under the tree.

Here is one last look at both the front and back of the little cocoa box.

Dies I Used


Well, I think that about covers it for today. Be sure to stop back by and check out all the amazing projects the designers create! Until the next time,
Have a wonderfully crafy day!
-Melinda

Tuesday, October 17, 2023

Gingerbread Man Peeker

Hello Friends 

Our new Christmas Release is available at a wonderful 30% off.  Make sure to stop by the online store and check out all the fantastic new designs!

Today, I am using the Ginger Pocket Peeker.  This little gingerbread man is just adorable in his Santa Claus hat!

I am following along with this weeks Color Challenge over at SplitcoastStamper:  The colors are Real Red,  Pool Party, Old Olive and Lemon Lolly.  (I also used navy which is considered a neutral)

Design Steps:

1.  Using the Ginger Pocket Peeker cut out the following colors of card stock: Navy, Pool Party, Real Red, Tan, White and Old Olive.  Use coordinating inks to shade the pieces and then assemble with a fine tip glue
2.  The base is a white A2 size with the following: 4 1/8 x 5 3/8 red, 4 x 5 1/2 red polka dot, 2 Lemon checked columns 3 x 1 and layered on red, second to the largest Stitched Scallop circle in white, and red scalloped retangle measuring 1 3/4 x 5 1/2
3.  Glue the red polka dot paper to the solid red card stock.  Glue the scalloped rectangle to the center of the card.  Next glue the yellow columns about 1/2 inch from each side centered on the card  
4.  Add the scalloped circle to the center of the columns as shown above.  Place dimension squares to the back of the seeker.  And then pop him to the center of the circle
5.  Add glitter snowflakes and your sentiment and your card is complete


We have more inspiration on our YouTube Channel check it out HERE

Thanks so much for stopping by!  And I will see you next Thursday.

Blessings and Take Care