Saturday, January 07, 2023

Valentine Wishes From the Puppies

Hello CottageCutz friends! Thanks for taking the time to stop and visit with us today. It's Mary Marsh here bringing you the Sunday edition of the Blog.

Hope you all had a great Christmas and holiday week. Now it's time to settle in for the winter months. It's a perfect time for cardmaking, scrapbooking and other crafting pursuits. I am onto my Valentine cards. I send them out to family and friends. 

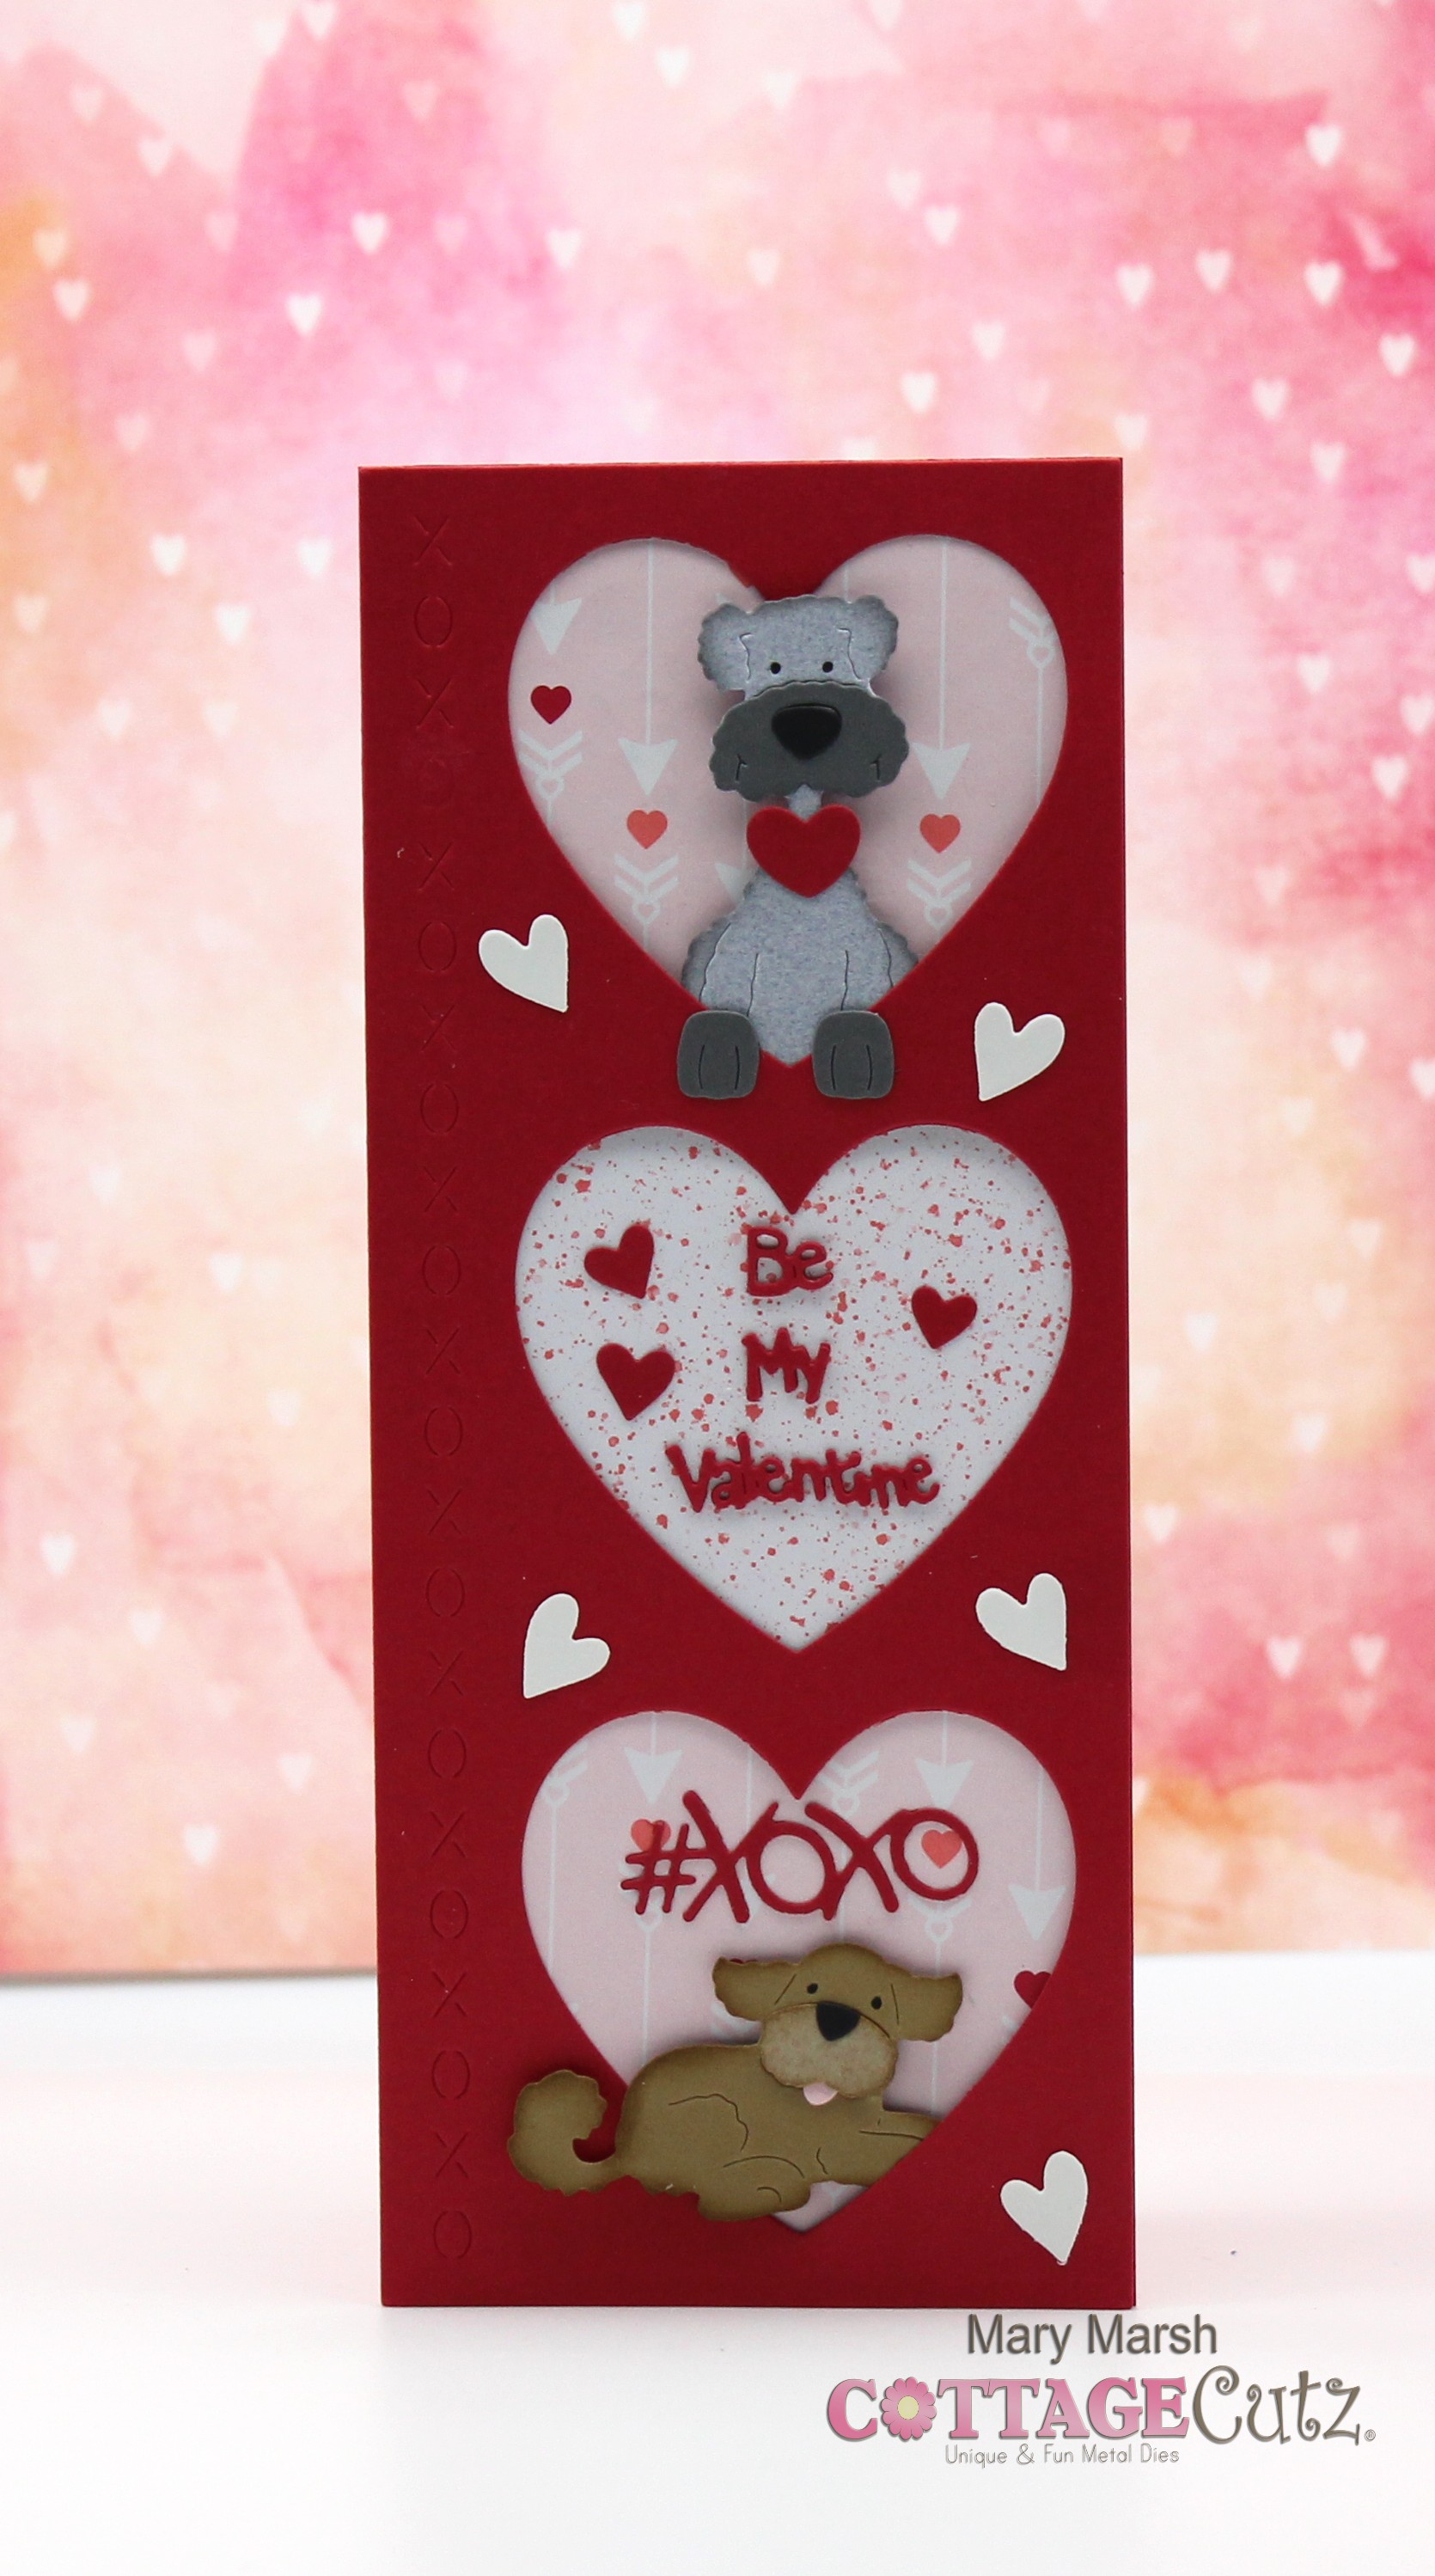
For your viewing pleasure today, I am featuring a slimline card using the Christmas Puppies and the Heart XO Windows Slimline dies. I like taking dies intended for one season and move them to a different holiday. It allows you to get more use out of your dies that way. 

card details: 

I started my card by using the Heart Xo die and cutting it in red cardstock. For the background for the hearts, I am using designer paper. I only had a small piece of the heart paper, so I decided to do something different with the middle heart window. I used another paper that I only had a small piece of, but it complements the other paper. 

The slimline panel is 3 1/2" x 8 1/2". I cut red cardstock in the same size for the card base. 
Next, I cut the puppy images I used different colors of cardstock. You could also cut them in white cardstock and use the medium of your choice to color them. 
I started some card assembly at this point. Attached the designer paper inside the hearts with double sided tape. For the puppy images I used dimensional adhesive to lift them off the background slightly. 
I wanted a phrase for the middle heart window. I thought about stamping something but then I decided to use the "be my Valentine" phrase from the 2019 Valentine Puppies die. For the bottom heart window, I used the XOXO from the Valentine Phrase & More die also from the 2019 release. 
Now I am ready to finish off the card. I attached the phrases with clear art glue. In the middle heart, I added some hearts cut from the Valentine Puppies die. On the top heart, I added the puppy paws. And then scattered some white hearts on the card front. I had those saved from another project. I am not sure which die they came from. 
Well, that's it for me for this week. I hope I have given you a way to use this Christmas die for another holiday. See you next Saturday! 

dies I used to create card:


Thursday, January 05, 2023

You Rock Valentine

Hello Scrapping Cottage Friends

It is Pam creating with you today!

I hope you all had a fantastic time ushering in the New Year!  We decided to stay home and just have a quiet celebration.

Believe it or not I have started my Valentine's Day cards!  I used the Fifties release to create the card.  This release can be used in so many different ways!  The dies I used are Fifties Phrases #1 and Guitar, Music Notes & Records


Design Steps:

1.  Using the Guitar, Music Notes & Records die cut out the following card stock colors: black, turquoise, silver, pink, white, brown and yellow.  (I cut 2 guitars and two sets of notes) Also using the Fifties Phrases #1 cut out three of the stars and You Rock in black twice (glue the two together)
2.  Assemble the pieces with a fine tip glue
3.  For the card base use a white slimline measuring 8 1/2 x 3 1/2 closed.  Cut a piece of heart DP 8 1/4 x 3 1/4.  Start your design on the DP by adhering the you rock and stamped Valentine in the center
4.  To the right of the center add the two guitars plus the notes and to the left add your records and some notes.  Glue down the stars around the sentiment as shown below.  Glue the heart panel to the white card base and you card is complete

CottageCutz Products


We have more inspiration on our YouTube Channel check it out HERE

Thanks so much for stopping by!  And I will see you next Thursday.

Blessings and Take Care


Wednesday, January 04, 2023

Let's Party


Hey Krafty Friends, Jen from Katahdin Krafts, back with another  CottageCutz YouTube video on the CottageCutz Channel For this weeks project I am featuring three dies from the "Classic Fifties" release, "Guitar, Music Notes & Records", "Classic Radio", and "Fifties Phrases #1."  


To really bring the "party" to this project I selected bright retro colors, and filled in most of the white spaces.  This helped make the card busy and super fun, just like any party should be!


I love how all the dies from this release pair perfectly together!

You can find all my layout instructions over on the YouTube Channel!

While over on the channel, make sure you like and comment for a chance to win the "Guitar, Music Notes & Records" die!

The winner of the "Snowy Village Buildings" die from my last video is Minnie Lewis, the details for collecting your giveaway prize are over on YouTube!  

Thanks for stopping in, and Happy New Year!!!


Tuesday, January 03, 2023

Slimline Birthday Puppies Card

Happy Tuesday Cottage Cutz Friends!
Melinda here with you, and today I am sharing a fun and cheerful slimline birthday card. Here's a look at my finished project. I used the sweet little Christmas Puppies Dies from this year's Christmas release.
My card is pretty straightforward. It is a side folding slimline card. I started with a white card base. I cut a piece of paper to 8 x 9. I folded it in half at the 4" mark along the 8" length. I then cut a piece of red cardstock paper at 3.75 x 7.75. After I added that to my card base, I cut out the slimline circle windows base out. I then cut out a piece of the cute dotted patterned paper from doodlebug. I used some foam tape to give the slimline circle window base some lift. I then went to work cutting out the cute little puppies from some plain white cardstock. I then colored them with my markers.

Here's a closeup of the Happy title and the cute puppies in the first - top circle. The Happy title comes from the Fifties Phrase 1 die. I cut those pieces out in plain white and then used my markers to color the backgrounds.


Here is another closeup showing the cute puppy on the second window. I colored him with my markers and then put the paws along the rim.

In this final closeup, I have two more of the cute puppies. I colored them with my markers along with the Birthday sentiment. As for the hearts, I cut out the Whimsical Hearts Slimline die. You get a TON of hearts as part of the negative spaces. I love using them. I colored them with my same markers.

Dies I Used


Today's the last day for the fabulous New Year Sale! So head over and do some shopping and grab some terrific dies at a super price!


Well that about covers it for today! Until the next time, have a wonderfully craft-die day!
Melinda Beltran

Monday, January 02, 2023

Sweet Hearts Slimline Shaker

Happy New Year crafters!

Kris here sharing with you today.  I have a feeling we're in for a very long cold winter here, so I decided to make a cute Snowman Slimline Shaker card for Valentine's Day using the Snowmen Friends and the Cookies & Cocoa dies from the Christmas Release #2.  I've also used the Whimsical Hearts Slimline die - I thought with many open spaces it would be perfect for a shaker card!  (See product list at end for a full list with links.)


- CUTTING -

Dark Teal Cardstock
•  8" x 9" and score the 8" side in half for a top folding horizontal base.
• Whimsical Hearts Slimline (try to keep the hearts in place after they're cut)

Pixie Pink Cardstock
Whimsical Hearts Slimline (punch out all hearts)
 
Patterned paper (teal with white grid)
• 3-3/8" x 8-3/8" (for background behind the sequins)

Acetate/Window Sheet
• 8-3/8" x 8-3/8"

Light Teal Cardstock
• Stitched Hearts (2nd largest centered in middle of largest die to make a frame)

Dark Pink Cardstock
• Stitched Hearts (largest die)

White Cardstock

Black Cardstock

- ASSEMBLY -

1.  Teal Whimsical Hearts Slimline piece - punch out all the large and medium hearts, but try to keep all the tiny & small hearts in place.

    - Turn piece onto backside and place a small dot of glue onto each tiny & small heart.
    - Place acetate onto back of teal piece and press down where glued hearts are.
    - Turn piece over and carefully lift off the Teal background, leaving the tiny/small hearts

2.  Pixie Pink Whimsical Hearts Slimline piece - add glue to the backside and place carefully onto front of acetate, lining up the teal hearts.

    - Glue in any remaining tiny/small hearts that may not have stuck or that fell out after die-cutting so that all the tiny/small hearts are filled in and all the medium/large hearts are empty.

3.  Turn Pink piece onto backside and add 1/8" foam strips all along the 4 edges, getting very close to the edge, but not past it.  

    - Remove backing from foam strips.
    - Add shaker elements (ie. sequins, glitter, beads, etc)

4.  With your patterned paper piece turned upside-down, carefully fit it onto the top of foam strips, lining up the edges.

5.  Add tape or glue to back of shaker and center it onto card front.

6.  Add dimensional tape or foam strips to back of Light Teal heart frame and adhere to Dark Pink heart.

7.  Color Cocoa mug, and 2 of the Snowmen and pop them onto heart with foam tape.

8.  Glue the white "Sweet" onto it's black shadow and adhere to the top left of large heart. 

    - Adhere hearts to middle of shaker.


I hope this project inspire you to get crafty in 2023 with your favorite CottageCutz dies!

~ Kristine

PRODUCTS USED:


Sunday, January 01, 2023

Happy New Year

Hello CottageCutz friends! Thanks for taking the time to stop and visit with us today. It's Mary Marsh here bringing you the Sunday edition of the Blog.

Hope you all had a great Christmas and holiday week. Now it's time to settle in for the winter months. It's a perfect time for cardmaking and other crafting pursuits.  To help you out we are having an after Christmas sale over in the online store. The savings are up to 80% off.  
Today for your viewing pleasure, I am featuring a slimline New Year's card. I typically send out a few to friends I may have missed with a Christmas card. I used the Polar Bear Trio & Igloo die and the Stitched Numbers dies. This one is retired but it's still available at 76% off right now. 

Card Details:  

I started my card with the designer paper selection. I have this collection of slimline card fronts and I picked this scene. I thought it had a celebratory look to it. Sort of like fireworks going off in the sky. My interpretation anyway (lol)!!! I added it over a white card base.

White card base: 3 3/4" x 8 3/4"
Designer Paper: 3 3/4" x 8 3/4"
Next, I cut the polar bears in white cardstock and used different colors of complementary cardstocks for their hats. The bears with their hand lifted looked as though they were sending happy new year greetings. 
The "2023" stitched phrase is cut in white cardstock.
Now that all my elements are prepared, I am ready to start card assembly. I attached the designer paper to the card base using double sided tape. 
The bears were attached with dimensional adhesive. 
To finish off my card, I added the stitched 2023 phrase. The numbers were attached with clear drying glue. 
That's my card for this week. See you again on Saturday!

dies I used to create card: