Tuesday, March 21, 2023

Empty Tomb (new die)


Hello Scrapping Cottage friends! Thanks for taking the time to stop and visit with us today. It's Mary Marsh here bringing you the Tuesday edition of the Blog.

We have a brand-new Easter release with 17 new designs available in the online store. There is something for every card maker with faith based dies, beautiful floral images, whimsical with bunnies and frogs and several lovely birds and butterflies. 

You will be able to take the images beyond the Easter or Spring season. And for a limited time you can get bundle pricing on the entire release at 65% off or individual dies at 30% off.

Today for your viewing pleasure I am using the new He is Risen w/Empty Tomb die. 

I started my card using the colors from the Splitcoaststampers color challenge #940. We are to use soft succulent, soft suede and mango melody for our color trio. Neutral shades are allowed in the challenge. 
soft succulent, soft suede, mango melody


I decided to try and create an Easter card with these colorsI thought I could create an outdoor scene with limited colors and use the Empty Tomb die. 

Soft suede card base: 5 1/2" x 4 1/4"
White image panel: 5 3/8" x 4 1/8"

I started by stenciling sun rays with wild honey distress ink. I cut the stone tomb in gray cardstock and sponged with lost shadow distress ink. The greenery around the tomb is cut in soft succulent and then sponged with the same color ink for a darker shade. 

Scripture states that an angel announced that Jesus had risen so I used the Nativity Camel, Palm Tree and Angel die for my angel image. I stamped my sentiment with the idea that the angel is speaking the words. Added a few rhinestones to complete my card. 

See you Saturday with another sample from the new release.

dies I used to create card:


Monday, March 20, 2023

Hexagon Pop Up Easter Card


Welcome CottageCutz peeps!

Kris here with some Monday inspiration for you.  My card today is an easy Hexagon Pop Up card featuring some cute Easter dies and more!  This style of card was a li'l harder to photograph, but it's pretty cute when displayed and squishes flat-ish to fit into an envelope.  

I will share my design steps below, but if it's easier to watch a video, you can watch Sam's here.


I used heavy 100 lb cardstock for my springy mechanism that makes it pop out to its hexagon shape, and if you do not burnish the folds, it pops out even more!  However, this also causes the front panel to lean backwards more.  If I had used a lighter weight like an 80 lb. it might stand up more, but then the hexagon would be more wide than deep.  You'll get that idea once you make one.


I've listed & linked all products at end of post.

DESIGN STEPS:

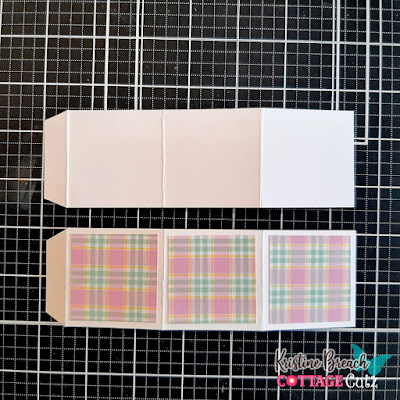
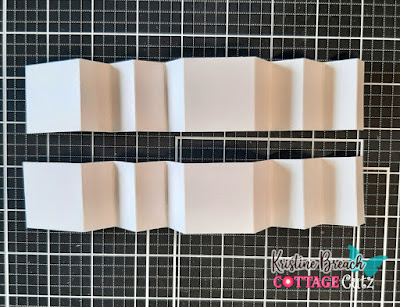
1)   I began with the base of my card that forms the hexagon shape by cutting (2) strips of 2" x 6-1/2" white cardstock and scored at 2", 4", and 6". Mitered the corners of the li'l 1/2" tab on the end. Then I added (3) 1-3/4" squares of patterned paper onto just one of the strips as shown.


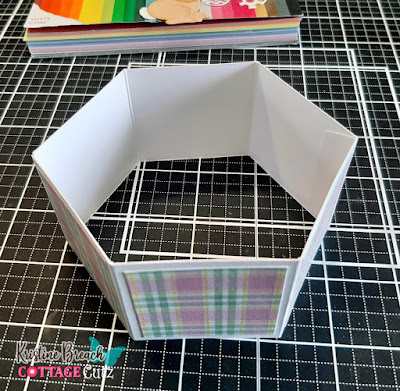
2)  I added glue to both 1/2" tabs and glued one tab to a non-tabbed end of the other piece to form a hexagon as pictured.


3) I cut a piece of white cardstock to 2" x 8" and scored at 2", 4", and 6" - fold and burnish score lines. I don't have a photo of this, but add glue to the 2 end sections (the first 2" and then between 6-8") and with it folded in half, insert into base so that it's attached to the center panel of the FRONT of hexagon base and to the center BACK of hexagon base.

4)  Next, I cut the pieces for the springy mechanism.  Cut (2) strips of 1-1/2" x 9-1/2" and score both strips at 1/2", 1-1/4", 2", 2-3/4", 3-1/2", 5" 5-3/4", 6-1/2", 7-1/4", 8" - Accordion fold as pictured below, but DO NOT BURNISH the folds as it won't pop out as much if you do.  


5)  I glued the small tabs to the opposite end of each strip to make this shape...


6)  Then glue the two together.


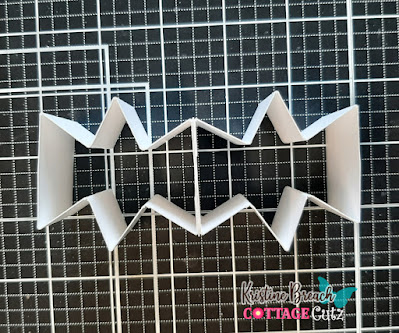
7)  Add glue to each of the square ends and insert into the base of the hexagon piece.

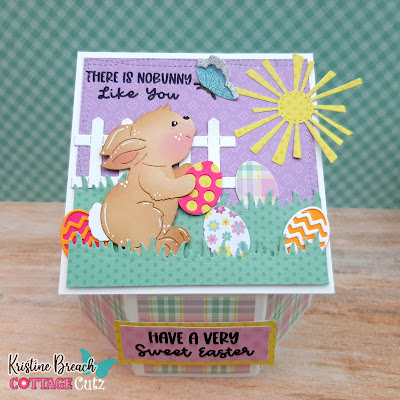
8)  I cut my pieces for my main image panel....
--- 4" square from white cardstock.
--- purple patterned paper using the 2nd largest Nested Wacky Stitched Rectangles
--- 2 pieces of green patterned paper using the Grass Slimline die in varying heights
--- die cut the Bunny w/ Butterfly, Spring Bowl w/ Eggs (just eggs), Fence and Grass (just fence) and Stitched Sun, Clouds & Umbrella (just sun)


9)  I glued my purple layer to white square, then the tallest green grass, leaving the very top unattached. Then I glued and tucked the fence and an egg behind that grass.

10)  I popped up the shorter grass with foam strip and glued in the rest of the eggs.  I popped up bunny with foam tape.  I stamped my sentiment in top left corner, then glued my butterfly and sun.


11)  I added glue to the front white mechanism piece sticking up (from the hexagon base) and attached my bunny piece.  I then stamped a 2nd sentiment and attached it to the center of card base.


Here's how it looks from the side...


There's room on the back to write your message. 
 Or you can choose to add patterned paper ☺


Thank you for taking a peek!  

I hope you get crafty with your favorite CottageCutz dies!


PRODUCTS I USED:


And be sure to check out the beautiful 
NEW EASTER RELEASE 
as it's all on SALE!!


Sunday, March 19, 2023

Thanks Accordion Fold Card

Hello Cottage Cutz Friends!
Melinda here with you, on this wonderful day! For today's project, I am sharing a simple and pretty card I created with dies from the amazing Flowers & More release from Cottage Cutz!

Here's a look at my card. It is an accordion top fold card. The base of the card is 4.25 x 11.
I scored it at 5.5 inch. I then scored it at 2.75" and did a mountain fold. I then added some mats to the two halves on the inside or with the base open. I then also put a patterned paper mat on the right side as well. Each mat was a quarter inch smaller than the base dimensions. 2 at 2.5 x 4 and one at 4 x 5.25.

Here is a shot of what the base will look like when folded.


Here is another view with the card slightly open. I did add a rectangle double-stitched mat with a couple of mats. I then also used the Thanks die and cut the sentiment out. I colored the sentiment with a blue marker to match the patterned paper.

Here is another view of the card opened up to show the inside. I added a white rectangle stitched scallop mat so I could write a sentiment.


Here is a closer look at the beautiful flower die cut. I colored them and then put them on a patterned paper mat that went onto the double stitched circle mat. I put adhesive on only half of the mat so that it could open. I did also add some sequins to dress it up a little. I also added some perfect pearls to the centers of the large flowers.

Flowers & More Collection!
Here's a look at the entire collection of dies in this fabulous release.


Dies I Used


Don't forget to head over to the Cottage Cutz You-Tube Channel where you can see some of our amazing design team members create some beautiful projects!

PLUS Check OUT  The new release from Cottage Cutz!
On sale for a limited time! Go grab it today at this fantastic price!!!


Well that about covers it for today! May you have a wonderful day! Until the next time, have a wonderfully craft-die day!
Melinda Beltran

Saturday, March 18, 2023

Cross with Spring Lilies


Hello Scrapping Cottage friends! Thanks for taking the time to stop and visit with us today. It's Mary Marsh here bringing you the Saturday edition of the Blog.

Our Flowers & More release is still available in the online store at 30% off the individual dies. This release has what we are calling "simple cuts". Meaning not as many pieces to put together so they assemble quickly.

They are so perfect for the many card making occasions that we all have. Easter, Birthdays, Thank You, Sympathy, Mother's Day, Thinking of You or even a scrapbook layout just to name a few. 

Today for your viewing pleasure I am revisiting an older die -  Cross with Spring Lilies die (2019 release). This is a perfect die to reflect on why we celebrate Easter. It's retired but still available and on sale right now. Let's get started on some details of how I created this card.  

Step 1: I started my card this week with the layout. I am using a sketch that I had saved on one of my Pinterest boards. I thought it would work great to show off the cross and allow me also to use some background designer paper. This particular sketch gave all the dimensions for the layers so it made creating the card a bit easier.
I just had to select my card colors and I decided on shades of purples since purple is the color of royalty.
For the center panel I used a white dotted tulle and an olive satin ribbon. The olive picks up the stem of the lilies.  For the oval panel, I used the 3rd largest oval and stitched oval dies.
I cut my cross using 2 shades of purple cardstock. The lilies are cut in a paler shade of purple with olive for the stem. I thought that color would look better against the white background. 
Next, I stamped my sentiment in the heather shade of ink. It's the top layer of the cross color. Attached to the ovals with dimensional adhesive. 
Now that all the panels, card base and cross are cut, I am ready to start card assembly. I used double sided tape for all the panels. I secured the ribbons with glue dots.
To complete my card, I secured the oval image panel with dimensional adhesive and attached to the card base with double sided tape. 
Well, that's it for me for this week. See you next Saturday. 

Reminder: Our YouTube Channel has a new video from Jen Hartsgrove. There is a giveaway for being a subscriber, liking the video and leaving a comment. Click here.

dies I used to create card: