Saturday, November 06, 2021

Santa Gnome & Silly Reindeer

Hello CottageCutz friends! Thanks for taking the time to stop and visit with us today. It's Mary Marsh here bringing you the Saturday edition of the Blog.

IT'S NEW RELEASE TIME! The new Christmas dies are in the online store with 40 new designs from Christmas Part 1 and 19 new designs from Christmas Part 2 and they are on a limited time sale at 30% off.

I send a lot of Christmas cards and during the busy holiday season, I need to make a few cards that are more simplified in design and can be reproduced quickly. This allows me to spend time on more detailed designs.   

Today for your viewing pleasure, I have a CAS design featuring the whimsical Santa Gnome w/Silly Reindeer die from Christmas Part 2 and the Merry Christmas w/Snowflakes die from Christmas Part 1. So let's get started with some details on how I created this card. 

Design Steps:

I started my card this week by cutting the images. The packaging had the perfect Christmas colors so I went with those. 
Then I looked through my designer papers for a paper that had a snowy background scene. I found this one and thought it was just perfect. With the right designer paper I think you can make a more simple design but still have the wow effect. 
I didn't want to cut too much off this paper so I decided to go with a square card. 

Navy Blue card base: 5 3/4" x 5 3/4"
Designer paper Layer: 5 1/2" x 5 1/2"

I cut the Merry Christmas sentiment in navy blue cardstock.
 
Now that all my card elements are prepared, I am ready to start card assembly. I attached the designer paper to the card base with double sided tape. The images are attached with dimensional adhesive. Lifting them slightly off the background gives your card more depth.

To finish off the card, I added the sentiment using Art glitter glue. This one is my new fave and it dries clear. Well that's it for me for this week. See you next Saturday.
Reminder: The CottageCutz You Tube channel is up and running again. We have new videos every Wednesday. Plus there is a giveaway on the channel. Details on the channel. Check it out here.  

Die I used to create card


Friday, November 05, 2021

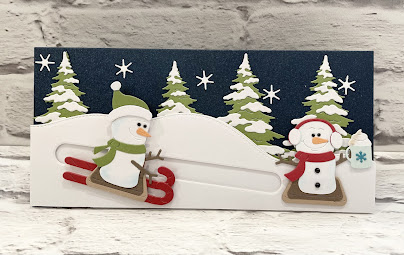
Christmas Smores Penny Slider


Happy Friday Cottagecutz fans. It’s Wendy bringing you the Friday blog. I hope you’ve had a wonderful week and have plans for Christmas crafting this weekend. 

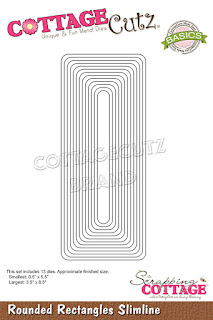
I really wanted to bring you something different today so I worked out that the smallest of the ‘Rounded Rectangles Slimline’ was great for crating a slider card. How fabulous is that!

So I have a full tutorial for you today to set you up for the weekend and helpfully inspire you to make some similar cards with the extensive Cottagecutz die range

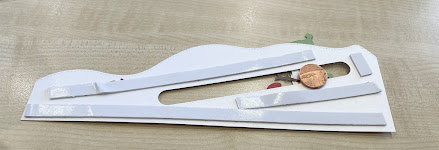
To begin with I cut a pice of white card using the ‘Hills Slimline’ die twice. I’ll explain the reason for shortly.

So I took the smallest die from the ‘Rounded Rectangles Slimline’ to create the path for my slider die. I made the hill quite steep so that I could add some other embellishments to the card.


Next I cut out both S’mores, snowy trees and assembled. I wanted to give the side facing S’more some heft so it would move through the track so I attached another piece if card behind it and then I doubled up the ski’s,


So we are ready to get the slider up and running. Place the S’more on your desk and add approx. 4mm foam pads. Place the front layer of the card over the S’more and then attach a 1 penny coin.


Add the same height foam (4mm) all way around the front piece of card and attach this to the other piece of card that we cut in the same size which I mentioned in the opening tutorial


So then I started to attach the trees to the card before sticking over the finished design above. I also added a few snowflakes from the ‘Slimline Snowflake Background’


I added the other S’more to the right hand side of the card. Your slider card is now complete. Skiing S’more looks like he’s coming down the hill for a hot cocoa :-)

I really hope that you like the card and have got some inspiration for your Christmas crafting

Have a wonderful weekend and don’t forget to find time to craft
Wendy


Reminder: The CottageCutz You Tube channel is up and running again. We have new videos every Wednesday. Plus there is a giveaway on the channel. Details on the channel. Check it out here.  

Dies I used


Thursday, November 04, 2021

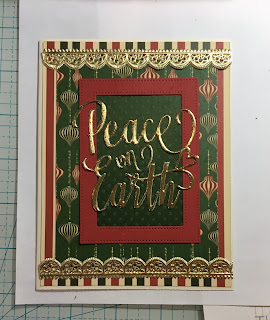
Peace on Earth

 Hello Friends,

It is Pam sharing with you on the blog today!

Guess What!! It is New Release Time!  The collection is Christmas Part 2!  There are are 19 new designs just as adorable as the Christmas Part 1 release.  For a limited time there is 30% off individual dies.  You can check all of these fantastic dies out right HERE!

I am showcasing two of the new release dies today.  The Peace on Earth with it's beautiful font and the Woodland Christmas Set specifically the gorgeous poinsettia.  I added a lot of gold for some extra Christmas bling!


Design Steps:

1.  Using the Woodland Christmas Set I cut the poinsettia out of striped DP, the leaves out of dark green and the centers out of gold.  Next I gave them some shape by using my stylus first on the back of the petals and then flipping them over and pressing down in the center of the flower.  For the leaves just run the stylus over the back of the leaves
2.  I used black ink on the edges of the flowers and leaves for a little depth.  Then used a glue dot or a strong glue to assemble the flowers

3.  Using the same gold card stock that you used for the center of the flowers cut out the Peace on Earth phrase

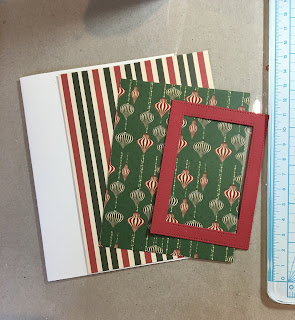
4.  For the card base use a cream colored card stock in an A2 size.  Cut a piece of Striped DP 4 x 5 1/4, a piece of ornament DP 3 1/2 x 4 1/2 and using the second to the largest Pierced Rectangle Frame die cut out a red frame.  Cut out a piece of dark green card stock 2 1/2 x 3 1/2 to place behind the frame
5.  Glue the striped paper to the card base, next glue the ornament DP to the center of the striped paper.  Glue the dark green card stock behind the red frame and then glue the frame to the card center.  Add the lacy foil trim to the top and bottom of the card as shown
6.  Next add the Peace on Earth phrase glued flat, the poinsettia and the leaves and your card is complete


Thanks you so much for stopping by today and as always I look forward to seeing you next Thursday to share more crafty ideas!

Our CottageCutz You Tube channel is up and running once again. We have new videos every Wednesday. There is also a giveaway on the channel for subscribing, commenting and liking the video. Check it our here.  

Take Care and Blessings
Pam
CottageCutz Products


Wednesday, November 03, 2021

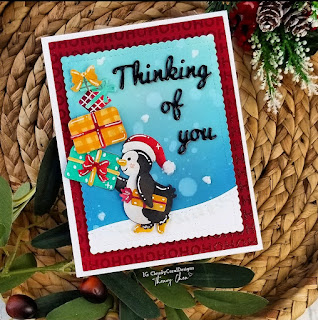
Thinking of You Christmas Card Featuring Penguin Decorating Tree

Hello friends! 

It's Theary Chea here on the blog sharing another fun video on the CottageCutz YouTube Channel

For this video, I am using Penguin Decorating Tree die, along with Santa’s Delivery die. 

The thought of a penguin decorating a tree is so adorable, but a penguin juggling presents on his way to his friend's house is even better! 

Don't you think so? 😊


If you would like to see how I created this card, please check out the video here


🎉🎉Congratulations!! 🎉🎉

The lucky winner for Santa's Delivery Giveaway is 
Christi McKain.
Please send an e-mail to MrMarsh917@Gmail.com.


Until next time, 
I hope you have a wonderfully blessed day!


Supplies Used:


Tuesday, November 02, 2021

Santa Gnome in Throne


Good Morning Cottagecutz fans. I hope you’ve had a wonderful weekend crafting. My usual weekend includes dog walks with my Border Terrier Betty and a whole lot of crafting 

Todays post is a light tutorial as I will be including a full tutorial on my Friday post

I’m including some of the designs from the new release where you can still get 30% off which is amazing. These dies have really inspired me to make some really different cards, not usually my style. Get your dies why the discount is still available.

Top tip from me today, If I know I’m going to repeat a card, tag etc. many times, I always buy more than one of the design. If you have an A4 cutting plate you can load several does at once.

So lets get on to todays project 

I started with a card when folded measured 6” square. The next layer was a piece of red card measuring 
5  3/4”square, followed by a silver piece of card measuring 5 1/2” square. Finally I took a piece of white card measuring 5 1/4” square and in the centre using the largest of the nested stitched circles I cut a hole. With all the other pieces of card stick I stuck them down with glue but the white piece of card I adhered using 1mm foam pads.

Next I cut out the Santa Gnome and the chair in the colours above. I used a small stitched oval coloured in blue to act as a rug and then adhered the design on the top with 1mm foam pads. I took the mug from the new Smores die and gave it to Santa. He needed a hot cup of cocoa after delivering all those presents. I used some brown chalk to look like the marshmallow is toasted

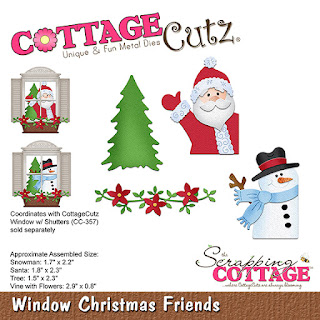
I thought it might be nice to adorn the card with some additional elements so I used the ‘Window Christmas Friends’. From this I took the Christmas tree, the vine and the poinsettia. What I liked about the vine is that you could bend it to fit around the tree and also for the top left hand corner of the card.

Finally I used the new ‘Merry Christmas W/Shadow’ sentiment. I think the red looks really powerful on the silver card. I used a diamanté above the ‘I’ in Christmas to give the card a little more bling. I attached the sentiment with 1mm foam pads

I really hope you like the card. I’ve tried to keep this simple and clean and a card that can be easily repeated for your crafty stash. Have a wonderful week and I really look forward to seeing you Friday with something a little different

Dies I’ve used for the card


Monday, November 01, 2021

Floral Christmas

Hi everyone.  Welcome back to the Scrapping Cottage blog today I am here sharing a Christmas card for a huge exchange I am in so I wanted to make sure it was very Christmas (if that makes sense).   I used "Christmas Farmhouse Floral" for my card today.


I used gold foil paper for the Floral jar that the flowers are held in.  I diecut it and then colored the band around the jar red to break up the color and give my jar additional pizzaz.


I then colored all the pieces with my copics and yes I am loving coloring my die pieces with my copics because you can give the pieces more depth by adding color.
To make my card front I used a piece of Christmas patterned paper and matted it against a piece of kraft colored paper to match the colors in the paper.
I then added all my diecut pieces and arranged the floral to finish off my card.
Here is an angled look and I really love the versatility of this set. 
What is so nice about this set is that it comes with so many elements this one die gives you endless possibilites so talk about a bang for your buck!  This die is definitely it!!

I hope everyone enjoyed my post and...

The CottageCutz YouTube channel is up and running. We are featuring videos every Wednesday. Drop by and subscribe so you don't miss one and give us a thumbs up on our videos.


Products Used: