Sunday, March 07, 2021

Taking A Rest

Hi!

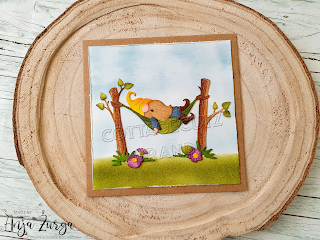
It's Anja here. I have a simple card for you today. I made a scene with a gnome taking a rest in a hammock. Can't wait for the warmer days to come and hook my hammock in the garden.

For this card I used:

- Cottage Cutz dies (Gnome Sleeping In Hammock),

- Distress Inks,

- craft card base (12,5x12,5 cm),

- white card stock for die cuts and background (11,5x11,5 cm),

- black pen,

- scissors,

- paper glue. 


First I cut and colored the gnome.

Next I did the background.

And for more interest I trimmed the edges of the paper. I used scissors for it.

And my quick and simple card was done.


Thank you for stopping by. Have a nice Sunday and see you again tomorrow for my Monday's post. 

Anja Z.


Cottage Cutz dies I used for this card:

Saturday, March 06, 2021

Overlapping Fun Fold with Bluebells

Hello Scrapping Cottage friends! Thanks for taking the time to stop and visit with us today. It's Mary Marsh here bringing you the Saturday edition of the Blog. 

We have a brand new release of dies in the online store. It's our Spring Release with 22 new designs. Everything you need to create Spring, Easter, Birthday, Mother's Day, Father's Day, Thinking of you cards and so much more.

The Design Team has been  showing samples using these new dies. So if you haven't seen them check back on the blog for lots of great ideas. The dies are currently on sale at 25% off so check all the new designs in the online store for some great selections. The Safari & Circus releases are still available at 25% off as well. 

Today for your viewing pleasure, I am featuring the new Bird w/Bluebells die. I created an Easter card with this sweet image and also a new to me fun fold technique. So let's get started with some details on how I created my card.

Design Steps:

I started my card this week with the layout. I found this cute fun fold technique on YouTube and thought I would give it a try. I will be showing photos and panel sizes but if you want to see a YouTube video from the stamper who created the idea-click here

Panel sizes: 
Lemon-Lime card base: 4 3/8" x 5 5/8"
Heather layer panel: 4 1/4" x 5 1/2"
White inside sentiment panel: 4" x 5 1/4"
Designer Strips: 3/4" x 4"
Left panel: 3 1/2" x 4"
Designer Paper: 3 1/4" x 3 1/4"
Right panel: 3" x 3 1/2"
Designer Paper: 2 3/4" x 2 3/4"

I cut my white sentiment panel and adhered the 3/4" strips of designer paper to the top and bottom of panel.
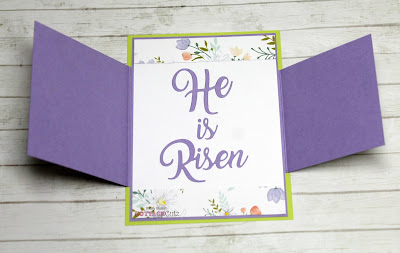
 I was thinking of stamping a Happy Easter Sentiment then decided on this phrase from the 2019 die - He is Risen Cross die.  I cut it in the highland cardstock that coordinates with the designer paper I used. 
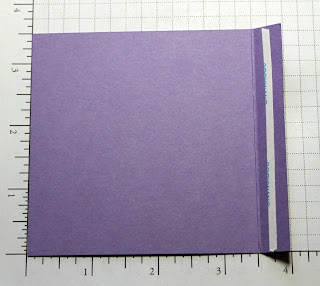
Next, I cut the side panels for my card. Sizes are above. The idea is to make the panels a square so you make the one side a 1/2" larger for the flap. I scored the left panel at 3 1/2" - it created my flap and now it's a square.   
I scored the right panel at 3"- again the score created my flap and also the square panel. 
The designer paper is attached with double sided tape, 
and for the flaps I used Scor-Tape. It's a stronger adhesive and I want to be sure the panels won't come off in the mail.
 
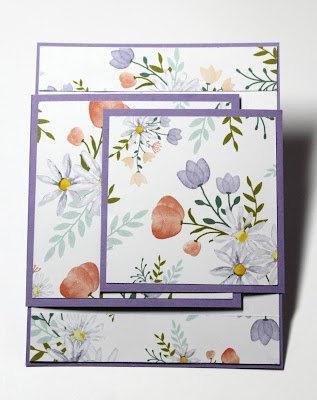
Now, I am ready to attach the side panels to the card base. The left side is attached first then the right side is centered and overlaps the left panel. 
Next, I cut my bird & flower images. I used cardstock that matched the designer paper. 
I was going too add the images directly on the cardstock but the background was just a bit too busy. So I cut a white square at 2 1/4". I didn't want to cover up all the designer paper on this panel because its to pretty. The images are attached with Ranger multi medium matte. I used dimensional adhesive on the little bird. The lemon-lime base panel was added to cover up the panel flaps on the rear of the card.  

Here is the card inside.

Well, that's it for me for this week. I hope I have given you an idea for a fun way to use this new die. See you next Saturday.

die I used to create card:


Friday, March 05, 2021

Welcome Spring!

Happy Friday!  Are you ready for the weekend?  I know I am; I think I was ready for the weekend on Tuesday!  I have a card using the Bunny with Butterfly die from the new Spring release.  This release features some adorable dies that are perfect to welcome in the sunnier days ahead.

 This card is very simple to create.  I started with a sketch from Splitcoaststampers.
 This always makes creating go a little faster.
 I cut a 5 1/2 x 4 1/4 inch panel for my card base from the bright green card stock, a 4 x 5 1/4 inch panel from a coordinating paper and a white panel using the third largest of the Stitched Rectangle Dies.

I glued the paper to the base panel and added a ribbon.  Tying that bow was the most difficult part of the card for me!  LOL!  (Confession - I'm not good at tying bows.)

I cut the bunny, flowers and butterfly from various colors of coordinating scraps using the Bunny with Butterfly die.  For the bunny I used a sponge dauber and Distress Oxide Vintage Photo to edge her a bit - just enough to give some depth.

I adhered her to the white rectangle and popped that up from the base using foam strips.

For my sentiment I used an older die - Hello Spring Bloom.  The purple that matched my ribbon seemed too dark and the white was a bit light and blended in too much with the background, so I decided to stack them.  I used two layers of the purple below the white.

That gave just enough "shadow" to make the sentiment visible but not overpowering.

I hope you have enjoyed my card today.  It was quick to put together (other than that bow!) and the bunny is adorable and so ready for spring.  Be sure to visit the online store where the new Spring release is on sale for a limited time!

Products used:


Thanks for visiting today.  I hope you have a fun and creative weekend!

Thursday, March 04, 2021

Gnomie Easter

 Hello Scrapping Cottage Friends

It is Pam creating with you on the blog today!

Our new release is called Spring Time!  There are 22 designs and it is everything from Bunnies to Gnomes!!  It is on sale right now in the store.  So head on over and check out this fantastic collection.  You will not be disappointed in fact you will want every single die!

Today,  I am featuring 3 of the Gnomes.  They are perfect for the ever so popular slimline cards!


Design Steps:

1.  Cut all of the pieces out using Bunny Gnome 1Bunny Gnome 2, & Bunny Gnome 3.  I used the following colors of card stock: green, pink, yellow, orange, teal, white, brown, gray, dark brown and purple
2.  Shade all of the pieces with a variety of ink colors that match the card stock.  Assemble the pieces using a fine tip glue
3. The base is a white slimline size card.  Use the Stitched Wide Square Frame second from the largest cut out 6 frames.  Glue 2 frames together for a little more stability 
4.  Use pop tape for the back of each frame except where the frames overlap
5.  Arrange the frames which ever way you would like and pop them to the base card
6.  Insert the little gnomes and your card it complete

CottageCutz Products


Thanks so much for stopping by today!  I am really having so much fun with this fabulous new release.  I hope you take the time to stop by the online store and check them out! 

Blessing and Take Care
Pam


Wednesday, March 03, 2021

Keep Calm and Make Tea!

Hello!  This is Sukie and today I have a whimsical card to share for my design team day. I created a fun tea party scene with the new Springtime die release!

The adorable critters are from the Spring Tea Party die set and were cut out of card stock and shaded with ink.  I also cut out the birch trees from white card stock.
I used a soft color palette for my background and ink blended the colors.  I fussy cut the hill for a bit of dimension.  The background was spritzed with water and splattered with a bit of paint. 
The birch trees were cut apart for better placement on my card.  I shaded the birch tree pieces with ink.  The sentiment was heat embossed in white.
Next, I adhered the birch trees on each side ensuring the tops were aligned with the top edge of my card and the bottoms were tucked into the hills.
The sweet fox with her tea cup was nestled into the hill with a partial tree branch behind her.
The raccoon was placed on the opposite side with another birch tree branch stretched above.
For a finishing accent on my card, the tea kettle was adhered next to the embossed sentiment.
Here are the die sets used on my card, available in the store: