Friday, December 06, 2019

A Beary Merry Christmas

Hello Scrapping Cottage friends! Thanks for taking the time to stop and visit with us today. It's Mary Marsh here bringing you the Friday edition of the Blog. 

The new release of Artic Animal dies are in the online store. There are 13 new designs in this release and they are currently on sale. You can get this entire release at an amazing price of under $70.00. The sale ends tonight though so make your selections quickly. 

These new dies are so versatile, and can be used for a variety of occasions. The baby Artic animals  would make a cute congratulations card,  baby shower invitations, a welcome new baby card, a child's birthday card or cards for our animal loving friends. The other dies are great for a winter birthday, thinking of you, thanks and let's not forget our Christmas cards. 

I am featuring the new Artic Polar Bear and Cub + the Artic Snowy Tree dies, and I made a whimsical Christmas card. So let's get started on some details of how I created my card.

Step 1: I started my card by choosing my designer paper. I have this Christmas collection of plaid papers and I wanted to use some of the patterns on my Christmas cards. Plaids are so on trend right now.
Spruce layering panel: 4 1/4" x 5 1/2"
Designer paper layer: 4 1/8" x 5 3/8"

Next I cut my Polar Bear images. I used a naturals white paper that has fine specks of gray in it. Although in this photo the bears look a bit yellow (lol)! It's perfect for the bear images. I matched their scarves to the colors in the designer paper. The snowy trees are cut in the same spruce cardstock as the layering panel.
I used the largest Circle and largest Stitched Circle dies for the image panel. My sentiment is computer generated so I printed that off first on white cardstock and then used the die to cut the circle.
I wanted the Bear to walk on a snow mound so I used the one from the Skiing Gnomes die.
In order for it to fit in the circle I used the largest circle die and laid the snow mound in there and cut it.
Finished image
Step 2: Now that all my elements are cut, I am ready to start card assembly. I attached the bears with dimensional adhesive & the snowy tree with double sided tape to the circles. 

I used double sided tape to adhere the other panels. When it was put together I decided to make the card base the cherry shade. I thought it brightened up the card with this extra color and I also added a tuft of spruce ribbon. The base measures 4 1/2" x 5 3/4". I added the glitter to the snow mound after it was attached to the designer paper. A little tricky doing it this way but it worked out ok. 
To finish up my card, I scattered a few gold sequins. I hope I have given you an idea on a way to use these new dies. Today is the last day of the sale, so if you are considering any or all of them head over to the online store before 9:00 pm PST.

  
dies I used to create card:


Thursday, December 05, 2019

Husky and Friends

Hello Friends

Our new release called Arctic Animals is just so cute!  And you have just one more day to catch the Black Friday sale.  The discounts are amazing.  So hop on over to the online store!!

I hope you are all ready for Christmas!!  I have a friend who's birthday is close to the holiday and she is a dog lover.  So I made her a card featuring our sweet Husky pup. He is part of the Arctic Animal release.

Design Steps:
1.  Cut all the pieces out of white using the Husky w/ Sled die.
2.  Color and shade all of the pieces using your favorite markers.  I used Copics

 3.  Assemble the Husky and his sled
 4.  Using the Arctic Polar Bear and Cub die cut the pieces out of white card stock
 5.  Color and shade the pieces with your markers
 6.  Use a white A2 card base, cut out a piece of blue card stock just slightly smaller then the  front of the card and then cut a piece of DP slightly smaller then the blue.  Cut a piece of white glitter card stock 2 x 5 1/4.  Glue the DP to the blue card stock and the white glitter card stock to the center of the DP
 7.  Place dimension squares to the back of the dog and sled
8.  Pop the die cut to the glitter card stock as shown.  Using the Expressions Let it Snow die cut it out twice using purple card stock.  Glue the pieces together and add to card as shown below.  I added Glossy Accents to the words

CottageCutz


Check out this amazing collection of Arctic Animals!  It is a terrific buy!!

Blessing


Pam

Wednesday, December 04, 2019

I Can Nearly Wait til Christmas!

Hello!  This is Sukie and I'm back for my design team post with this sweet Christmas card.  I used two die sets from the new Black Friday die release for my card.  These dies are still on sale over in the store.
I cut out the adorable polar bears from the Arctic Polar Bear & Cub and Arctic Moose & Polar Bear die sets.  I cut out an extra scarf so all three bears would have a scarf.  I also used a left over piece from the Icicle Border die set and cut it into two pieces.
I created the card base with a snowflake paper layered with some patterned paper.  The icicle border was adhered along the top edge with the thinner scrap added along the bottom edge. Everything was matted on a black card base.
The first polar bear was placed on the left side of my card and the other two bears were added on the opposite side.
I heat embossed a sentiment from the Scrappy Moms (retired) Winter Wishes stamp set on a hand cut flag.  The sentiment flag was placed above the polar bear as a finishing accent.
Here are the die sets used on my card, available in the store:

Tuesday, December 03, 2019

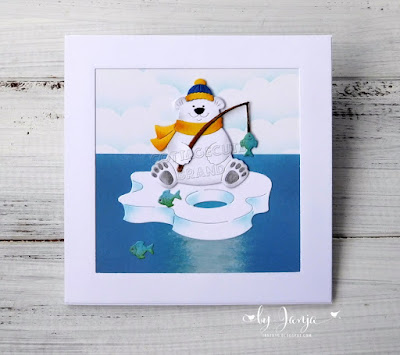
Polar Bear Fishing

Hi! Janja is here with you. I made a winter card for today.
I'm sure you've seen our lovely latest release - Arctic Animals.  I used one die from this release.


- CottageCutz die Polar Bear Fishing
- white card blank: 5.3 x 5.3" (13,5 x 13,5 cm), folded
- colored cardstock
- colored pads
- cloud stencil
- glue, double-sided adhesive tape, self-adhesive foam pads

Cut all the pieces out of white cardstock. Use colored cardstock for scarf, hat and fish. Color the edges with colored pads.
Once everything is cut and colored, glue it all together.


My background was made with Distress Oxide pads, cloud stencil and makeup brushes.
I used white ink to reflect in the water.


Prepare the card base and cut out a white frame that should be the same size as the card base. The inside dimensions of the frame are: 4 x 4" (10 x 10 cm).


Paste the frame on the background and complete the card.


Have a nice day.
Janja

Monday, December 02, 2019

Penguin Holidays

Hi!

It's Anja here on the blog today. I made another card using one of the new arctic dies. They are all so adorable and it was so much making this holiday scene.


For this card I used:
- Cottage Cutz dies (Arctic Penguins & Igloo, Christmas Pup w/ Dog House),
- Distress Inks,
- white card base (15x15 cm),
- white card stock paper for die cuts and background (14x14 cm),
- black pen,
- brush,
- Perfect Pearls powder,
- water spritzer,
- washi tape,
- heat gun,
- adhesive foam pads,
- paper glue.

First I cut and colored the penguins and the tree. I used black pen for the eyes.


Next I trimmed paper for the background. I taped it to my glass surface and masked it with washi tape. I used different shades of Distress Inks to color the night sky.


When satisfied with the shade, I used Perfect Pearls mixed with water. I used heat gun to dry the paper.


Next I used adhesive foam pads to adhere the background and lift it a bit from the card base.


Last I glued all the pieces to the background and my card was done.


I wish you a stress less Monday and see you again on Sunday.

Anja Z.


Cottage Cutz dies I used:


Sunday, December 01, 2019

Artic Animals Black Friday Release 2019 Day 4

Hello Scrapping Cottage friends! Happy Sunday to you! Thanks for taking the time to stop and visit today.

We are sampling DT cards using dies from the new Artic Animals Black Friday release. There are 13 new designs in this release and they are currently on sale. You can get this entire release at an amazing price of under $70.00.

These new dies are so versatile, as you will see with the DT samples. They can be used for a variety of occasions. The baby Artic animals  would make a cute congratulations card,  baby shower invitations, a welcome new baby card, a child's birthday card or cards for our animal loving friends. The other dies are great for a winter birthday, thinking of you, thanks and let's not forget our Christmas cards. 

So let's get started on the samples for today. The DT has created some beautiful cards with the Artic Animals

Card 1: Our first sample today is from Anja Zurga. She is featuring the new Artic Polar Bear & Cub die and created a lovely Holiday card. She is showing the laminator technique on the card window. Check out this blog post for more details on this interesting technique. The Pierced Wide Square Frame die was used to cut the frame and create the window. She stenciled clouds and then used artificial snow and placed it between the laminating sheets and put through the laminator machine. Because of the sentiment, you could even make this a Hanukah card in addition to Christmas. Here is a close-up of the snow.
(click to enlarge)
Card 2: Our last sample for today is one that I (Mary Marsh) created using the Artic Baby Foxes die. A young couple in our neighborhood just told me they are pregnant. I wanted to send them a card of congratulations and since they don't know the baby's sex as yet, I cut a pink and blue baby fox. The card layout is this week's Splitcoaststampers sketch #777. I thought it worked well to highlight the fox images.
Well that's our samples for today. If you missed our other group posts featuring these new dies, you can check it out here, here and here.  I hope the team has given you some fresh ideas on ways to use these new dies.
 
dies used to create samples: