Thursday, April 25, 2019

Fairy Dust!

Good Morning Scrapping Cottage Friends

It is Pam sharing with you on the blog!

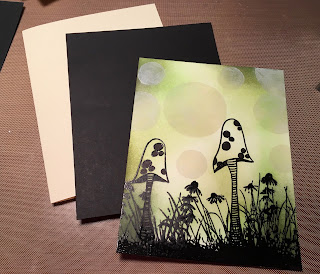
Today, I am sharing another whimsical die from our new collections call Magical Fantasy!  This group of dies are so much fun to work with because you can really let your imagination go wild!  I have created a fun bokeh background for my fairy.


 Designer Steps:
 1. Use a 4 x 5 1/4 inch piece of smooth white card stock. Before I stamped I used an embossing buddy to remove any oils on the card stock.  Next stamp the mushrooms with Versa Mark ink. I used black embossing powder and heat set
 2.  On the bottom of the card I stamped a field of flowers and grass with Versa Mark ink.  Then I used black embossing powers and heat set
 3.  Using 3 different colors of green ink to create the background by sponging it on
 4.  Get some unwanted card stock and the Cross-Stitched Circle dies to create your 3 different size circle stencils
 5.  Use white opaque ink and a dabber to ink inside the different size circles.  I just placed the circles randomly on my background
 6.  Using the Magical Fairy die cut out the fairy in black then trace her dress to back it with black card stock
 7.  Stamp your sentiment and layer it onto black card stock

 8.  Use a cream colored A2 card base and a slightly smaller piece of black.  Glue the black to the card and then add your stamped background.  Place your fairy on top of the tall mushroom add the glitter to the wings and mushroom stem.  Then add the sparkle stars and white dots to the sky.  Glue down your sentiment and your card is complete
CottageCutz Products


Make sure and stop by our sale this brand new collection is 25% off!  You really don't want to miss out on this fantastic sale!

Blessings
Pam


Wednesday, April 24, 2019

Have a Magical Day Card

Hello!  This is Sukie and today I'm sharing a project for my design team post.  The new Magical Fantasy dies are perfect for making all kinds of unique creations.  I love all of the whimsical designs from this release.
I found this scrap of confetti paper left over from another project in my scrap box which inspired the colors of my card.
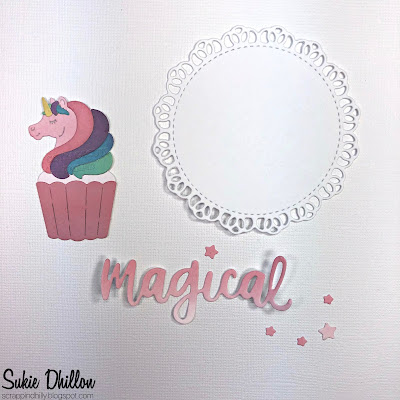
I die cut the Unicorn Cupcake in white card stock and shaded it with my Oxide Inks and adhered all of the pieces.  I die cut the sentiment from the Magical Unicorn Dreams set and shaded it to coordinate with the cupcake.  The gorgeous doily is from the Nested Stitched Doily set.
I created my A2 sized card by layering the tiny checkered pattern with the confetti strip and white card stock.
Next, the doily was placed on the top half of my card with the unicorn centered on top of the doily.
The oversized sentiment was anchored on the white card stock along with the tiny stars from the same die set.
To finish off my card I stamped a partial sentiment from the Scrappy Moms (retired) Countless Occasions stamp set and pop dotted the pieces to create the phrase.
Here are the dies I used on my card available in the shop:


Tuesday, April 23, 2019

Knight and Dragon

Hi, Janja is here with you.
Above the dragons and knights, boys are always excited. I made two cards for all the little boys who dream that they are brave knights who overcome the dragon.
I used dies from the new release - Magical Fantasy.


- CottageCutz dies: Knight, Royal Horse, Magic Dragon, Fairytale Castle, Rainbow With CloudsRetro Alphabet
- white card base: 4.25 x 5.5" (10,8 x 14 cm), folded
- white cardstock: 4 x 5,2" (10,2 x 13,2 cm)
- scrapbooking glitter paper
- colored cardstock
- colored ink pads
- embossing folder
- glue, double side adhesive tape, self adhesive foam pads

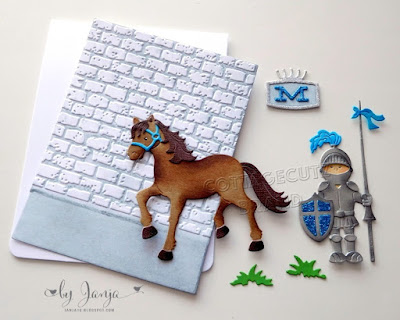
For the first card, cut out the knight and horse. Then darken all the pieces with colored ink pads along the edges and fasten them together.


For the brick wall use embossing folder and distress ink - Iced spruce.


The first letter of the boy's name is cut out of blue and silver scrapbooking glitter paper.


Completed card.


Repeat the process on the second card and cut out the central motive first. 
Cut the hill with scissors.


I used an oval brush and a plastic stencil for the cloudy background. Very simple and the result is flawless.


Now we have everything ready. We finish the card as shown.


Have a nice day.
Janja


Sunday, April 21, 2019

Happy Easter!

Hi!

It's Anja here. Today is Easter Sunday. I'm spending it with my family, eating a lot of food and having a good time.
I made the last Easter card for this season for today's post. I combined different dies and made a bunny, picking daffodils.


For this project I used:
- Cottage Cutz dies (Spring Showers Bunny, Buster w/Spring Daffodil, Egg Painting Bunny),
 - Distress Inks (Wild Honey, Fired Brick, Mustard Seed, Peeled Paint, Crushed Olive, Spiced Marmalade, Spun Sugar, Pumice Stone, Black Soot),
- white card base (21x10 cm),
- patterned paper for die cuts and background (20,7x9,7 cm),
- white cards stock for die cuts and background (19,7x8,7 cm),
- black pen,
- white pen,
- paper glue.

First I cut the eggs and bunny's clothes out of patterned paper. I used Distress Inks to color around the edges.


Next I cut the bunny and all the daffodils and colored it.


The I cut the background paper.


Then I arranged all the pieces and glued it on the card base. I colored the sky around the bunny and daffodils.


And my card was done.


I wish you all a Happy Easter Sunday. I hope you get to spend it with people you love and good food.

See you again next week.

Anja Z.


Cottage Cutz dies I used: