Sunday, February 10, 2019

Love Cottage

Hi!

It's Anja. Today I have a simple card for you. I used adorable cottage die, which has a lot of lovely small details. I wanted to highlight those details and that's why I made a minimalistic background. 


For this card I used:
- Cottage Cutz (Valentine Cottage, Love Phrase),
- Distress Inks (Mustard Seed, Picked Raspberry, Shabby Shutters, Peeled Paint, Spun Sugar, Worn Lipstick, Vintage Photo, Barn Door, Broken China),
- water color card stock (30x15 cm),
- white card stock for die cuts,
- water spritzer,
- heat gun,
- paper trimmer,
- paper glue.

First I cut and colored the cottage. I used Distress Inks to color it.


I did the same with the love phrase.


Then I trimmed the paper for the card base. I made 15x15 cm base.


I used Distress Ink to color the sky. I colored in circles.


Then I spritzed a few water drops to add a little interest to the sky. I used heat gun do dry the paper. Before drying I used paper towel for additional water.


And then I just glued the cottage and the phrase to the card base and my card was done.


Before I go, I would like to invite you to the store to check out the new Spring release. Many new adorable dies, now for 25 % off. Can't wait to start using it.

Have a nice Sunday.

Anja Z.


Cottage Cutz dies I used:


Saturday, February 09, 2019

Bunny Kisses (New Die)


Hello Scrapping Cottage friends! Thanks for taking the time to stop and visit with us today. It's Mary Marsh here bringing you the Saturday edition of the Blog. 

We have a new release of 36 Spring dies in the online store. There are a variety of designs so perfect for Easter or Spring cardmaking. Take a look in the store you definitely won't be disappointed.

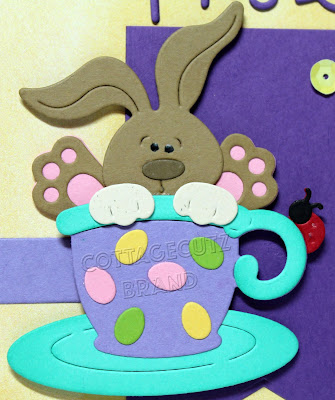
For my card today I am using the new Teacup Bunny and Bunny Kisses and Easter Wishes dies. The sweet little bunny sitting in the teacup is just too cute. I knew I had to make a card showing him off. This could definitely be used for Easter but, I am going to give it as a birthday card for a 6 year old. The birthday sentiment will be on the inside of the card.

I apologize, but I don't have a full tutorial for you today. I woke up yesterday feeling under the weather with a sore throat, earache and no energy. I slept a good portion of the day. So I have card details but no photos. Thanks for understanding Blogger friends and followers.

Step 1: I started my card this week with the layout. I am using the weekly sketch from Splitcoaststampers. I liked the simplicity of the layout and it would allow my sentiment and bunny image to be the star of the show. I used lots of bright Spring like colors on my card.
Yellow Card Base:  4 1/4" x 5 1/2"
Yellow Designer Paper: 4 1/8" x 5 3/8"
Light Purple Rectangle Panel: 1/2" x 4 1/8" (Element 2 in sketch)
Dark Purple Banner: 2 1/8" x 3 3/8" (Element 3 in sketch)

Step 2: I cut my Teacup Bunny image in the cardstock colors shown. I like to use cardstock but this image could certainly be cut from all white cardstock and colored with Markers or the medium of your choice. For the smaller flag banner (Element 4), I decided to use my bunny image. Just a little creative idea for this sketch. Notice the cute little ladybug crawling up the cup!

For the Bunny Kisses sentiment, I used the same dark purple cardstock that I used for my banner. I thought it was a nice contrast against the yellow designer paper background. Notice the different font styles in the part of the sentiment I am using on my card. It really highlights the phrase. 

Step 3: I assembled card using double sided tape for all the layers. On the bunny kisses sentiment, I used Ranger multi medium matte. The bunny image is popped up with dimensional tape. 
To complete my card and for added interest, I scattered a few yellow sequins on the flag banner. 

Well that's it for me for this week. See you next Saturday. Happy Valentine's Day!!!

dies I used to create card:
http://www.scrappingcottage.com/cottagecutzbunnykissesandeasterwishes.aspx

http://www.scrappingcottage.com/cottagecutzteacupbunny.aspx


Friday, February 08, 2019

Ape for You Valentine

Happy Friday!  It's Jeanne posting today.  I have a quick Valentine's Day card for you today.
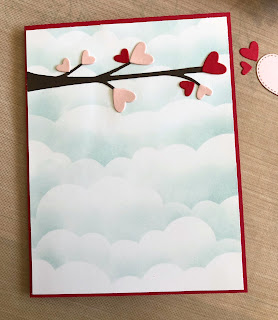
First, I stenciled the cloud background on a piece of card stock slightly larger than A2.
I used Soft Sky ink.
I cut the monkey from two shades of brown card stock and used a black pen to color the eyes.
I cut the hearts from both pink and red card stock and the branch from dark brown.
I cut the stenciled panel down to 5 3/8 x 4 1/8 inches and adhered it to an A2 red card base.  Then I glued the branch and hearts to the upper portion of the card.
I stamped the sentiment on the pink card stock and used the second smallest heart to cut it out.  Then I placed everything on the card base before gluing down.
While the branch, hearts and sentiment are all glued to the card, the monkey is popped up using foam.
Dies used:
http://www.scrappingcottage.com/cottagecutzswingingmonkey.aspx
http://www.scrappingcottage.com/cottagecutzstitchedheartsetbasics.aspx

Thanks for stopping by today!  There is a sale on the Valentine's Day release and the new Spring release, but it's for a limited time so stop by the online store today.

I hope you have a fun and creative weekend!


Thursday, February 07, 2019

Spring Teacup!

Good Morning Friends!

It is Pam sharing with you on the blog today!

I am so excited to give you a peek at our new Spring Release!  And not only do we have a new release it is at 25% off right now.  There is also a fantastic Early Spring Sale going on in the store too!  What more could you ask for check out the great savings!

Now on to today's project.  I love teacups and flowers so naturally this die was just calling my name!!  It is called Spring Teacup Bouquet.  I can already tell it will be so versatile with uses for so many occasions.


Design Steps:
 1.  Using the Spring Teacup Bouquet die cut out the flowers and cup in colors of your choice.  I did a little shading on the flowers and cup before the assembly
 2.  Use an A2 card base cut a piece of black 4 x 5 1/4, dotted DP 3 3/4 x 5 and then using the Nested Stitched Scallop Square die cut out a black square.  I used the second from the largest.  Run the square through a dotted embossing folder
 3.  Begin assembling the flower arrangement on the black square.  I put a foam dot under the teacup and then began my flower placement
 4.  Glue the black card stock and the DP to the front of the card and then pop up the black square slightly above center
5.  Using the Expressions Thanks cut it out of black card stock.  Glue the Thanks to the lower right of the card under the arrangement and your card is complete


CottageCutz Products


Again I just want to remind you we have some awesome sale going on in the store!


Thanks so much for stopping by!
Blessings
Pam

Tuesday, February 05, 2019

XOXO

Hello!  This is Sukie and today I'm sharing a project for my guest designer post.  I had so much fun creating this sweet card with the new Valentine's dies.
The Swinging Monkey was the focal point of my card.  Once I put him together, I added an extra heart to his belly for a whimsical look.  The sentiment was cut from the Valentine Phrase & More die set and the grass was cut from the Grass with Cattails die.  I simply trimmed off the cattails.  All of the die cuts were inked on the edges for some depth and dimension.
I wanted to create a fence for the background of my card so I simply cut strips of paper with my paper trimmer.  Two smaller strips were cut to be used horizontally on the fence.  The paper strips were inked on the edges.
I layered them together along the solid brown background.  Varying the sizes of the strips gives the fence a more natural appearance.
To finish off the fence, I added some bling stickers along each of the "posts" and adhered the grass along the bottom edge.
Nest, I added the sentiment at the top of the fence and then adhered the branch directly below ensuring the sweet monkey would fit perfectly.
Here are the dies I used on my card available here: