Saturday, October 06, 2018

Harvest Vegetables

Hello Scrapping Cottage friends! Thanks for taking the time to stop and visit with us today. It's Mary Marsh here bringing you the Saturday edition of the Blog. 

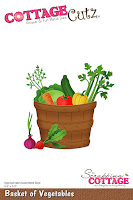
My card today is a sneak peek from the  soon to be released Autumn 2018 dies. I am featuring the Basket of Vegetables + Fall Phrases dies. As soon as I saw this die, it reminded me of our own vegetable garden that has most of these same veggies growing. We have had a big harvest this year.

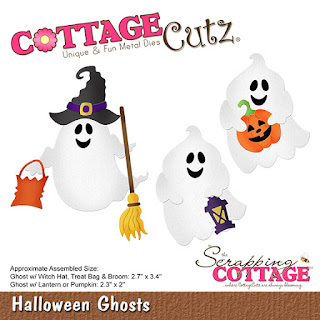
Also, over in the online store we have the Halloween and Christmas Part 3 dies that are currently on a 25% off sale. All new designs and a really cute huskie die that is an online exclusive.

So let's get started with some details on how I created my card;

Step 1: I started off my card this week with the layout. I used the Splitcoaststampers Sketch #717 for my card. I thought the layout would show off this basket of vegetables die well.
Step 2: I wanted to use designer paper that had more of a fall theme to it. I had this sheet in my papers and I paired it with daffodil and a moss green cardstock. I also added another layer to my card than was called for in the sketch.

Daffodil card base: 4 1/4" x 5 1/2"
Mossy green layer: 4 1/8" x 5 3/8"
Designer paper layer: 3 7/8" x 5 1/4"
Step 3: I cut my basket and all the vegetables. I just used the colors that are on the packaging. They are the colors that are true to the actual vegetables.
I layered this on a white panel (element 2 of the sketch). I found the panel in my stash that was already embossed and sponged. The fence look was perfect as a background for my image. I changed the color of element 3 of the sketch. I decided to use the moss green cardstock and then orange bakers twine.
Added the vegetable basket image to the background. I used dimensional adhesive to lift it off the panel slightly. I die cut the Autumn phrase in orange cardstock and added it to this panel.
Step 4: Finished the assembly of the card. To cover the angled panel (element #4) of the sketch, I used the fig and radish.
Well that's it for me for this week. I hope you have enjoyed the sneak peek of some new dies. they will be in the online store shortly. See you next Saturday!

Dies I used to create card:
http://www.scrappingcottage.com/cottagecutzbasketofvegetables.aspx

http://www.scrappingcottage.com/cottagecutzfallphrases.aspx


Friday, October 05, 2018

BOO! to You

Happy Friday Cottage Cutz fans!  It's Jeanne today with a quick and easy card featuring the ghosts from the new Halloween release.  This release along with the Christmas Part 3 release are on sale for a limited time on the web site.
There are several ways to decorate these ghosts including a witch.  I chose to use the lantern and the jack-o-lantern with these two.  First I cut all the pieces from white cards tock.
I used a sponge dauber and Smoky Slate ink to add just a little shading to the ghosts.  The rest of the pieces I colored using Copic markers.
For the background I cut a piece of mixed media paper slightly larger then A2 and used Washi tape to tape it to a masonite board.  This helps keep the paper from warping while making a wash background.  I used the Smoky Slate ink.
 After I had my "mist" I stenciled some bats on top using the Smoky Slate. When everything was dry I cut it down to A2 size.
For the word "BOO" I cut both orange and black letters using the Sugar & Cream die. 
I decided to use the black letters on top with a hint of orange underneath.
I used foam dots to adhere the ghost and glued it all to an A2 card base.
Fun card and easy to make.

Dies used:
http://www.scrappingcottage.com/cottagecutzhalloweenghosts.aspx

http://www.scrappingcottage.com/cottagecutzsugarandcreamalphabet4x8.aspx


 Thanks for stopping by and have a fun and creative weekend!


Thursday, October 04, 2018

Halloween Potions!

Hi Scrapping Cottage Fans!

I really appreciate you stopping by today!  It is Pam creating with you on the blog.

Halloween is fast approaching and I am getting all of my cards ready to send out.  My friends, nieces, nephew, brother and sister love getting them.  So I have designed one that is relatively easy so you can make multiplies pretty fast.


Design Steps:

 1.  Use an A2 black card stock base cut a piece of DP just slightly smaller than the base.  Cut a piece of orange polka dot paper 4 in x 3 in
 2.  Glue the orange dotted paper to the top of the DP.  Add a piece of glittering black ribbon between the two papers
 3.  Mount the DP panel to the black card front
 4.  Use some green DP and cut a circle using the Nested Scalloped Stitched Circle Set.  I used the second from the largest.  Next using the Happy Halloween die cut it out in black cards stock.  Then use a small piece of orange and cut out just the pumpkin
5.  Glue the orange pumpkin on top of the tiny piece of yellow card stock.  Then glue the orange pumpkin on top of the black pumpkin.  Glue the sentiment to the center of the scalloped green circle.  Pop the scalloped circle to the card as shown below
CottageCutz Products


Thanks for stopping by and don't forget this awesome Halloween die is on sale right now in our online store for a big 25% off!  Visit us for all the fun and wonderful savings!

Blessings
Pam


Tuesday, October 02, 2018

Jolly Santa Claus

Hi, Janja here!

Today I'm sharing with you my new card with Jolly Santa Claus.


Supplies:
- Cottagecutz dies: Jolly Santa Claus, Tea time Doily
- white card base: 5.3 x 5.3" (13,5 x 13,5 cm), folded
- patterned paper: 5 x 5" (12,7 x 12,7 cm)
- patterned paper: 3.94 x 3.94" (10 x 10 cm)
- white and colored cardstock
- colored ink pads
- glue, double-sided adhesive tape, self-adhesive foam pads

Die cut all the pieces for jolly Santa Claus. Ink the edges, and attach all pieces to each other.


Prepare a white card base. Cut square, and two strips of patterned paper. Paste both on a white cardstock.

Cut two smaller squares from white and patterned paper. Cut a round lace from a white cardstock. With a scissor cut it in half.


Attach all layers as shown.


Now stamp a sentiment. Attach Santa Claus with self-adhesive pads on the background.
And we're at the end.


I would like to remind you that the new Christmas dies (Part 3) and the new Halloween dies are already in the store. They are currently on sale for 25% off.

Thanks for stopping by. Have a lovely day.


Monday, October 01, 2018

Halloween Z-Box Fold Card

Hi, Lois here at the start of a new month  It's October -- time for colorful leaves, pumpkins, and Halloween!  Halloween is what I'm bringing you today.  CottageCutz has a brand-new release of really cool Halloween dies -- currently on sale at 25% off, along with their Christmas (Part 3) release.

I'm a big fan of fun-fold cards, and my card today is a relatively simple fun-fold card -- a Z-Box Fold card, using two of the new Halloween dies.


To start the card, cut cardstock and patterned paper as follows:

Black - 4 1/4" x 5 1/2"
Orange - 4" x 9 3/4"
Patterned paper - 4 3/8" x 2 7/8"
Patterned paper - 7/8" x 5 1/8" (one piece), 7/8" x 2 1/8" (two pieces)


Place the orange cardstock in your paper trimmer with the short side at the top and place the long side at the 1" mark.  Cut a 1" slit from the 3" mark down to the 7 1/2" mark.  


Place the cardstock in your scoring board and score down to the cut line at the 3" mark, up from the bottom at the 7 1/2" mark, and all the way through at the 5 1/8" mark.


Place Scor-Tape on the back of the largest section of the orange cardstock, as shown.


Fold on the score lines and adhere to the black 4 1/4" x 5 1/2" panel.


Cut three ghosts from the die.


Color and construct the ghosts.


Cut the Spooky Garland from a scrap of black cardstock.


Adhere the patterned paper to the card base and sponge around the front panel.  Add the ghosts and garland, and your card is completed.


CottageCutz dies used on this card are:

http://www.scrappingcottage.com/cottagecutzhalloweenghosts.aspx

http://www.scrappingcottage.com/cottagecutzspookygarlandelites.aspx