Saturday, August 04, 2018

Party Hats Birthday

Hello Scrapping Cottage friends! Thanks for taking the time to stop and visit with us today. It's Mary Marsh here bringing you the Saturday edition of the Blog.

We are still continuing with our Throwback theme until the new release of Christmas dies comes out. The team has been featuring some of our previously released dies to give you fresh ideas for using them.

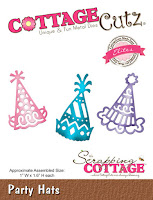
I have several family birthdays coming up in August, and I thought I would get proactive on creating the cards I need. So for your viewing pleasure today, I am going birthday.  I am using the Party Hats die on my card today. Let's get started with some details on how I created this card.

Step 1: I need a card for a teenager, so I chose this designer paper from my collection. I think the graphic design of the paper gives it a modern look that should appeal to a teen. The paper determined my card colors. I used lemon-lime twist and dapper denim  to coordinate with the designer paper and then I added gorgeous grape as my 3rd color.
Lemon-Lime Twist card base: 4 1/4" x 5 1/2" 
Dapper Denim Layering Panel: 3 7/8" x 5 1/8"
Designer Paper Panel: 3 5/8" x 4 7/8"
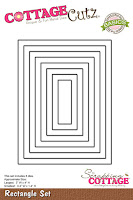
White Image Panel: 2nd largest pierced rectangle die
Dapper Denim Layering Panel: largest rectangle die
Step 2: Cut my party hats in the card colors. Then I cut them a 2nd time in a different color and did a die inlay technique. Adhered these to the white image panel with Ranger multi matte medium.  I just think it sets the hats off very nicely.
 I stamped my birthday sentiment in denim ink. Used my MISTI for stamp placement and also because sometimes the clear stamps don't get a good impression the first time around. And that was the case here. Sometime between the 2nd & 3rd photo I lost one of my die inlays.  I added it back in for the final photos. (LOL)!!!
Step 3: Now all the preliminary work is done and I can start card assembly. Secured all panels with double sided tape.
I wanted the image panel raised off the designer paper so I used Scotch mounting tape. 
 
 To finish off my card I scattered some green sequins. Just thought it added to the festive vibe of the card.
Well, that's it for me for this week. I hope I have given you some fresh inspiration if you own this party hat die. If you don't have this one, it is available in our online store. See you next Saturday.
 
Dies used to create card:
http://www.scrappingcottage.com/cottagecutzpartyhatselites.aspx
http://www.scrappingcottage.com/cottagecutzpiercedrectanglesetbasics.aspx

http://www.scrappingcottage.com/cottagecutzrectanglesetbasics.aspx


Friday, August 03, 2018

Vintage Christmas Puppy

Happy Friday!  It's Jeanne today with a vintage looking Christmas card.  My daughter said the colors looked vintage to her and I had to agree. And the card uses previous Christmas and non-Christmas dies.
I started by die cutting all pieces in various colors of card stock to match my plaid.  For the frame I used the second largest of the Eyelet Squares and the fourth largest of the Stitched Squares.  I centered one inside the other and used washi tape to hold them in place as I ran it through my die cutter.
I cut a white panel for the front 5 1/2 x 4 1/4 inches, a 2 1/2 inch square from the plaid paper and a piece of ribbon a bit longer than the panel so I could wrap it around the back.
I glued the candy together and covered them in Wink of Stella.
I laid things in place to get a general placement and took a photo with my phone.  I often do this so as I'm gluing things down I have a reference.  This is especially good if you have a lot of pieces or critical placement.
I glued the ribbon 1/2 inches from the left side and lined up my plaid square with the edge.  The bottom of the square is 1 1/2 inches from the bottom of the panel.  I also glued the dog to the plaid square.  His eyes and the nose piece are colored with a marker.
I glued the candy with the notch to the frame (I snipped off the part that showed beyond the frame) and used narrow foam strips to raise up the frame.
Next I tucked one candy under the frame and the other on top.  I also decided at this point to angle my sentiment rather than put it on straight.
In looking at the panel, I thought it needed just a bit more.  So I rounded the upper right hand corner using a corner rounder.  Then on the white A2 card base I adhered a small strip of the plaid paper. I toyed with the idea of using a solid, but decided the plaid looked better.
And the finished card!

We're getting ready for a new release of holiday dies that promises to be WONDERFUL!  There are so many cute dies coming - I can't wait!

Dies Used:
http://www.scrappingcottage.com/cottagecutzforestpeekersbeaveranddog.aspx
http://www.scrappingcottage.com/cottagecutzsnowmanincocoa.aspx
http://www.scrappingcottage.com/cottagecutzstitchedsquaresetbasics.aspx
http://www.scrappingcottage.com/cottagecutznestedstitchedeyeletsquareset.aspx

http://www.scrappingcottage.com/cottagecutzexpressionsmerrychristmas.aspx

Thanks for stopping by.  I hope you have a fun and creative weekend!


Thursday, August 02, 2018

Sea Turtles!

Good Morning Friends!

It is Pam sharing with you on this wonderful Thursday morning!

We are getting very close to our new release for Christmas!  And it will soon be time for us to share the new dies but until then we are showing you some new ideas for those favorite dies from the past!  I live near Hilton Head Island and the area is famous for sea turtles!  So with that in mind I used our turtle die combined with a few other dies to create my card for you today!


Design Steps:
1.  Cut out 2 Sea Turtles one in green and one in brown.  Place the shell panels from the green turtle into the brown and the brown into the green.  I just taped them into place
 2.  Add a little shading to the turtles using TH inks.  Use a fine black marker to make the eye standout
 3.  Use an A2 kraft card base, cut a slightly smaller piece of white 4 x 5 1/4.  Cut a 4 x 5 1/4 piece of wood grain DP and cut an oval in the center using the largest of the Wacky Stitched Oval dies.
 3.  Next cut a piece of 3 3/4 x 5 kraft card stock and cut out the second to the largest Pierced Oval die in the center.  Glue it directly behind the wood grain DP as shown
 4.  On the white card stock create an inked background for the water.  Use TH inks and then splatter with shimmer water (water mixed with Perfect Pearls Powder)
 5.  Glue to the back of the wood grain DP. (Make sure not to glue to close to the oval opening so you can stick the sea grass behind the oval
 6.  Using the Botanical Garden 2 die cut out the foliage in 2 shades of green card stock
 7.  Tuck the foliage into the oval and glue down
 8.  Add the sea turtle to the card front
 9.  Take a piece of white cheese cloth and spray with a walnut stain and let dry
10.  Add the cheese cloth to the card front and then add the pearls
CottageCutz Products


I hope you are having a good time looking a new ideas for all of those older favorite dies!  I am sure having fun using them again!  Stay tuned for those new Christmas dies coming very soon!

Blessing

Pam