Showing posts with label watercolor. Show all posts

Monday, May 15, 2023

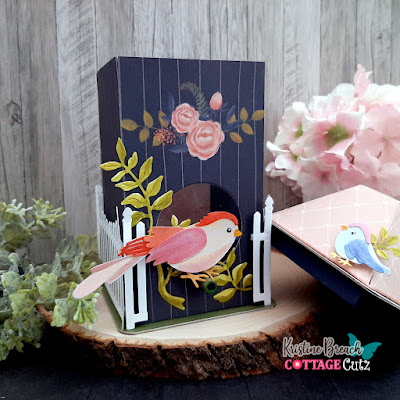
Birdhouse Gift Box

Hi friends! 

Kris here to share some crafty inspiration with you ☺  I had fun making this birdhouse gift box with a couple of the birds from the latest release!  I used the Spring Bird w/ Vine and a smaller bird from the Spring Birdhouse Cup.


The lid comes off and has a smaller box attached under it that fits snug into the top of the box so it won't easily fall off.  


and here is the inside of the gift box!


I created this type of birdhouse box before, following a tutorial I found on Norma's blog here. She shares a lantern with "X"s cut out of 2 sides so you can put those battery operated lights or even fairy lights and it'd shine thru both windows -- excellent idea, especially for winter. But since I wanted mine to be a birdhouse, I adapted the instructions for this tutorial.

DESIGN STEPS:
PLEASE NOTE****  I'm also typing out the text I have on my photos for those who need to translate instructions.  Not meant to confuse you!


• Start with a sheet of 6 x 12" cardstock.  
-- with the short side at top of score board, score at 3/8" & 5-1/2"
-- with long side at top, score at 2 15/16", 5 7/8", 8 13/16" & 11 3/4"


• I covered the sides of my box with decorative paper -- this is totally optional!  Cut (4) panels at 2-15/16" x 5-1/8" and glue them onto each of the front sections. (The one with the floral spray, I adhered to the 2nd panel since that will be the FRONT of my box.) 

• Die cut the 5th smallest circle from the Pierced Circle Set, leaving a li'l room to add a perch for the bird to sit on later.


• Add 1/4" Scor Tape around the circle cutout (on the back) and place a window sheet.
-- Also add 1/4" Scor Tape to the back side of the 3/8" scored flap along the top of box.


• Cut a piece of patterned paper at 2 7/8" x 5" for the inside "back" that will show thru the acetate window from the front.  Since my box is dark colored, I chose something light and pretty for the inside.


• Add 3/8" Scor Tape to the FRONT side of the bottom 1/2" flap
-- then with scissors, cut on each vertical score line, just up to the 1/2" horizontal score line.


• Remove backing of the Scor Tape that is on the backside of the top of box rim and fold it down -- all across the top.  This will strengthen the rim of your box.

• Add 1/4" Score Tape to the front side of the small vertical flap on the end, peel off the backing, and attached the other end of the box.

 • Cut (2) pieces of chipboard and (4) pcs of patterned paper at 3-1/2" square 
-- round the corners of all 6 pieces 
-- glue patterned papers to top and bottom of each of the chipboard squares.


• Peel off the backing of  Scor Tape on bottom of box flaps and adhere to the center of one of the chipboard squares.

• Cut another piece of patterned paper at 2-7/8" square to fit down inside the box & cover the tabs


• Cut a piece of cardstock at 4-3/8" square
-- score at 3/8" and 3/4" along each edge 
-- see reference photo above for where to make your cuts

• Add Scor Tape along the outer flaps, remove backing and adhere flaps of each side to make a box.  *There will be an opening in the center of backside. 


•  Attach to CENTER of the underside of lid (chipboard square)
--make sure it fits snug into the top of your gift box


CREATING THE ROOF:

• Cut a 6" square of cardstock
--score 1/2" in from all 4 sides.
• Measure in 1-1/2" from each corner and cut away the corner squares.


• Turn your roof over to backside and with a ruler and pencil, draw lines at 2-1/2" and 3-1/2" (from the farthest left edge)
-- turn paper 90 degrees and repeat.
• SCORE the intersecting square in the middle.
• From each corner of the middle square, make 3 score lines to the "V" and to each 1/2" score line you already made in pt. 1.
• Turn over (top facing up) and Mountain fold all the score lines that meet your pre-existing 1/2" score line and Valley fold all the shorter middle score lines.


• Once you've cut and scored the roof and mountain and valley folded it, you can add glue in between those valley folds and pinch them together.  Might be good to add binder clips to hold together until glue dries.


DECORATING MY BOX:

• I die cut (4) of the Fence w/ Flower Garland to add around the base of my birdhouse.


• I cut one of the fences down by cutting 2 of the outermost pickets from each end.  The other 3 fences I left whole ~ they fit perfectly and wrapped all the way around the birdhouse!
-- I used 1/8" foam strips to the backside of fence pcs. (just on horizontal slats) to attach to house. 


• I die cut my birds from the  Spring Bird w/ Vine 
and a smaller bird from the Spring Birdhouse Cup
-- then I water-colored all the pieces


• I created a li'l perch for the larger bird by rolling a scrap of the green c.s. around the end of my paintbrush and added glue towards the end to hold it together.  Once dried, I cut it to the length I wanted and attached with glue to the bottom of my window.


• I glued the leaves and added birds with foam strips and done!


PRODUCTS I USED:


I hope enjoyed my tutorial today!

Remember, we have a DESIGN TEAM CALL here!

More inspiration on our YouTube channel with GIVEAWAYS here!

~Kristine


Friday, March 17, 2017

Watercolour on Diecuts-floral card


Hello dear friends

Happy Friday to all !!!
Spring is in full bloom and flowers are spreading their beauty all over. It's Anita once again, sharing with you the beauty of spring flowers.

Many times we are all short of time and also some people are not fond of making 3D flowers . They want quick beautiful cards .
So here is a cool technique where colouring die cuts with water colour can really make them look beautiful and layering them together gives a lovely floral card like this.


To make this card,
Cut all the die cuts with white card stock and emboss a card panel 6" x 4"


Using distress inks , colour all the die cuts. Use the negative of the wild flower to create subtle stamping on the oval label. Distress ink names are mentioned below.


Layer the ovals like this and adhere on the embossed panel as shown.

Adhere all the die cuts layering them together like this.
Add a sentiment.

Adhere the card panel on card base measuring 7" x 5".

CottageCutz products used.

Wildflowers 2

Springtime Bluebell flowers


Cross-stitched Oval set

Distress inks used -- Peeled Paint, Mowed Lawn, Chipped Sapphire, Candied Apple, Fossilised Amber, Carved Pumpkin
I hope you will try this technique. Do share your work. I hope you have a good crafty weekend. 

Wednesday, March 01, 2017

SPRING FLOWER-DAISIES AND 3D EFFECT OF STAMPING


Hello dear friends!!

A warm welcome to the Cottage blog !!! I 'm Anita here with lovely spring daisies from the new stamp and die combo sets from CottageCutz. I'm having so much using them to create my projects. The stamps and dies are of superior quality . you can check out the entire range here

For my card today, I feature the spring flowers -Daisies and I have used this set to create a 3D scene along with die cuts. We can use similar themed dies to create a raised or popped up scene along with the matching stamp. CottageCutz has many foliage dies that combines so well with many flowers stamps and dies.

Here is my card.
  

 To make this card, Cut die cuts from the CottageCutz Foliage die and CottageCutz Spring Greenery
set and colour with Distress inks. Emboss them a little on foam pad and arrange on a card panel 4" x 5.25" with silicon gel. 


Stamp two images from CottageCutz Spring Flowers - Daisies -April and colour with water colour. Cut with coordinating die. Arrange on the card panel with silicon gel as shown to create a raised 3D image.


Stamp the bees and a sentiment. Adhere the card panel on two matte layers.


Cut a  Wide Rectangle Stitched frame diagonally and adhere at the two corners. Mount the finished panel on a card base that measures 5.75" x 4.5".

CottageCutz dies used


CottageCutz has a huge range of stamps and dies to create many wonderful projects. Do check them out here at the store. I am so thankful that you spent some time here.

Monday, March 14, 2016

Lisbeth Butterfly Card

Hi Everyone, Jenny here to show you how to make this sparkly 3D butterfly card. It is a fast card to make so consider making a few.

Let’s get started!

Take a 4.25 x 5.5 piece of cardstock and use this for your base. I used purple, you can use any color. Just match your decorative elements to your selection. I did a fun spray background, you could skip this part to speed up your card making but it adds another layer of texture. Take a piece of white cardstock measuring 4 x 5.25. (I used watercolor paints to match my cardstock choices, pink and purple) Take an old tooth brush and load it with some inky paint. Run your nail down the bristles and spray some color on your paper. The spray is light but noticeable. That is why I used watercolor paints, it dries light. Since I didn’t use a lot of water, the paper did not warp. Set this paper aside to dry.


 While that layer dries, select a complementary paper color and cut a circle with the Circle Set. (Use the third circle from the outer edge) Then cut a white circle with the Stitched Circle Set. (Use the fourth one from the outer edge). I used a pink outer circle with a white inner stitched circle. Attach them together with your favorite adhesive. Set aside and pick two colors for your butterfly. I chose purple and pink. Cut a base butterfly using the solid butterfly from the Butterfly, Lisbeth set. Cut a detailed butterfly from your other choice of color (I added some extra sparkle to my detailed piece with a Wink of Stella pen. This again is optional.). Don’t forget to cut a body too.  Layer them together and add liquid glue along the center piece. Do not glue down the wings. That is where we will get our 3D effect. Add the body on top of the detailed layer as shown. When the body dries, take a pencil or dowel and curl the top layer of the wings around it. This will lift the wings and also show the sparkle details.
 

 To get the dimensional wording, I used fun foam. If you don’t have fun foam you can cut the wording out several times on white cardstock and glue them together to form the base and attach the top layer with your choice of color paper. I used fun foam and cut out the words, “Thinking of you” from CottageCutz Thinking of You set. I cut a set out of pink cardstock and added some Wink of Stella again, to add some sparkle and make it coordinate with the butterfly.


Now that the main piece is dry, take some coordinating washi tape and add some strips down the front of the card as shown. This adds more dimension without adding bulk. ( If you do not have washi tape tear some strips of decorative paper and attach. Use what you have on hand. If you want you can add ribbon, twine, or leave it blank)
 

 Assemble the components as shown in the picture. Attach the white painted cardstock to your base layer.  Layer the butterfly circle piece you created with dimensional squares to give more drama. Attach the “Thinking of you” embellishment with your liquid adhesive. Then you are finished. If you would like more “sparkle” as I did, add some colored sequence randomly around the card.