Showing posts with label shaker card. Show all posts

Friday, February 23, 2024

Magical Unicorn Dreams Shaker

Hello friends,

Kris here to share some Friday inspiration with you.  I've created a fun Unicorn Shaker card that is perfect for a young girl.  The inside says "Birthday Wishes"


DESIGN STEPS:

I die cut the Flying Unicorn and the Rainbow with Clouds from white cardstock and colored with Copics.


Next, I cut (2) pieces of white cardstock at 4-1/4" x 5-1/2".  From one of those, I die cut the largest Double Stitched Rectangle die from the middle, creating a frame for our card front. 


From the Double Stitched Rectangle that was cut out, I die cut one of the Clouds Slimline dies.


On the other A2 piece of cardstock,  I ink blended Distress Oxide inks over the whole background, then repeated it onto the frame.    


I used Scor Tape to adhere a piece of acetate to the backside of frame, and also to the backside of the clouds border for the front.  Before removing the tape backings, I inset the clouds and glued the rainbow so the ends are tucked under the clouds. 


Once I got my clouds adhered on the front, I flipped it over to the back and added 1/8" foam strips around the opening, then added my shaker elements.  I then placed my ink blended layer (back of shaker) upside-down onto the foam strips.


I die cut "Magical" from the Magical Unicorn Dreams die from lavender c.s. and adhered to bottom of clouds, then I popped up the unicorn with foam strips.  

I cut a white A2 top folding card base and attached my shaker to the front and done!  


Head over to Cottage Cutz and do a little shopping today!

Get Social With Cottage Cutz


Thank you so much for joining me today! 
 I hope you are inspired to get crafty with your favorite CottageCutz dies!  

~Kristine

Monday, October 02, 2023

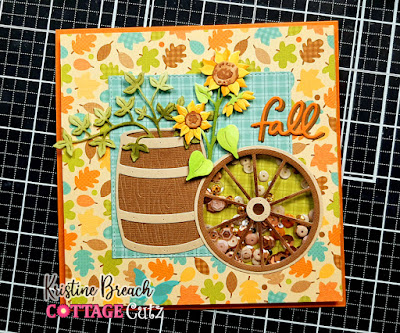
Fall Wagon Wheel Shaker

Happy Monday friends!

Kris here to share a fun Fall shaker card using some brand new dies from our FALL 2023 RELEASE!  There are 15 designs in this release and they are all on sale!  Individual dies are 30% OFF and for a limited time only, you can get the whole bundle for 50% OFF!

This release has so many wonderful dies (I love Fall!)  and the first thing that came to mind when I saw the Fall Wagon Wheel and Fall Barrel dies was to create shaker cards!!  I decided to use them together and make the wheel into a shaker.  Super easy to do!  


All the patterned papers I used came from the Pumpkin Spice paper pad from Doodlebug Designs

PRODUCTS:

SUPPLIES:
Low-tack tape
Foam strips
Acetate or window sheet
Sequins or other shaker elements

DESIGN STEPS:

• Card Base is a 5-1/2" square in Pumpkin Pie cardstock - set aside until the end.

• Leafy paper is cut at 5-1/4" square.

• I die cut a square using the largest of the Pierced Square Set from the blue plaid and glued to the center of leafy paper.

• I also die cut a circle (not pictured below) using the 4th largest of the Pierced Circle set from the green plaid paper that will be the back inside of the shaker.


• I die cut the Wagon Wheel from 2 shades of brown/tan and the Barrel from white and the same 2 shades of brown.  I then colored the white leaves and sunflowers.


• I glued the leaves behind the barrel and then to the bottom left of my plaid square.


• Next, I taped (with low-tack tape) the 5th largest Pierced Circle slightly overlapping the barrel, then die cut thru all layers.


I glued the larger outer wheel on top of die cut opening, then the smaller wheel on top.


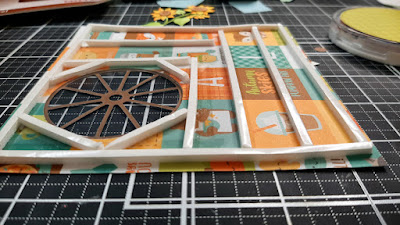
 • On the back, I added Scor Tape all around the wheel, then removed backing and add the window sheet.  

***TIP:  running a used dryer sheet over the acetate will help prevent sequins from sticking!


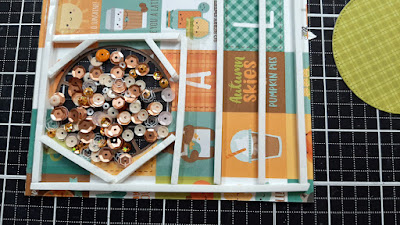
• I added 1/8" foam strips closely around the circle opening and all around the edges... then can fill in with a few strips.


Add sequins or other shaker elements 


Add your circle shaker backing to lock in the sequins.


Apply glue to the back of the shaker part and remove backing of foam strips and center it onto card front.

• Add Sunflowers and "Fall" and glue the wagon wheel center to the wheel.


We have more inspiration on our YouTube Channel HERE
 
Happy Crafting!

~Kris


Monday, January 30, 2023

Thanks a TON

Hi there crafty friends!

Kris here, and as promised in Saturday's post, I'm back with a tutorial for a Vertical Easel Card with a Floating Shaker!  Today's is the same style card, but a different theme.  I realized this weekend that I don't have enough "Thank You" cards, so I used the Festive Elephant from the Christmas 1 Release (which are all 30% off right now!)... I simply left off his Santa hat and tree and added a heart ♥ I also used the Thanks w/Shadow die, and then I spelled out "a ton" on the far right strip that holds the easel in place using the Stitched Alphabet die.  A few other dies are listed in my tutorial (and shown at the end of my post).  


Before I get to the tutorial, I'll share a few more project photos so you get a good idea of what we're making today!  

-Here's the front in closed position-

-Inside-

-View from the top as it is standing in easel position-

Trust me - this is so EASY to make, you don't even need a video!  If you've ever made an easel card, this is basically an easel turned on it's side... except that instead of your focal image on the front being glued to half your card front, there is a li'l mechanism that makes it pop forward when the card is in easel position.  ☺  And I stepped it up by making my focal image a shaker! (If you want to keep your card more flat, you can simply made a flat focal image piece.)

- Here's How I Made It -

BLACK CARDSTOCK:
(Card Base) Cut at 5-1/2" x 8-1/2" 
- score at 2-1/8" and 4-1/4" (along 8-1/2" side)

PINK CARDSTOCK:
(Front Mats)  Cut 2 Panels at 5 1/4" x 1 7/8"
(Inside Mat) Cut 1 Panel 5 1/4" x 2 1/2"
(Inside Mat) Cut 1 Panel 5 1/4" x 1 3/8"
(Focal Mechanism) Cut at 3" x 1-1/2" 
- score at 1/2", 1", 2" & 2-1/2" 

PATTERNED PAPER (Floral):
(Front)  Cut 2 Panels at 5 1/8 x 1 3/4
(Inside) Cut 1 Panel at 5 1/8 x 2 3/8

PATTERNED PAPER (Polka-Dot):
(Inside Edge)  Cut 1 Panel at 5 1/8 x 1 1/4

- DESIGN STEPS -

• Attach your patterned papers to the pink mats.

• Fold your mechanism so that the outside scores are mountain folds & inside scores are valley folds.


Mechanism:   Add strong adhesive to the bottom of your 2 outside flaps and attach them right up to the score line of your card front. See photo below.  It helps to attach one side first, then the other.


•  Attach your front panels over the glued flaps of mechanism but under the top part as shown.


•  Add foam strips (or dimensionals/pop dots) to the back side of your thin polka-dot panel and attach INSIDE your card, near the edge.


• Attach your larger panel (not popped up) to the side of it, leaving equal black border all around.


• Since the base is black, I added a white panel to the INSIDE far left (backside of card front) for writing a message.  That measures 5-1/4" x 1-7/8" - OR you could cut a larger white panel for the way back of your card cut at 5-1/4" x 4"

Our Card Base is DONE!  Easy peasy, right?!  


Now let's make the shaker!

BLACK CARDSTOCK:

• Die cut a frame by nesting the largest from the Nested Stitched Scalloped Circle set and the 3rd largest die from the Pierced Circle set as shown...

*Note:  this photo is not exactly correct, but my instructions are!  The photo shows that I first cut with the 4th largest die, but then I went back and cut it again with the 3rd largest and forgot to take a photo.


WHITE CARDSTOCK:

• Die cut a frame by nesting the 2nd & 4th largest dies from the  Pierced Circle set


• Glue your white frame onto the black scalloped frame, making sure to center it so there's equal border showing.  (Mine is not centered as it's not glued down yet in this photo.)


PATTERNED PAPER & ACETATE:

• Die cut a circle using the 2nd largest from the Pierced Circle set

•  Glue your acetate circle to the BACK of your scalloped frame.  

•  Add foam strips/tape on top of acetate, being careful it doesn't show from the front.

*TIP #1: if you remove the backing from your foam tape first, it makes it much easier to bend around curves like this. 

*TIP #2:  if you rub both sides of your acetate with a used dryer sheet, it will remove the static from it so your sequins don't stick to it!

•  Add your shaker elements to the well as shown below.

*TIP #3:  If you glue a few of your sequins to the patterned paper, when your card is standing up and all the rest of the elements fall to the bottom, it will still look pretty! (at least until they get shaken off! LOL)


•  Turn your patterned paper circle upside down and place centered onto the shaker.


•  Add Scor Tape or other strong adhesive/glue to the tab mechanism on card front and attach your shaker!


•  Die cut and color/assemble your CottageCutz Festive Elephant.  (The heart is left over from die cutting the Whimsical Hearts Slimline Die for another project, so use any CC heart die you have)

• Die cut "a" and "ton" from the Stitched Alphabet die from PINK & BLACK cardstock, then offset them and glue together.  

• Die cut Thanks w/ Shadow die from GREY & PINK cardstock and glue together.


•  Glue "a" and "ton" vertically to the inside popped up panel 


•  Glue "thanks" to the top of your shaker.

•  Pop up the elephant with foam tape to your shaker.  I added 2 layers of foam tape to his head to give it more dimension. ☺


Voilà! and DONE!

I hope you enjoyed this tutorial and found it easy to recreate!

-Here's my version I shared on Saturday-
see more pics of this one here

PRODUCT USED on today's card:


~Kristine