Showing posts with label Woodland Friends. Show all posts

Monday, November 08, 2021

Forest Friends

 Hi everyone welcome to another Monday with the Scrappin Cottage. Today I am sharing the  Windows Slimline card using the newly released Christmas Van w/Bear and Woodland Christmas set.


I used speciality papers to create the van and added the diecut piece to the bottom window on my slimline card
You can see how shiny it is in the image below

I next used craft colored paper to diecut the woodland deer and decided to leave it as it 
and adhered it in the second frame. 
The top window I colored the trees with my copics and used some white glitter paper to give a look of snow to the Forest Friends Border die (as seen below)

I glued the piece to a piece of white cardstock and this completed my card for today.


Saturday, November 17, 2018

Merry Christmas w/the Deer Family

Hello Scrapping Cottage friends! Thanks for taking the time to stop and visit with us today. It's Mary Marsh here bringing you the Saturday edition of the Blog. 

You can still pick up the Autumn 2018 dies with 10 new designs at 25% off in the online store. There are some dies in this release that could be used for some cute outdoor scene cards that aren't fall related. And, if you need some card ideas for the dies look back on the blog because the DT has posted some beautiful cards for inspiration. 

My card this week is featuring the Merry Christmas w/Deer Family die. It is part of our Christmas Part 2 release. I like making Christmas cards that feature an outdoor type scene. This one is relatively simple and would be easy to make multiples of. So let's get started with some details on how I created my card.

Step 1: I knew I was going to create a snowy scene with the deer, so I picked my card colors accordingly. I also wanted to get some red in there for a more traditional Christmas card.
Red card base: 4 1.4" x 5 1/2"
White layering panel: 3 7/8" x 5 1/8"
Blue embossed panel: 3 5/8" x 4 7/8"
I used a snow fall embossing folder on the blue layer. I was looking for a quick way to get the snow fall look on my card. You could use a stencil and embossing paste, or even a snowflake stamp.
Step 2:  I cut the birch trees from white cardstock. The deer are cut in a medium brown and the Merry Christmas phrase in red.
I decided I wanted a snowbank for the deer to stand on. So I cut one from white cardstock and added glue to the top edge and sprinkled on some chunky glitter.
Step 3:  Now that all the card elements are cut, I am ready to start card assembly. I attached the birch trees to the embossed panel first. I rolled up glue dots to give a slight lift off the background.
The snowbank is attached with dimensional adhesive. I attached the deer in the same way.
T decided not to hang the Merry Christmas banner across the trees. I attached it with Ranger multi matte medium. I like this adhesive because it dries clear.
To finish up my card I secured the image panel to the red card base. Scattered a few sequins on the snowbank for a more finished look there. To get a little color in the birch trees, I cut 3 small birds in red cardstock. The birds are from the Woodland Friends die. They are the perfect size and added just the subtle touch I was looking for.

Well that's it for me for this post. I hope I have given you an idea for using this new die.  See you next Saturday!

dies I used to create card:

http://www.scrappingcottage.com/cottagecutzmerrychristmaswdeerfamily.aspx

http://www.scrappingcottage.com/cottagecutzwoodlandfriends.aspx


Saturday, May 20, 2017

Exploring in a MotorHome (New Die)


Hello Scrapping Cottage friends! Thanks for taking the time to stop and visit today. It's Mary Marsh here bringing you the Saturday edition of the Blog.

There is another great release of new dies over in the online store. The Expressions Plus (word dies) with 35 designs are available right now. The font is so beautiful and you will definitely want these in your collection. Janet (our video artist) has put together a video showcasing some of these new dies.
https://www.youtube.com/watch?v=QSLcthpx5W0&feature=youtu.be


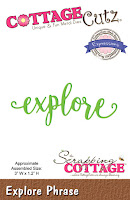
For your viewing pleasure today, I am featuring one of the new dies. I am using the Explore Phrase. As soon as I saw this word, I thought of making an outdoor scene with the dies from the November 2016 Camping Bundle set.

I have some friends that just retired. they bought a motorhome and are taking a 3 month trip across our beautiful country. This is a retirement celebration card for them.

I thought the outdoor scene would work best in a different type fold. I found a tutorial on YouTube for a double front fold card. You have your front image, then an inside image an then another panel for a 2nd inside image.  Here is a video link. I will also give you a step by step tutorial.

So let's get started with some details on how I created my card this week.

Step 1: I started by cutting my navy blue card base. It is 5 1/2" x 8 1/2". I scored it at the 4 1/4" point and cut 2 1/4" off  the 8 1/2" side. This is how I achieved the front fold on my card.  I set that aside to work on my outside image panel.
Step 2: The next step was to cut the Motorhome. I used light and dark gray + red cardstock on the image. The white panel is cut at 2 3/4" x 3 1/4". I layered that over red cardstock measuring 3" x 3 1/2". I stamped my sentiment and set this aside to work on the inside image panel.
 
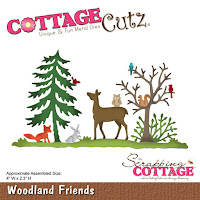
Step 3: On this panel I used the images from the Campsite & Woodland Friends dies. I cut the pine tree in a dark green, a yellow sun and the directional arrows in red, green and blue. I cut a small cloud from the sun & clouds die and used that as a template and did a bit of background sponging.

The white panel is cut at 2 3/4" x 3 1/4". Cut the explore phrase word in navy cardstock. I layered this panel over red cardstock measuring 3" x 3 1/2".

Step 4: I cut another piece of white cardstock at 5 /14" x 8" and scored it at 4". I attached this image panel to the cardstock and then secured it to my navy blue card base.

1st inside image
Now I can attach the front panel to the card.  It goes directly over the inside image. I used Scor-tape to make sure it stays put when the card gets opened and closed.
 
 
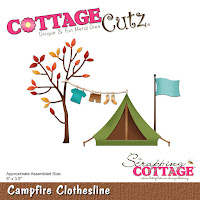
Step 5: Now it's time to decorate the inside hidden panel or the double fold part. I used the Jamboree Bear die and the campfire from the Campfire Squirrel die. The background paper is some that I had in my stash. It reminds me of a nighttime sky so I thought it would work well here.
 
2nd inside image
Well, that completes my card for this week. I hope I have shown you another way to use the new Expression Phrases dies and incorporating them with existing CottageCutz product you already have. And, I hope you will give this fun fold a try. I think it makes a big impact on a card.  
 
Dies I used to create card:
http://www.scrappingcottage.com/cottagecutzwoodlandfriends.aspx

 
http://www.scrappingcottage.com/cottagecutzcampsite.aspx

http://www.scrappingcottage.com/cottagecutzjamboreebear.aspx

http://www.scrappingcottage.com/cottagecutzmotorhome.aspx

http://www.scrappingcottage.com/cottagecutzsnowcappedmountains.aspx

http://www.scrappingcottage.com/cottagecutzexpressionsplusexplorephrase.aspx
 
Front panel
1st inside panel
2nd inside panel
 

Saturday, December 03, 2016

Camping Scene on StairStep Card

Hello Scrapping Cottage friends! Thanks for taking the time to stop and visit today. It's Mary Marsh here bringing you the Saturday edition of the Blog.

We had some great sales this past week. First there was Black Friday and then Cyber Monday. I managed to pick up a few Christmas presents at great prices.
Speaking of Black Friday, there was a new release of dies here at the Scrapping Cottage.  The Camping Bundle is packed full of dies for the outdoor enthusiast and can help you create some really cute scenic cards. There are 12 new dies included in this set. And, it looks like it is on sale. If you buy the entire set you can save 55%. Each individual die is currently 30% off the list price.

I am using several dies from this new release. So let's get started with some details on my stair step camping card. I used an outer stair step to create my camping scene. I bought the stair step card at a local retailer. But, here is a tutorial from Splitcoaststampers  that shows you step by step how to make your own. This card will fold flat for mailing and measure 4 1/4" x 5 1/2". It's a standard A2.

I started the creation of my scene with the 3rd step and there I placed the snowcapped mountains and forest trees. I sponged the white background with a soft blue ink. I used 2 sets of mountains to fill the width of the step. The forest trees are cut in a dark green cardstock. They are a border die so it was perfect to use here.


My next step was to add the images for the outer part of the card. I sponged the outer part of the stair in the same soft blue ink and then down at the bottom I used an olive ink and a chocolate ink. I used the Campfire Clothesline, Woodland Friends and Camping Phrases dies on this part of the card.


In the center part of the step, I used the Campsite die for the directional arrows and the Forest Critters die for the little hedgehog.

 
That completes my card for this week. I hope I have provided some inspiration for you with these new Camping dies. they were so much fun to work with to create my camping scene. I will see you again next Saturday. So until next time........inky hugs.
 
Dies used with links to online store;
 
http://www.scrappingcottage.com/cottagecutzwoodlandfriends.aspx

http://www.scrappingcottage.com/cottagecutzforestcritters.aspx

http://www.scrappingcottage.com/cottagecutzcamptfireclothesline.aspx
http://www.scrappingcottage.com/cottagecutzcampingphrases.aspx

http://www.scrappingcottage.com/cottagecutzcampsite.aspx

http://www.scrappingcottage.com/cottagecutzsnowcappedmountains.aspx