Showing posts with label Witch Legs. Show all posts

Sunday, October 09, 2022

Halloween Release Design Team Samples (Part 2)


Hello CottageCutz friends! Thanks for taking the time to stop and visit today. We are sampling DT cards from the Halloween release.

There are 22 new designs in this release. So many whimsical images that are perfect for your Halloween card-making. They are currently on sale with 30% off individual dies. The sale is just for a limited time so hurry over to the online store to make your selections.

Group Posts give you the opportunity to see more card samples from the Design Team. We have 4 samples for your viewing pleasure today.

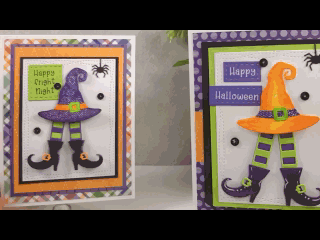
Card 1: Our first sample today is from Marla Harris. She created a colorful indoor scene that has such a fun vibe to it. Nothing scary here just cuteness overload! The dies she used are Cauldron, Witch LegsWitch Hat, Candy & Bucket, Web, and Potions Bottles. The candy phrase is from the Candy Cart die (May Sweet Treats) 

The floor was done with vintage photo and walnut stain distress oxide inks. Her wall is inked with seedless preserves distress oxide and splattered with water. The images are all Copic colored. She even added white glitter to the spiderweb for a little extra sparkle.


Card 2:  Our next sample is from Linh Van. I love the playful and whimsical appeal of her Halloween shaker card. She created it with the Witch HatWitch Leg, Jack-o-lantern WitchSpooky KittiesPotion Bottles (spider on pumpkin), Web and the Spooky Web Tree (the spider hanging on the web) dies.
 
For the shaker windows, she used solid color cardstock in bright colors that are perfect for her images. Her sentiment is stamped and embossed with embossing powder.  

Card 3: The next card is one that I (Mary Marsh) created using the Haunted Ghost House die and created a nighttime spooky scene. I used distress inks - black soot, villainous potion, carved pumpkin and forest moss for the ink blended sky. For the moon I used a circle die before sponging my background colors. 

The welcome phrase is from the Bee Phrases die (June 2022). Did you catch the bone that is holding up the side porch roof!!!
Sample 4: Our last sample for today is from Jen Hartsgrove. We know that we have scrapbookers out there that follow our Blog and purchase our dies. So, we are trying to give those crafters a way to use our dies in their layouts. Jen has done this on several of her YouTube videos - check them out here and here

For this layout she is featuring the Haunted Ghost House and paired it with some great designer papers to create a fun and not spooky layout. Her layout is all set for her to add her photos and title. 
I hope you have enjoyed the samples for today and that we have given you some ideas on ways to use these new dies. The team will be posting all week on the Blog & YouTube so make sure you check back each day for ideas. There is still lots of time to order your dies and get cards made for Halloween.

Dies used to create today's samples:


Monday, October 03, 2022

Dancing Feet Treat Box & Card

Hellooooo CottageCutz friends!   

Kris here with a fun and interactive card and treat box using dies from the new HALLOWEEN RELEASE!   If you missed Part 1 of our team post yesterday, click here. You'll see that these dies are not just for Halloween... many of the dies you can use any time of year!  There will be another team post next Sunday, and we are also showcasing samples throughout the week, so LOTS of inspiration for you!

I started by making 2 "Dancing Feet" cards (or should we call them swinging legs?) but then I decided to make a fun Candy Box, with the dancing legs/feet on the front!  They are both easy to make and I'll show you how!

(here they are in action)

How FUN are these?!! 

For my projects today, I used the Witch Legs, Witch Hat, Trick or Treat Phrase, and the spider is from the Spooky Truck die from the New Release.  I also used the Wacky Stitched Rectangles the Pierced Wide Circle Frame die set and the Pierced Circles set.

Let's Start with the Card:

1)  I started with my card base then attached each of the following layers:
White card base = top folding card, 5-1/2" x 4-1/4"
Plaid paper mat = 5-1/4" x 4"
Purple paper mat = 4-7/8" x 3-5/8"
Orange paper = 4-5/8" x 3-3/8"
Black cardstock = 4-1/8" x 3-1/8"
White cardstock = die cut with 2nd largest Wacky Stitched Rectangle


2)  I die cut my pieces:  hat, legs and spider, and added some shading with Copic markers.

3)  Then I made the mechanism that will make our legs swing!  I used the smallest circle die I could find in my stash and cut a hole from purple cardstock.  I then hand cut around it a piece that looks like the one in my photo below on the left, cutting a rectangle around the circle first, then I cut up from the bottom to create 2 stems, and I rounded the top to follow the shape of the hat.    


4)  I glued my witch legs onto the stems of the purple piece we just cut.  See photo below.

5)  I then added a small circle foam dot to my white card front a li'l higher than the center, and hung my legs around it.  

6)  Next, I added foam dots to my hat.  Notice you DON'T want to add them to the brim of your hat or your legs won't move!  Learned that one myself!  LOL!  One at the tip of hat will suffice, because you'll also have the middle dot that we hung our legs on.  Remove the backing from both foam dots and center your hat over legs.  

7)  I added s sentiment that I generated on my computer and die cut, added the li'l spider and some black sequins and we're done with the card ☺


I made another similar one for the front of my treat box.  


Design Steps for Treat Box:

1)  I cut a piece of lime green cardstock at 3-1/4" x 4-1/8" and mounted my white Wacky Stitched Rectangle on top.   I repeated the rest of the steps as my card to create the front panel.

For the box... I wasn't sure score lines would show up on black, so I also made an orange version to show you where to score/cut etc.  

2)  I cut a piece of (black) cardstock, 11" x 7-1/2".  Then, with the 11" side along top of my score board, I scored at 3-3/4", 5-1/4", 9", and 10-1/2".  Then I turned it so the 7-1/2" side is along the top and scored at 1/2", 1-1/2" and 6".

3)  Use the photo below to make cuts with scissors to create mitered flaps etc.  The largest sections you will NOT miter the flaps, all others you will.  (you can click the photo to enlarge if you need to)


4)  Once my flaps were mitered, I measured each of the larger sections (that have the 1/2" score on top) to find the middle and placed a pencil mark at 1-7/8" and used my Crop-o-dile to create a hole.  I rounded the corners of the flaps with the holes.  

5)  You CAN decorate just one side of your box and be done, but I thought it'd be fun to create a peek-a-boo window on the back so they can see the candy inside!  ☺  So I cut a piece of purple patterned paper, 3-1/2" x 4-1/4" and glued it to the outside panel of the largest end as shown below.  

6)  Then I die cut a circle (5th largest of the Pierced Circles Set) from the middle of that panel. 


7)  I then turned it over and added a piece of window sheet larger than the circle and attached to inside.  


8)  I cut a circle frame to cover the hole on the outside using the middle sized Pierced Circle Frame die.  Then I added the cute spider from the Spooky Truck die by gluing it behind the frame, then attaching it to the box. 


9)  This is totally optional, but I thought the candy (and spider) would show up better with a colorful insert, instead of seeing black through the hole, so I cut a piece of yellowy-orange paper cut at 3-1/2" x 4-1/4".


10)  I cut some candy-patterned pieces for the spines and top portions of my box.  I cut (2) spines at 4-1/4" x 1-1/4"


11)  And (2) plaid pieces for the top portions cut at 3-1/2" x 3/4"

12)  I die cut the Trick or Treat Phrase from glittered cardstock and glued onto the back of my box as shown.


12)  To assemble the box, add a strip of Score Tape onto the outer 1/2" flap as shown.


13)  Then flip it to the other side and add 2 or 3 strips of Score Tape to the non-rounded end flap as shown below. 


14)  Bend the short 1/2" flap over and remove backing from tape, then fold the other end of box over onto that flap, lining up corners.

15)  Now you can fold in the small bottom (non-rounded) flaps in, then fold in the non-taped flap, then remove tape backing from the 3 strips and fold over that flap.

16)  You can use the straight end of your bone folder to stick inside your box and rub over the flaps to help secure them. 

17)  Lastly, I added cute ribbons thru the holes at the top and tied a bow!  Done☺

PRODUCTS I USED:


Check out the whole HALLOWEEN RELEASE HERE!


I hope I inspired you to get crafty with your favorite CotageCutz dies ~ Have a blessed week ☺

~Kristine

Saturday, September 24, 2022

New Halloween Release Sample

Hello CottageCutz friends! Thanks for taking the time to stop and visit with us today. It's Mary Marsh here bringing you the Saturday edition of the Blog.

It's new release time!!! We have new dies in the online store. It's our Halloween release with 22 new designs. They are currently on sale with a 50% discount on the entire bundle or 30% off individual dies. The sale is just for a limited time so hurry over to the online store to make your selections. 

For my card sample today, I am featuring the new Witch Hat, Witch Legs and the Trick or Treat Phrase dies. So, lets get started with some details of how I created my card. 

Design Steps:

For my card I used the colors from the Splitcoaststampers color challenge #914. We were to use granny apple green, melon mambo and highland heather. I thought they were bright and fun colors and would work well for my card design. I used a deeper shade of purple for my card. 
granny apple green, melon mambo, highland heather
I cut the images from cardstock in the challenge colors. 
For my card sentiment, I decided to use the Trick or Treat Phrase die. I cut it from the grape shade of cardstock I am using. 
I kept my card base as white cardstock and the designer paper is granny apple green. It's also in an unusual size. At least a size that I have never used before. I also used a border punch on the designer paper just for added interest. 
White card base: 4 1/2" x 6 1/2"
Designer paper layer: 4 1/2" x 5 1/4"
Now that my card elements are prepared, I am ready to start card assembly. I attached the hats first with double sided tape to the designer paper. 
Next, I added my trick or treat phrase with clear drying glue. 
Now I am ready for the witch legs. I attached those to the card base before I attached the designer paper. 
To finish off my card, I attached the image panel to the card base with double sided tape. I decided to add a few spiders from the Spooky Truck die just for added interest. I used the stars from the Trick or Treat Phrase die. 
That's it for me for this week. I will see you next Saturday. 

Reminder: Our YouTube Channel has a new video from Linh Van. There is a giveaway for being a subscriber, liking the video and leaving a comment. Click here.

Dies I used to create card: