Showing posts with label Window with Shutters. Show all posts

Tuesday, December 14, 2021

Christmas Window


Good morning Cottagecutz fans. I hope your week is gong well and that you are almost ready for Christmas. I can’t believe it’s next week. I say this every year but where does the year go?

Anyway, it’s Wendy bringing you the blog today. I have a simple sweet card for you using some of my very extensive Cottagecutz stash.

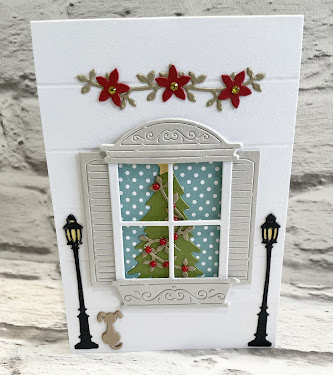
I thought’s I’d make a little window scene. I have had these dies for a while and I thought, let’s use them.

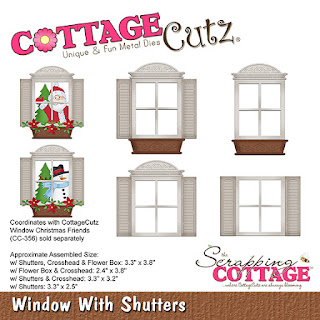
To begin with I took s card 6” x 4”. At each inch point I have scored a line. I then cut out the ‘Window with  Shutters’ die in white an then the top and bottom in grey. Behind the window I used the “Window Christmas Friends” tree die and added some some gold tinsel from the same die. I then added some red pearls to look like lights. I thought it would be fun to have wallpaper behind the tree so I had this in my crafty stash.

I attached the window with 2mm foam pads as I wanted some dimension. At the top of the card I used the same ‘tinsel’ that I used on the tree and added some poinsettias,l finished with gold gems.

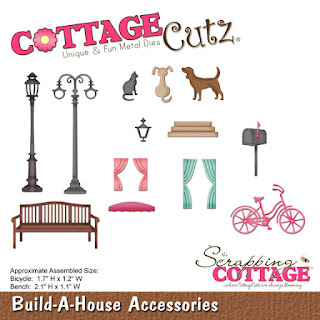
Next I thought the card looked a little bland so I used the ‘Build a House Accessories’ and cut out the lamps twice for each side of the card. I also used the dog which I layered 3 times so it looked more realistic. That is our card done


Dies I have used:


I have been a little bit distracted and excited this week as my craft room was finally finished,I am so blessed to have such a large room and my family have really pulled together to get this finished for me.

Here’s a few photos, excuse my crafty mess


Monday, December 04, 2017

Santa at the Window


Hi, CottageCutz friends!  Lois here with a Christmas card today.  It's hard to believe that it's already December.  If you haven't made all your Christmas cards yet, you best get cracking!   CottageCutz has lots of fun Christmas dies in their store.  Be sure to take a look!  My card for today uses two coordinating dies, Window with Shutters and Window Christmas Friends.


To start my card I cut cardstock and patterned paper as follows:

Black - 8 1/2" x 5 1/2", scored at 4 1/4"
White - 4" x 5 1/4"
Patterned paper - 3" x 4 1/2"


One of my favorite embossing techniques is to ink up the embossing folder before placing the cardstock inside.  This Sizzix Bricked folder always works so well with this technique.  I inked it up with gray ink, inserted the white cardstock, and ran it through my Cuttlebug.  When you use a dye-based ink (such as Memento), the folder rinses clean under the faucet.


Next I die-cut the pieces from the coordinating dies, placing them on my sticky board to keep the small pieces from getting lost.


Using ink or markers, I added some texture to various die-cut pieces.


I wanted a window in my brick wall, so I laid the die-cut window in the center of the panel and drew inside the panes.  Then, using an Exacto knife, I cut the opening just outside the lines that I had drawn.


This photo shows the opening.


I placed some Scor-Tape around the perimeter of the window and cut a piece of acetate slightly larger than the opening . . .


. . . and, removing the protective paper from the Scor-Tape, I carefully placed the acetate over the opening.


I then glued the patterned paper in the center of the black card base.


I decorated the front of the card, gluing down the window frame and cornice and adhering the shutters and window box with foam pop dots.  After gluing the three flowers to the garland, I pierced the centers and added a yellow mini brad to the center of each.  I then glued the whole garland to the window box.


Before attaching the front of the card to the base, I had to construct Santa.  I used the illustration on the front of the packaging as a guide.  His head is attached with foam pop dots, which made it easy to place him on the front -- leaving his arm not glued down.  I then slipped the tree (on which I had applied some liquid glue) under his arm and pressed it down to hold it firm.  I had lined him up so that he would show through the window.


Because I had used pop dots on Santa's head, I needed to use thicker pop dots on the brick card front so that there was a bit of room between Santa and the window sheet.


I attached the brick card front so that Santa and the tree showed through the window -- and I was finished.


Be sure to check out all the wonderful Christmas dies on the CottageCutz website.  Dies used on this card are:

http://www.scrappingcottage.com/cottagecutzwindowwithshutters.aspx


http://www.scrappingcottage.com/cottagecutzwindowchristmasfriends.aspx


Tuesday, November 07, 2017

Santa Napping Die + Video

Hello Scrapping Cottage friends! Thanks for taking the time to stop and visit with us on this Tuesday in November.

Have you checked out the online store lately? The new Christmas dies are currently on sale and you can save 25%. It's a great chance to get some dies that might be on your wish list. The DT has been showing some great cards and card ideas for Christmas.

Today, for your viewing pleasure we are featuring another one of the new dies, this one is the super cute Santa Napping. And it's also a double feature because we have a guest designer with us. Sherry Wolfe, was one of the video artists who took part in the video hop a couple of weeks ago.

She had such a cute idea for this die as well as the Window with Shutters and the Window Christmas Friends dies. She has graciously prepared a process video for us. The video is attached and I have also included some photos of the super cute card that she has made.


inside of card

close up view

card front

Please leave her a comment and give her video a thumbs up on You Tube.  


Dies used to create card :
 
http://www.scrappingcottage.com/cottagecutzsantanapping.aspx

http://www.scrappingcottage.com/cottagecutzwindowwithshutters.aspx

http://www.scrappingcottage.com/cottagecutzwindowchristmasfriends.aspx
 

Thursday, October 26, 2017

Peeking Santa

Hi Scrapping Cottage Friends

It is Pam sharing with you today!

Before I get started I wanted to share with you that tomorrow and Saturday we will be having a video blog hop!! Six talented YouTube crafters will be showing off their interpretations of some of the new holiday release dies during the hop.  The sneak peeks are amazing featuring some beautiful projects!  Please check out Janet's post to get all of the details!!

Now on to today's project, I am making my Christmas cards and this one is going to someone very special!  I just love this Santa peeking out the window!

Designer Steps:

 1.  Cut the pieces using the Window With Shutters and Window Christmas Friends dies.  I used red, green, white, brown and white card stock for all of the pieces.
 2.  Color and shade the pieces with Copic markers.  Add small rhinestones for the eyes and the centers of the poinsettias
 3.  Glue all the pieces together and add a small piece of yellow DP behind the window
 4.  Use an A2 white card base and glue a slightly smaller piece of DP with snowflakes on the card base.  Pop dot the window and sentiment to the front of the card


I hope you are inspired by all the new dies in our Store!

Blessings
Pam


Wednesday, September 27, 2017

Santa & Snowman Window Cards

Hey everyone! It's Janet dropping by to show you two cards I made using two new holiday release dies. The first is called Window With Shutters and it has a great window, complete with a header, flower box and shutters. This die could be used year round to create a cute window scene by itself or filled with characters of your choosing that fit in the window space.
.

Today, I chose to use the companion die set made just for this window called Window Christmas Friends. It includes adorable Christmas figures including a pine tree, Santa, Snowman and Poinsettias with greens for the flower box.


Since the Santa and Snowman are both cut when you use the set, I decided to use both in each card. Nothing should go to waste right?! For Santa, the snowman is saying hi when you open the card. The opposite is true if the snowman adorns the front. I also used the Nested Stitched Scallop Rectangles inside for the stamped sentiment and die cuts. These are such cheerful little figures!


To learn how I made this card including how I created the acetate window effect, click on the video below. I hope you enjoy this one because I had a lot of fun creating them!

Have a great week and thanks for spending some time with us here at CottageCutz.

Hugs,
Janet
SugarShine Designs


Dies used for this project: