Showing posts with label Window Slimline. Show all posts

Thursday, March 09, 2023

Hello Flowers

 Hello CottageCutz Friends,

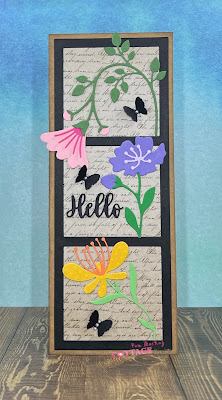
I like to send cards to family and friends with no special occasion.  So today I thought I would make a card just to say hello and I am thinking of you!

The dies I used for today's card are from the new collection.  They are Flower 2Flower 6 and Flower 7.  I decided to make a slimline to display these pretty flowers.

Designer Steps:

1.  Using the following dies Flower 2Flower 6 and Flower 7 cut out these colors of card stock: yellow, orange, pink, dark pink, purple, light purple and 3 shades of green
2.  Use a Kraft slimline base measuring 3 1/4 x 8 1/4
  • Use the Window Slimline and cut it out in black
  • Use the Hello w/Shadow and cut out the hello in black 3 times
  • Cut a piece of script designer paper 3 x 8
3.  Glue the 3 Hello's together.  Glue the black window frame to the designer script paper as shown above
4.  Glue the Hello and the purple flower in the middle window as shown above
5.  Glue the pink and yellow flowers as shown above
6.  Ink the edges of the kraft slimline card base in black 
7.  Glue the flower panel to the kraft card base.  Using the Spring Meadow die cut out 3 black butterflies.  Place 3 small pearls on each butterfly and then attach to the card front as shown below and your card is complete

CottageCutz Products


We have more inspiration on our YouTube Channel check it out HERE

Thanks so much for stopping by!  And I will see you next Thursday.

Blessings and Take Care


Monday, September 05, 2022

Peeking Reindeer Window Shaker


Happy Monday CottageCutz peeps!  
 
Kris here with a card featuring the cute Peeking Reindeer Window die from the NEW CHRISTMAS RELEASE!  I thought with all the open spaces, it would be perfect for making into a shaker ~ and I even had some snowflakes and star sequins to put inside! 

Great News for YOU!!

This whole Christmas Release 1 bundle is 50% OFF for a limited time! And the individual dies are 30% OFF!!

And don't miss our BIG LABOR DAY SALE!! Up to 65% OFF so many dies -  Sale ends Thursday, September 8, 2022 at 9:00 PM Pacific Time sHURRY OVER and save!!!  

~ DESIGN STEPS ~

Creating the Card Base:

The design papers I used are from the Christmas 2019 collection at Divinity Designs.  The glittered cardstock is from the Park Lane collection at Joanne's.

From the following, I cut and attached in this order:

Thick White Card Base:  5-1/4" square 
Purple Cardstock:  5-1/4" square
Large Snowflake Layer:  5" square
White Glittered Cardstock:  5" x 2" - cut the top off with a die from the  Hills Slimline set

Creating My Shaker:

1.  I die cut my Peeking Reindeer Window 3x:  white glittered cardstock, tan, and black.

Since this die is all one piece, you COULD cut it from white cardstock and color the different parts, but since I wanted the icicles to be sparkly, I went ahead and pieced my die cuts.  

2. From the glittered white die cut, I carefully cut away the images of Santa's sled and flying reindeer, leaving a nice straight edge for the window pane.   


3.  From the black die cut, I did the same, except I cut away the window pane and left the Santa & reindeer all in one piece.  I then glued it behind the window as shown.


4.  From the tan die cut, I carefully cut the reindeer out.  I then added some Vintage Photo Distress Oxide ink over his head and feet, and just a tiny bit of the antlers to give him more dimension.  I cut out the eyeballs.  (Sorry!  but they were brown after I sponged ink and wanted to color them green, so with scissors, I simply cut those away.)  I colored the eyeballs and nose with Copic markers.


5.  I added some 1/8" Score Tape around the outside edges of the window on the backside.  

6.  I cut a piece of acetate to 3-1/2" and attached it to the back of my window. 


7.  I then added 1/8" foam strips on top of the acetate, just around the outer edges.  Then added my shaker elements in the middle.  Removed the backing from the foam strips. 

8.  I cut a 3-1/2" square from the light purple with snowflakes paper from the design pack and placed it upside down on my foam strips to cover the back of shaker. 

9. Then I glued the shaker to my card front.


10.  I thought it needed a sentiment, so I cut a pennant from the Windows Slimline set.  Then I stamped "Ho Ho Ho" (from a Stampin' Up! stamp set) in light blue, medium blue and purple, fussy cut them out and glued onto the pennant.  Then I attached with thick foam strips to my card front, and done!


Thanks so much for PEEKING!  :)  

Products I used:


We'd LOVE to see what you do with this fabby Christmas Release!

~Kristine

Thursday, August 19, 2021

Missing You

 Hello Scrapping Cottage Friends,

It is Pam creating with you today on the blog!

It is time to make the CottageCutz family a little bigger.  We are adding a brand new line of Photopolymer Clear Stamps call Lil' Bluebird Designs.  We are kicking off this new line with 16 new stamp sets that have coordinating dies.  Make sure to check all of them out by clicking HERE

 Today, I am featuring the Forest Friends set.  I have family all over the country so I love sending Miss You cards to them.

Design Steps:

1.  Use a Slimline card which measures 8 1/2 x 3 1/2.  Cut a piece of blue DP 3 1/4 x 8 1/4,  also cut out 3 white Windows using the Window Slimline die
2.  Stamp your images in Memento Black ink using the Forest Friends Stamp set
3.  Color the stamped images with Copic markers.  The colors I used are in the picture above.  After you are finished coloring use the Forest Friends Coordinating die set to cut them out
3.  Glue all three frames together then glue the blue DP to the back of the frame.  Use the Spring Grass die to cut out 2 pieces of grass on green card stock.  Cut the grass down to 2 1/2 inches and glue them into the bottom two frames as shown

4.  Using the Lighthouse w/Clouds die cut out 2 white clouds. For the little hearts I used the Love Cupcake die and red card stock.  I cut out 3 hearts.   Glue all of your pieces into the frame as shown above.  Add the sentiment, sequins and hearts and your card is complete

CottageCutz and Lil' BlueBird Designs


Thanks so much for stopping by today!  Please check out all the adorable new stamp set we have in the online store!
Blessings and Take Care
Pam

Thursday, April 15, 2021

Friends are Like Sunshine

Hello Scrapping Cottage Friends!

It is Pam creating with you today!

We have a new release of Slimline dies and they are just a great addition to any card makers collection.  There are 9 designs and everyone of them can be used on ever single kind of card I can think of!!

Today,  I am using the Windows Slimline and the Scalloped Stitched Rectangle Slimline with a variety of additional dies.


Design Steps:
1.  Base card is a white slimline, using the largest Scalloped Stitched Rectangle die cut blue card stock,  use the Windows Slimline die and cut white card stock 
2.  Use the Bird with Bluebells cut out the leaves and the birds in green, blue, light blue, and purple.  Use the Rooster and Chick die and cut out the sun in yellow and light yellow.  Using Garden Accessories cut the white fence. Use Spring Meadow for the green grass and purple flowers 
3.  Assemble the birds and sun using a fine tip glue
4.  Glue the blue scalloped rectangle to the white base card.  Glue down the Window frame and then quickly tuck in the grass, fence and branches.  Add the sun to the top right corner of the card
5.  As I was working on the card I decided that I needed some butterflies so I used the Spring Meadow die again and yellow paper to create the butterflies.  I colored the butterflies bodies with a black Sukura Jelly Roll Pen.  I also used this pen on the eyes along with a white one
6.  Pop up the birds on the branches and stamp your sentiment.  I felt like the bottom of the card needed something more so I used the Mouse with Flower Cart die.  I cut the mouse out of gray card stock assembled him and then tucked him behind the fence.  Add your flowers onto the grass and your little yellow butterflies and your card is complete

CottageCutz Products