Showing posts with label Valentine Cards. Show all posts

Wednesday, February 14, 2024

Polar Bear Fishing Die Cut Card

Happy Valentine's Day crafty friends! I wanted to share a cute little card I created with one of the cutest cottage cutz dies!
It's the perfect card for my hubby for Valentine's day. He is indeed the perfect catch and he is all mine!


I started by cutting out and assembling all my pieces. For the cutie patootie polar bear, I cut all his pieces out in white cardstock. I then used some markers and chalks to give the pieces some color.

My card base is a standard A4 side fold card from some standard white cardstock. I used some cute patterned papers for the card base as well as for a mat for the scallop stitched rectangle mat as pictured.

Here is a closer look at the sweet little polar bear. He is holding his little fishing pole and he has one little fish on the hook. That fish I made extra sparkly with a touch of Stickles glitter glue.
I also used some of the glitter to color the water hole. The photo doesn't show the sweet little sparkle.

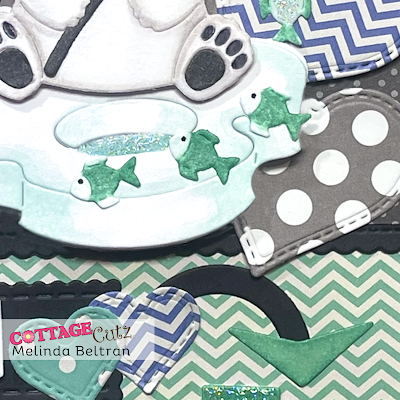
Here's a closer look at the cute little fish and you can also see a variety of the stitched hearts I cut out in a variety of patterned papers. I also used one of the arrows and one of the pieces from the retro alphabet set to make the arrow head look extra large.

here is a closer look at my layered sign. I layered one of the shapes from the Retro Alphabet die set onto one of the black scallop stitched dies. I then used another one of the arrows in the same retro alphabet set and wrote the words: you're, the and perfect. The perfect arrow points to the letters....

CATCH!  The letters are from the retro alphabet set. I cut them in white like the other pieces and then used the same marker color that I used on my little polar bear to color the letters in. I like doing this so that I can get the same colors on my project without having to try and have that particular color paper on hand. I have so many pieces of patterned paper and they are all from different manufacturers and the colors are so varied. This is the easiest, most economical way I have found to craft with a variety of color palettes.


Dies Used For This Project


Scallop Stitched Rectangle


Be sure to head over to Cottage Cutz and do a little shopping today!


Well, that about covers it for today. Be sure to come back real soon. You will want to keep up all the amazing projects the super talented design team shares! Don't forget to also check out the Cottage Cutz YouTube Channel and all our other social media accounts! Until the next time, have a wonderfully crafty day!
Melinda

Tuesday, January 30, 2024

Warm & Cozy Bears Card

Hey crafty friends,
Melinda here and it's another Terrific Tuesday! Today I am sharing a fun and super cute card featuring some more of the fun dies in the Cottage Cutz collections. Take a look.
My card is a standard A2 side fold card. I started with a white base. To that, I added a black mat and a cute blue polka dot patterned paper.

Here is a closer look at the cute little bears. I colored them with my markers. I also colored the logs, cocoa cups, fire and sign 

I used some clear gloss on my fire die cut pieces. As it dries, it dries clear and gives the die cut some glossy dimension. I did also add some to the inside of the bears' cups. You can't really see it in the photo above but it adds a cute touch.

Here is a closer look at my directional sign. I cut the pieces out in white and then used my markers to color the pieces in. I did print out the letters. I added a small pink heart and added some stickles glitter glue to it for the top of my sign.

Here is a closer look at the warm & cozy title. I also colored the purple and blue mini hearts. The darker pink (small and large one) and the lighter pink hearts were cut from that colored paper.

Here is one last look at my card. As I assembled the card, you can see I used the scallop stitched rectangle mat. To that I added a cute mat from some patterned paper. You can't really see it, but the paper has a heart print and it says.. Love One Another on it. I love this. Makes me think of me and my hubby as we are having a cold snap here in Florida. I have it set by my coffee and cocoa bar.


Dies Used For This Project

Rectangle scallop die (currently out of stock)


Well, that about covers it for today. Be sure to keep coming back to see what the other talented designers are creating! So much inspiration. Until the next time, have a wonderfully crafty day!
Melinda

Wednesday, January 18, 2023

We Go Together Hot Cocoa Pocket Box Surprise Card

Hello Cottage Cutz Friends!
Melinda here with you, and today I am sharing a fun and colorful Valentine's day card with a little surprise. Here's a look at my finished project.

Here's a look at just the cover. It features images from the following die sets
Cookies & Cocoa
Santa Gnome w/Cookies
Snowmen Friends
Nested Scallop Rectangle Set
Stitched Heart Set
 I used my markers to color in the various pieces. The cute image was from my Doodlebug paper pack as was the patterned papers I used for the scallop rectangle mat and the two hearts. I also used my puffy paint for the showgirls' hat and pompom and some stickles for the whipped topping on my mugs.


To make this fun card with a surprise you will start with a 5.5 x 11 piece of cardstock. I used white for mine. I then scored it at 5.25 and 5.75.

When scored you should have a half inch seam or section in the middle. See photo below. You will score and fold both lines so your base will close.


To make the little pocket you will need to create a little box like the one I created in the photo below. 
The base measurement is 4.75 x 11
You will score your piece of cardstock along the 4.75 side at .5", 7/8", 3 7/8" and 4.25"
You will score along the 11" side at .75", 1 1/8", 5 7/8", and 6.25"
You will cut it according to the photo below.

Here's a template image to offer a little additional help.

Once you have scored and cut the box, you will assemble it. When put together, this is what the "top" side should look like.

It has a flap that folds on the top so you can easily put a packet of Hot Cocoa inside.

Here is a photo of the "backside". I left the extra flaps so that I could adhere all of it to the base. Doing this makes the sides more sturdy. When you assemble the box, it will make more sense. They are optional and you could choose to cut them off to make the sides "flush" with the sides and not wrap around to the back. Here you can see I just added a piece of tape to keep down those flaps and then added adhesive to the entire back. This makes sure the little pocket/box is going nowhere...lol!

I added a blue mat to the inside background and then adhered my pocket/box to the center. I then decorated the top with a mat of patterned paper, a decorative piece of corresponding patterned paper and then a little rectangle, heart and another little snowmen friend. For this one, I added the little Santa Gnomes boots to him. Super cute! The rectangle and heart are left blank so I can write a little note to the recipient.

Here is a side view of the inside of the card, opened up. This gives you a good idea of what the box attached will look like and how the cocoa packet will be accessed.


Here is one last look at the top

I think it turned out super cute and you can make these for co-workers, friends and loved ones for Valentine's day and have a lot of fun doing them!

Dies I Used


Cookies & Cocoa

Santa Gnome w/Cookies

Snowmen Friends


Nested Scallop Rectangle Set


Stitched Heart Set


Well that about covers it for today! Until the next time, have a wonderfully craft-die day!
Melinda Beltran