Showing posts with label Sweet as a Christmas Cookie. Show all posts

Tuesday, January 10, 2023

Hey Sweet Heart Folded Flap Card

Happy Tuesday Cottage Cutz Friends!
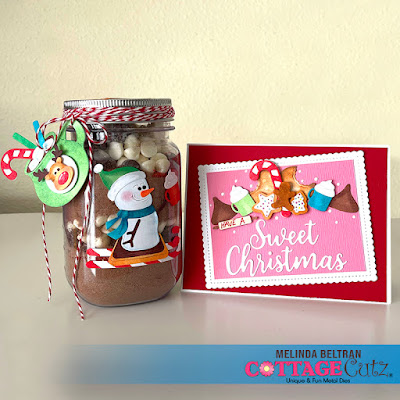
Melinda here with you, and today I am sharing a fun and colorful Valentine's day card. Here's a look at my finished project. I used the sweet Mrs. Gingerbread Die as the focal image from this year's Christmas release.

Here is a look at my finished card. I started with a 5.5 x 5.5 white mat. I then used a pink cardstock mat and some yellow mini hearts patterned pattern.


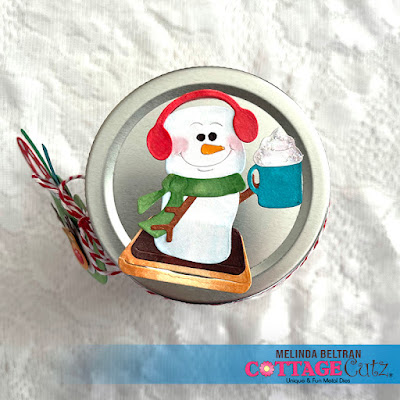
Here's a closeup of the sweet little Mrs. Gingerbread die. I used some Doodlebug patterned paper for her hat and dress. I mounted her onto the 3rd pierced circle die from the set. I then used a smaller circle punch for the mat. I added a couple of hearts from my stash.

I used a scallop punch and some circles along with some hearts for the last part of my sentiment.

Here I used the Hey from the Berry Phrases Sentiment along with the Sweet as a Christmas Cookie die.


Here is the center slightly open. I used a small Velcro circle to help keep the flaps closed.

Here is a closeup of the inside. I used some of the heart stitched dies along with the I Love You 


How to do the center of the card
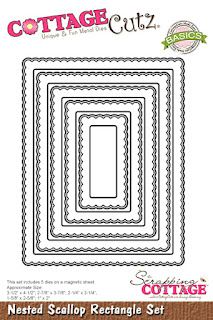
I used the largest Pierced Circle from the set and cut it out 4 times. I also cut a separate piece of white cardstock at 3.75 inches squared. I folded the circles in half.


Next I glued half of the circles to each side of the square. This is what it looks like in the photo above.

This is what the back of the card looks like once the 4 circles are attached. This photo is with the circles open.

This is what it looks like when the circle are closed.


I then used the next size circle down and used the pink cardstock for mats.

I then cut the circles in half and attached half on the front flaps and on the inside flaps. If you decide to put the mats on, make sure you leave a little room so they will close. I ultimately decided not to use the pink mats for the inside.

Dies I Used

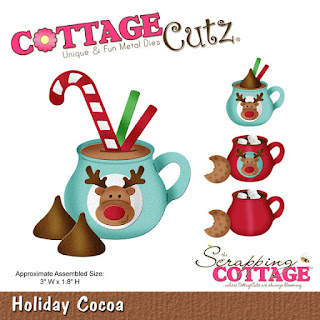
Mrs. Gingerbread Gnome


I Love You


Berry Phrases


Sweet As A Christmas Cookie


Pierced Circle Set


Stitched Heart Set


Well that about covers it for today! Until the next time, have a wonderfully craft-die day!
Melinda Beltran

Saturday, December 10, 2022

Baking Mice Slimline Christmas Card

Happy Saturday Cottage Cutz Friends!
Melinda here with you, and today I am sharing a cute and festive Christmas themed slimline card I created featuring the adorable Christmas Baking Mice die from this year's amazing Christmas release!
My card is a slimline card and the completed size measures 4 x 9. It is a side folding card with a white cardstock base.  


I started by die cutting all of my pieces in white cardstock. I then proceeded to color the various pieces in with my markers. I wanted to keep my little sweet baking mice close to the color of the packaging. Once all my pieces were colored, I began to assemble them.  on the lighter colored side. So I used shades of gray and light pink-peach for their ears. I used some chalks for their cheeks. I also added some stickles to the tiny chocolate chips in the batter. 
I then proceeded to cut out the largest two dies in white cardstock of the scalloped slimline die set
I then began to adhere my mice and all their little details onto my card base. I did use some pink cardstock for the main mat and also for a mat underneath.

Here is a closer look at the sweet little title. It is from the Baking Spirits Bright die set from last year. I also used some of the cookie pieces form the Sweet As a Christmas Cookie die. I colored them all with my markers. The cookies are a ginger brown and the lettering was read. I did leave the letters of the word spirits on the rolling pin white.

I layered that inner panel onto the larger scallop stitched panel. On the larger panel I added some of that diagonal Christmas plaid paper. Lastly I did add some stickles to the larger star cookie and the tree cookie.

Here is one last look at the completed card. I think this card turned out super cute!


Don't forget to head over to the CottageCutz YouTube channel and check out all of the amazing projects on there. Our video team is doing a wonderful job of filling the channel with all sorts of creative content! You don't want to miss it!

Dies I Used
Christmas Baking Mice

Scallop Stitched Rectangle Slimline Set


Baking Spirits Bright


Sweet As A Christmas Cookie


Here's a look at the entire release. Be sure to head over and grab them while they last!

Well that about covers it for today! Until the next time, have a wonderfully craft-die day!
Melinda Beltran

Sunday, December 12, 2021

Holiday Cocoa Gift with Tag And Card

Happy Sunday Scrapping Cottage friends! Melinda here with another project share. Today I am showcasing an easy, cute and sweet gift and card set.

Here is a look at my project.

I decided to use some sticker paper for my jar. It is a matte finish sticker paper. I ran it through my Gemini with my die and it cut the paper like butter!


I filled my jar with some hot cocoa mix, a layer of red sugar, some chocolate and white chocolate chips. I then added another layer of the hot cocoa mix and then some more red sugar and the chocolate and white chips. I then set to work coloring out all of the different pieces and then began to layer them.

Here's a look at the finished smore for the jar front. The sticker paper layered very well and adhered without any ripples or bumps onto the jar.  I didn't put a layer of Mod Podge over it, but you could to seal the stickers. I finished off the jar by wrapping some red and white twine several times around the lid. 

Here is a shot showing how I pulled the sticker paper backing off so I can build up the characters.


Here is the cute little smore on the lid of the jar from the Christmas Smores die set.


Here's a look at the card. I used a variety of die cuts from the Holiday CocoaChristmas Smores and the Sweet As A Christmas Cookie Die sets. I cut them all out of plain white cardstock and then colored them with my various markers.

Here is a closer look at them. I used the rolling pin and wrote "Have A" and then the Sweet Christmas sentiment came from the Sweet As A Christmas Cookie die set. I finished off the mat with some of my White Nuvo drops. I added the pink mat onto the largest scallop stitched rectangle die from that set. I then mounted all of that onto a horizontal folded A2 card base.

Here's a look at the cute little tag I made. I used the Holiday Cocoa die set. I colored all of my various pieces with marker after I cut them all out of plain white cardstock.


I cut out an extra die of the cup in white cardstock and then backed the colored die with it. I wrote the "to and from" on there with my red marker. 


The Dies I used to create these projects:


In case you didn't hear, The CottageCutz YouTube channel is up and running. We are featuring videos every Wednesday. Drop by and subscribe so you don't miss one and give us a thumbs up on our videos.


Make sure to come back by each day for some more great crafty inspiration from the super talented team. Don't forget to head over and take advantage of the great savings on these and more of the fabulous Sale!

Be sure to head over and check out the fantastic
CHRISTMAS PART 2 RELEASE!!!!
SOME AMAZINGLY CUTE DIES! 
This release has the Merry Christmas with Shadow die.

CHRISTMAS PART 1 RELEASE!!!!
SOME MORE AMAZINGLY CUTE DIES! 


Until the next time, have a wonderfully crafty day!
Melinda Beltran

Sunday, December 13, 2020

Christmas Cookie

Hi!

It's Anja here. I have another Christmas card for you today. This time is all about baking. 


 For this card I used:

- Cottage Cutz dies (Gingerbread Baker, Sweet as a Christmas Cookie),

- Distress Inks and Oxides,

- white card base (10x21 cm),

- white card stock for die cuts,

- black pen,

- white pen,

- water spritzer,

- heat gun,

- adhesive foam pads,

- paper glue. 

First I cut and colored gingerbread cookie.

Next I did the same with the sentiment.

Then I used Distress Oxides and did the background. I colored directly on the card base.

After coloring I spritzed over the paper and dried it with the heat gun.

And after that I glued all the pieces to the card base. I adhered the gingerbread cookie with the adhesive foam pads. And my card was done.


That's all from me for today. Have a nice week and see you again next Sunday.

Anja Z.


Cottage Cutz dies I used for this card: