Showing posts with label Sweet Unicorns. Show all posts

Thursday, May 23, 2019

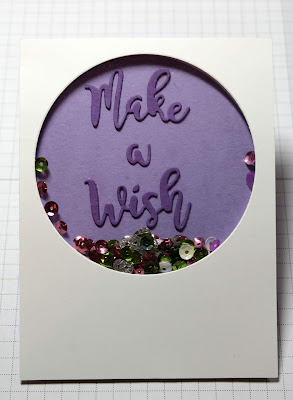
Make A Wish

Hello Scrapping Cottage friends! Thanks for taking the time to stop and visit with us today. It's Mary Marsh here bringing you the Thursday edition of the Blog.

We are still featuring cards using the new Magical Fantasy release.  If you haven't seen the Magical Fantasy release yet, you have to drop by the online store and check it out. These new dies are all so cute and whimsical. There are 27 new designs and I am in love with everyone of them. 

Today, I am featuring the new Sweet Unicorns die. It looks like it's currently out of stock but it should return soon. I needed a birthday card for a 4 year old girl and she loves unicorns. They are hot with the kids these days. Unicorns are everywhere along with rainbows and glitter. I thought I would turn it into a shaker card. She will love shaking the sequins around. They really aren't hard to make and it has that "wow" factor. So let's get started with some details on how I created this card. 

Step 1: I decided to cut the circle first to make sure I had enough room for my sentiment inside the circle. Using white cardstock 3 3/4" x 5" and the 2nd largest double stitched circle die I cut my circle. I used this die because it was the size I wanted for my opening. I will save the die cut circle for another use. 
Now I need to make my "window". I used a window sheet cut to 4" x 3 1/2". It's smaller than my white panel but larger than the circle opening. I used double sided tape to secure the window sheet in place. To avoid static on the window sheet I used my powder tool on both sides of the sheet. You could also use an embossing buddy. It will keep the sequins from sticking to the sheet. 
Next I used foam tape and ran it around my circle opening. I also used dimensional adhesive on the corners to make sure it's the same height all around my card. I again used the powder tool on the inside of the foam tape. It cuts down on the stickiness and the sequins won't stick to it. 
I cut the Make a Wish words in grape cardstock from the Fairytale Birthday die. I added to a lighter shade of purple. I wanted to have some color in the shaker background. 
Added the sequins to the inside of the circle. I added a little more than I thought  I would need because I wanted her to be able to shake it. 
I peeled off the foam backing and placed my sentiment panel on top. Since it is the same size as the shaker panel I lined it up at the top first. 
I wanted the shaker panel to pop and so I added a layer of the grape cardstock to this panel. The layering panel is 4" x 5 1/4"

Step 2:  Now that the image panel is ready, I cut my unicorn images from the Sweet Unicorns die. I used the package coloring as my color guide. 
Added them to the image panel and secured with double sided tape. 
To finish off my card, I secured the image panel to the pink card base. The base is 4 1/4" x 5 1/2". Added a few pink enamel dots and my card is complete. Don't you just love the unicorn images? I hope I have given you an idea for a way to use this new die. See you on Saturday with another card from this new release. 
dies I used to create card:


Tuesday, May 07, 2019

Somewhere over the rainbow

Hi, Janja is here with you.
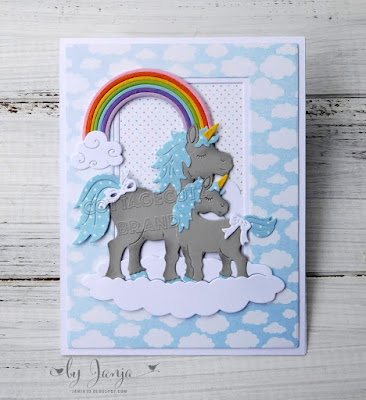
I found an inspiration for today's card in a lullaby for babies. I made a baby boy card with sweet unicorns.


- CottageCutz dies: Rainbow With Clouds, Sweet Unicorns, Fairytale Castle (cloud), Clouds & Sun, Rectangle Set, Stitched Rectangle Set
- white card base: 4.25 x 5.5" (10,8 x 14 cm), folded
- patterned paper: 4 x 5.2" (10,2 x 13,2 cm)
- white and colored cardstock
- gray ink pad
- glue, double-sided adhesive tape, self-adhesive foam pads

From colored cardstock die-cut both unicorn. Add the shading on the edges with ink pad and brush. Put all the pieces together with a glue.


Die-cut the rainbow and clouds.


Trim selected patterned papers and a white cardstock.
With two differently large dies, first die-cut the rectangle into the patterned paper. Place it on a white cardstock and die-cut a smaller rectangle.
Paste the clouds into the background and attach the frame.


Now we have everything ready to finish the card.


Have a nice day. 
Janja


Sunday, May 05, 2019

Love You Mom


Hi!

It's Anja here. Unicorns are still on my minds and another unicorn card was done on my craft table. This one can be used for Mother's Day.


For this card I used:
- Cottage Cutz dies (Sweet Unicorns, Love You Mom Phrase, Nested Wacky Stitched Square Set),
- Distress Inks (Hickory Smoke, Spun Sugar, Worn Lipstick, Pumice Stone, 
- white card base (15x15 cm),
- patterned paper for background (14x14 cm),
- white card stock for die cuts,
- gold pigment ink,
- VersaMark embossing ink,
- glitter embossing powder,
- heat gun,
- paper glue,
- adhesive foam pads.

First I cut the unicorns and embossed the wings and hair with glitter.


Next I colored both unicorns. I used gold ink for the horns.


Then I cut the paper for background. I used pink Distress Ink to color the edges.


Next I cut and colored the sentiment.


And when I had everything cut and colored I arranged it and glued it on card base. I used adhesive foam pads to glue the unicorns. And my card was done.


Before I go I want to invite you to the online store. Yesterday was National Scrapbook Day and there are still some sales going on. Don't miss all the great prices.

Have a nice Sunday and see you again next week.

Anja Z.


Cottage Cutz dies I used:


Saturday, April 20, 2019

DT Samples w/Spring & Fantasy Dies (Day 4)

Hello Scrapping Cottage Friends! Thanks for taking the time to stop and visit today. We are sampling cards from our Spring and also our new Magical Fantasy release.
There are 27 new designs in the Magical Fantasy release. And for a limited time the individual dies are on sale at 25% off. We want to give your some ideas for your own card making. So let's get started with our samples for today.

Card 1: This is a card that I (Mary Marsh) created using the beautiful new Unicorn Floral die. I thought this would make a great feminine graduation card since the grad will be going on a new life adventure. To create the circular wreath look I used one of our circle dies and drew a pencil line. Then I started building my wreath starting with the unicorn and worked my way around. The coloring on our packaging is so beautiful that I used similar colors. A simple change of sentiment and this could be a birthday, anniversary or even a get well card.

Card 2:  Our next sample is from Anja Zurga. She also created a floral card using the Spring Teacup Bouquet. How perfect would this be for Mother's Day. What Mom doesn't like to get flowers? Or do you have a friend who loves to garden and has flower beds that are the envy of the neighborhood? Make her a card like this to let her know you are thinking of her. So many occasions and possibilities with this die.
Card 3: Our next sample is from Pam MacKay. She used the Sweet Unicorns die to create a beautiful and whimsical birthday card. Since Unicorns are adorable and very magical, the special little one in your life will love it. The background was created with distress oxide inks and the use of shimmer paper on the unicorn manes added just the right touch of sparkle.  The sentiment carries through the magical appeal of her card.
 Card 4:  Our last sample for today is from Janja Albreht. She used the Peeking Egg Bunny and Spring Potted Bunnies dies to create this super cute and colorful Easter card. Don't you just love these precious little bunnies and look at that little bunny behind. The eye catching  Easter Phrase is using an older die -Retro Alphabet.
Well that's our samples for today. I hope the team has given you some fresh ideas for creative ways to use the new dies over the past 4 days. If you haven't seen the other cards check here, here and here. Happy Easter everyone!

dies used to create cards: