Showing posts with label Strawberry Cottage. Show all posts

Tuesday, August 02, 2022

Strawberry Box and Card

Happy TuesDIE Cottage Cutz Friends!
Melinda here with you on on another sweet TuesDIE. Can you believe it is already August? Whew, time is just flying!!!! Today I am sharing a super cute card and little treat box set I created, featuring dies from the new Strawberries and Bees release

 I used the Strawberry Cottage to create the fun treat box. For the Card I used the Berry Phrases Die set. For the card I also used the Circle Pierced Nesting Die set.

My finished card size is a standard top folding A4 size. The base is white cardstock and then I added a piece of red cardstock. To that, I added a mat of some patterned digital paper I created. I proceeded to cut out the pierced circle in the largest die in white cardstock and the next size down in green cardstock.

I then colored all my strawberries and leaves and stems. I also cut out all the phrases in white cardstock. I then assembled the words and berries onto the green mat.

To Make My Little Box

I started by cutting out a piece of white cardstock to 5.25 x 5.25. I scored it at 1.75 on all four sides. After scoring, I cut out the four corners leaving just enough for glue tabs to assemble the box. See the photo above.

Next I cut out the strawberry cottage two times in plain white cardstock. I lined up the bottom of one and used my ruler to find where up the strawberry the width was 1.25". Once I found that, I cut off the bottom. I did that for two of them. I then went ahead and colored the strawberries with my red marker.

I colored the leaves and stems of the strawberries and adhered them to opposite sides of the box. I also cut out two squares of red cardstock and then the mini strawberry patterned digital paper I created. I cut them out at 1 5/8" and 1 3/8". I adhered them to the sides of the box.

I then cut a strip of the patterned diagonal plaid digital paper. It was approximately .75 x 5.25

I went ahead and assembled the box.

Here you can see I added the strip for a handle. I also added some plaid paper mats to the inside of the box. It finished off the inside and it also helped keep the little handle securely attached to the box. I sandwiched it between the box and the extra mat.

Here's a closer look at the sweet little box. I added some of the adorable flowers, berries and foliage from the die to each side. I also lucked out and found that old-fashioned strawberry candies. I used those for the box.

Here is one last look at my project.


Dies I Used


Be sure to check it out and all the amazing creations from the design team!


Also, don't forget to head over to the CottageCutz YouTube channel and check out all of the amazing projects on there. Our video team is doing a wonderful job of filling the channel with all sorts of creative content! You don't want to miss it!


Well that about covers it for today! Until the next time, have a wonderfully craft-die day!
Melinda Beltran

Saturday, July 30, 2022

I'm Just a Gnome Boy Looking at a Strawberry Girl...


Hi everyone! My name is Linh and I'm honored and excited to be here as a guest designer. I have a new video up on the CottageCutz YouTube Channel. I've combined several dies from the Strawberry & Bees Collection to create this sweet scene card.  In this scene, our darling Strawberry Gnome Boy is bringing flowers and a pot of strawberries to his beloved Strawberry Girl who lives in a Strawberry Cottage. :)

Watch this video to see how I created this card.


Tuesday, July 26, 2022

Strawberry Gnome Couple So Sweet Card

Happy TuesDIE Cottage Cutz Friends!
Melinda here with you on on another sweet TuesDIE. Today I am sharing another very simple but so sweet card I created, featuring dies from the new Strawberries and Bees release
Today's card features the adorable little Strawberry Gnome Girl Die and the Strawberry Gnome Boy Die. They are part of the new Strawberries and Bees release. I also used the Strawberry CottageStrawberry Treats 1, and the Berry Phrases Die from the same release. My finished card size is a standard top folding A4 size. The base is white cardstock and then I added a piece of green cardstock. To that, I added a mat of some patterned striped paper. 

I started by die cutting all my pieces in white. I colored and assembled each little gnome. I then cut out the large strawberry from the Strawberry Cottage. I colored it and the leaf at the top in. I then added the sweet little cake from the Strawberry Treats 1 die.

Lastly I die cut the words So and Sweet from the Berry Phrases Die set and then colored those in with my green marker.


Here is one last look at my completed card. I am going to be using this for an Anniversary card. The little couple is just too cute!


Dies I Used


Be sure to check it out and all the amazing creations from the design team!


Also, don't forget to head over to the CottageCutz YouTube channel and check out all of the amazing projects on there. Our video team is doing a wonderful job of filling the channel with all sorts of creative content! You don't want to miss it!


Well that about covers it for today! Until the next time, have a wonderfully craft-die day!
Melinda Beltran

Friday, July 22, 2022

Faux Embossing with Dies


Hi everyone! My name is Linh and I'm honored and excited to be here as a guest designer. I have a new video up on the CottageCutz YouTube Channel. I've used a couple of die sets from the Strawberry & Bees Collection to create a faux embossed panel using on this sweet and simple card.


Watch this video to see how I create this wonderful texture as the background for my card.


Monday, July 11, 2022

Strawberry Cottage Fun fold

Hello CottageCutz friends! Thanks for taking the time to stop and visit with us today. It's Mary Marsh here bringing you the Monday edition of the Blog.

It's new release time!!! We have new dies in the online store. It's our Strawberries and Bees release with 16 new designs. You can pick up the individual dies are 30% off.
The new dies are perfect for all your cardmaking needs. They would work for so many occasions as our design team have been showing. 

Today for your viewing pleasure I am featuring the new Strawberry CottageStrawberry Gnome Boy and the Fresh Strawberry Patch dies. I created a pop and twist fun fold card. I have step by step instructions below but if you like to watch a video. Here is a link to one I found on YouTube. So, let's get started with some details of how I created my card. 

Design Steps:

I started with my card front and cut the Strawberry Cottage using the colors from the packaging.
white image panel is cut at 4 1/8" x 5 3/8" 
I used stencils and created some background clouds with broken china distress ink and a little grass with mowed lawn distress ink. 
Stamped a sentiment in blueberry ink. This ink matches the doors and windows of the cottage. 
Attached this finished panel to the red card base to complete front of card. 
red card base 4 1/4" x 11" and scored at 5 1/2"
Now I am ready to start my card inside. 

I started with decorating the four inside panels.  I decided to use the Strawberry Gnome Boy and the Fresh Strawberry patch dies for 2 of the panels. Then I added 2 sentiment panels. The cupcake is from the Lady Bug Cupcake die. 
I layered these on a white cardstock panel measuring 10" x 3 1/2". I scored and burnished it at 2 1/2", 5" and 7 1/2".
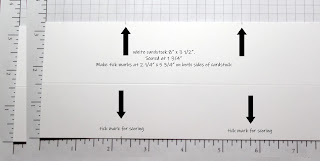
Next, I started on the pop-out mechanism. I cut a piece of white cardstock at 8" x 3 1/2". I scored it at 1 3/4" on the short side. then on the long side I put a tick mark at 2 1/4"& another at 5 3/4".
I used the scoring blade on my paper trimmer to make the next score lines. It's easier for me to line up at an angle on the paper trimmer. You score on both sides of this panel. Tick mark to tick mark. 
When it's finished you will have an "X" pattern. 
Then you pinch this panel in, so it forms a sort of arrow shape. 
Then to attach this to the inside of the card you use a strong adhesive (I used score tape) and attach to the top of the arrow only. You do this on both sides of the arrow and then lay it inside the card at the top of the card and close it. The photo below shows the mechanism open without the image panels attached. Before I attached the pop out mechanism, I decorated the inside panel with strawberry designer paper and stamped another sentiment. 
Now I am ready to attach my image panels to the mechanism. You use a strong adhesive- again I used score tape- to the top right and bottom left part of the mechanism only. Then the image panel is attached to the mechanism and you fold and close it. 
This is what it looks like when it's opened.
I made a short video to show you how it pops up when you open the card. 

And that's my card design for this week. I hope I have given you a fun idea for a way to use these new dies. See you this coming Saturday with another fun fold idea. 

Reminder: Our YouTube channel is active again. Check out the latest video from Jen Hartsgrove for a chance to win the die she used. Click here


Dies I used to create card: