Showing posts with label Spring Bunny w/Giant Carrot. Show all posts

Thursday, March 21, 2024

Do You Smell Carrots?

Hi Crafty Friends,

It is Pam sharing with you today.

I am still finishing up my Easter/Spring cards.   I learned a fun fold from Stacey.  She is a wonderfully creative fellow paper crafter.  So I decided to use it on this card today.  I am also featuring two different dies Bottoms Up Bunny Baker and Spring Bunny w/Giant Carrot.

Background photo by Freepiks

Design Steps:


1.  Cut 2 pieces of white card stock 8 1/4 x 4 1/4 (Score both pieces at 2 1/4, 4, 6 1/4) Cut one piece of white card stock 4 1/4 x 4 1/4

2.  Starting with the widest panel make a mountain fold and then the next 2 valley.  Set the two pieces next to each other as shown above in opposite directions.  Tuck the mountain fold into the valley fold and place close together as shown below

3.  I used a piece of tape to anchor them together then applied glue to the two panels as shown below
4.  After spreading the glue I lined up the 4 1/4 x 4 1/4 square on top of the flaps

5.  This is what it looks like after the panel is glued in place
6.  To open the panel pull on the two side flaps and it will look like this from the top view
7.  This is what the card looks like from the front view 
8.  Cut 2 pieces of plaid DP 2 1/8 x 4 1/8 and 2 piece of Easter Egg DP 1 5/8 x 4 1/8 (I decided to make a spring card rather then an Easter card so I switched out the pattern)
9.  Glue the DP in place as shown above


10.  Use the following dies and card stock colors:  Picket Fence Slimline White - Bottoms Up Bunny Baker pink, white, gray - Spring Bunny w/Giant Carrot orange, green (cut off the little curl at the bottom of the carrots).  Cut a piece of polka dot DP 4 1/8 x 4 1/8
11.  Working on the polka dot square DP glue down the fence (do not put glue on the top of the fence so you can tuck in the carrots), dirt and then the bunny as shown above
12.  Tuck in the 3 carrots behind the fence.  Glue the polka dot panel to the white panel on the card base.  Add your sentiment

13.  This card will fold down to fit inside an A2 envelope 


We have more inspiration on our YouTube Channel check it out HERE

Thanks so much for stopping by!  And I will see you next Thursday.

Blessings and Take Care


Head over to Cottage Cutz and do a little shopping today!

Get Social With Cottage Cutz

Saturday, March 12, 2022

Spring Bunny and Carrot

Hello CottageCutz friends! Thanks for taking the time to stop and visit with us today. It's Mary Marsh here bringing you the Saturday edition of the Blog.

IT'S NEW RELEASE TIME! The Spring Release with 20 new designs is in the online store.  There is a nice combination of both religious and whimsical designs. So perfect for all card makers out there.

And the dies don't have to be used strictly for Spring or Easter. The team has done Valentine, Birthday and Thinking of You cards with these new dies. Take a look back on the Blog for lots of ideas.

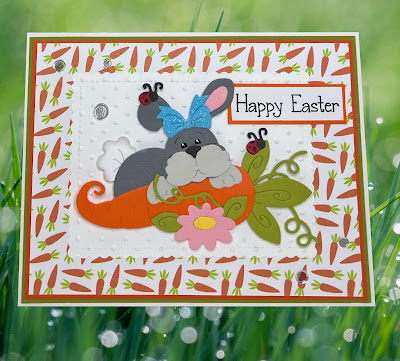
Today for your viewing pleasure, I have a whimsical card for Easter. I used the new Spring Bunny w/Giant Carrot die. I have a 5 year old great niece that would love this card. So, it will find it's way to her mailbox. 

Let's get started on some details of how I created my card. 

Design Steps: 

I thought this cute little bunny would look great on an Easel card. I created a vertical Easel card. For those of you that like videos here is a link to one on Splitcoaststampers

Start out with a 4 1/4" x 11" piece of cardstock and score at 5 1/2" and 8 1/4". Your card front piece will measure 4 1/4" x 5 1/2. I used white cardstock for my base color.
I wanted some designer paper as a base for the bunny image. I found this piece of blue designer paper that has a marble effect and a piece of matching blue cardstock for my card front. 

designer paper layer: 4 1/8" x 5 3/8"
blue cardstock layer: 4 1/4" x 5 1/2"

I attached this panel to the bottom flap of the card base using double sided tape. You just secure the bottom panel only. 

Next, I cut my bunny image with various colored cardstock. 
I stamped my bunny sentiment on white cardstock and then mounted it on the blue that coordinates with the upper part of the card. I am also using this as my ledge for the easel to rest on. I added an additional piece of blue cardstock to make it a bit more secure. 

I attached the bunny image to the designer paper panel with dimensional adhesive. The sentiment panel is attached 1 1/2" from the card bottom with double sided tape. 
I decided to add the Easter phrase to the top of the card. I cut it 2x in magenta cardstock and secured to panel with Art Glitter glue.  Added a few magenta enamel dots to finish off my card. This card does fold flat so it will fit in a standard A2 envelope. 
That's it for me for this week. I hope I have given you an idea for a way to use this super cute die. See you next Saturday!
Reminder: Our YouTube channel is active again. Check out the latest video from Marla for card inspirations. Click here. There is a giveaway and for a chance to win you just have to subscribe, like and comment on the video. 

Dies I used to create card:


Thursday, February 24, 2022

Munching Bunny!

 Hello Everyone!

Last chance to save at our Presidents Day Sale!  The sale has discounts of up to 60% off.  So don't miss out it ends at 9:00 PM Pacific time today!

Save up to 60% on CottageCutz Dies
Save 60% on CottageCutz "Stamp & Die" Sets
Save 60% on CottageCutz Slimline Dies
Save 60% on Little Bluebird Designs (Stamps & Dies)

Today, I have another cute little Easter card for you.  I am using Spring Bunny w/Giant Carrot.


Design Step:

1.  Using the Spring Bunny w/Giant Carrot cut out the pieces using: green, orange, pink, yellow, blue, light gray, dark gray, white, red and black card stock.  Assemble the bunny and carrot with fine tip glue.  Add a little Wink of Stella to the bow for some sparkle
2.  Use a whtie A2 card base,  cut a piece of green 4 1/8 x 5 3/8, orange 4 x 5 1/4 and Carrot DP 3 7/8 x 5 1/8.  Use the Scalloped Rectangle die second from the largest and cut it out of white.  Next run the rectangle through an embossing folder.  I used swiss dots
3.  Glue the green to the white card base, next glue the orange and then the carrot DP
4.  Glue down the white embossed rectangle to the middle of the card front.  Place pop dots onto the back of the bunny and add it to the center of the white rectangle

5.  Last stamp your sentiment and layer onto orange card stock add your little sequins and your card is complete

CottageCutz Products


As always thank you so much for stopping by today!  I look forward to seeing next Thursday!
We have more inspiration on our YouTube Channel check it out HERE

Blessing and Take Care