Showing posts with label Spring Bowl w/ Eggs. Show all posts

Monday, March 20, 2023

Hexagon Pop Up Easter Card


Welcome CottageCutz peeps!

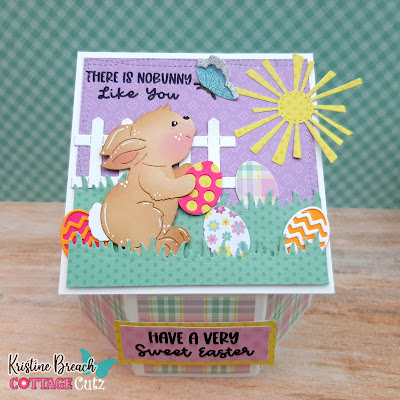
Kris here with some Monday inspiration for you.  My card today is an easy Hexagon Pop Up card featuring some cute Easter dies and more!  This style of card was a li'l harder to photograph, but it's pretty cute when displayed and squishes flat-ish to fit into an envelope.  

I will share my design steps below, but if it's easier to watch a video, you can watch Sam's here.


I used heavy 100 lb cardstock for my springy mechanism that makes it pop out to its hexagon shape, and if you do not burnish the folds, it pops out even more!  However, this also causes the front panel to lean backwards more.  If I had used a lighter weight like an 80 lb. it might stand up more, but then the hexagon would be more wide than deep.  You'll get that idea once you make one.


I've listed & linked all products at end of post.

DESIGN STEPS:

1)   I began with the base of my card that forms the hexagon shape by cutting (2) strips of 2" x 6-1/2" white cardstock and scored at 2", 4", and 6". Mitered the corners of the li'l 1/2" tab on the end. Then I added (3) 1-3/4" squares of patterned paper onto just one of the strips as shown.


2)  I added glue to both 1/2" tabs and glued one tab to a non-tabbed end of the other piece to form a hexagon as pictured.


3) I cut a piece of white cardstock to 2" x 8" and scored at 2", 4", and 6" - fold and burnish score lines. I don't have a photo of this, but add glue to the 2 end sections (the first 2" and then between 6-8") and with it folded in half, insert into base so that it's attached to the center panel of the FRONT of hexagon base and to the center BACK of hexagon base.

4)  Next, I cut the pieces for the springy mechanism.  Cut (2) strips of 1-1/2" x 9-1/2" and score both strips at 1/2", 1-1/4", 2", 2-3/4", 3-1/2", 5" 5-3/4", 6-1/2", 7-1/4", 8" - Accordion fold as pictured below, but DO NOT BURNISH the folds as it won't pop out as much if you do.  
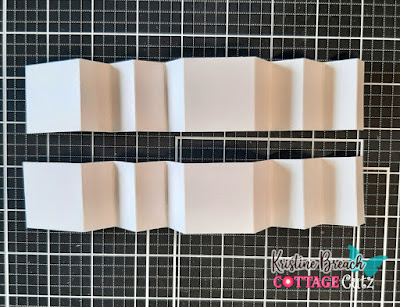

5)  I glued the small tabs to the opposite end of each strip to make this shape...


6)  Then glue the two together.


7)  Add glue to each of the square ends and insert into the base of the hexagon piece.

8)  I cut my pieces for my main image panel....
--- 4" square from white cardstock.
--- purple patterned paper using the 2nd largest Nested Wacky Stitched Rectangles
--- 2 pieces of green patterned paper using the Grass Slimline die in varying heights
--- die cut the Bunny w/ Butterfly, Spring Bowl w/ Eggs (just eggs), Fence and Grass (just fence) and Stitched Sun, Clouds & Umbrella (just sun)


9)  I glued my purple layer to white square, then the tallest green grass, leaving the very top unattached. Then I glued and tucked the fence and an egg behind that grass.

10)  I popped up the shorter grass with foam strip and glued in the rest of the eggs.  I popped up bunny with foam tape.  I stamped my sentiment in top left corner, then glued my butterfly and sun.


11)  I added glue to the front white mechanism piece sticking up (from the hexagon base) and attached my bunny piece.  I then stamped a 2nd sentiment and attached it to the center of card base.


Here's how it looks from the side...


There's room on the back to write your message. 
 Or you can choose to add patterned paper ☺


Thank you for taking a peek!  

I hope you get crafty with your favorite CottageCutz dies!


PRODUCTS I USED:


And be sure to check out the beautiful 
NEW EASTER RELEASE 
as it's all on SALE!!


Monday, March 13, 2023

Sweet Easter Wishes

Hello Scrapping Cottage peeps! 🐤

Kris here, sharing an Easter card featuring the CottageCutz Spring Bowl w/ Eggs.  


Design Steps:

I cut and layered the following, bottom to top:

• White card base = 4-1/2" x 11" and score at 5-1/2" for a top folding card
• Patterned paper (gingham) 4-1/2" x 5-1/2"
• Die cut largest from the Nested Scalloped Rectangles set (attach with foam tape)
• Patterned paper (scripty) 4-1/4" x 5-1/4" 
• Die cut largest of the Nested Stitched Scalloped Circles set
• Die cut Spring Bowl w/ Eggs, the Sweet w/ Shadow, and Wishes w/ Shadow from white cardstock and apply distress ink and/or markers.  Assemble. 
• Adhere bowl to lower part of scalloped circle with a thin piece of foam strip.  Adhere eggs behind the bowl with glue.
• Stamp "Easter" and trim.
• Run ribbon around the Scalloped Rectangle (between foam strips) and tie a knot on front right side.
• Add foam strips to each of the sentiments and adhere as shown.

Kept it fairly simple this week.  I hope you all have a funtastic week!
~Kristine

Products I used:


Tuesday, September 10, 2019

Get Well Soon

Hi! Janja is with you today to share a card created with a few spring dies.
Let's take a closer look at the card I created.


- CottageCutz dies: Spring Teapot & Cups, Spring Bowl w/ Eggs, Coffee & Donuts, Nested Stitched Doily Set
- white card base: 5.3 x 5.3" (13,5 x 13,5 cm), folded
- colored cardstock
- colored ink pads
- white crystal drops
- glue, double-sided adhesive tape, self-adhesive foam pads

Cut a teapot, two cups, and a bowl from colored cardstock. Fill the bowl with donuts.


Trim a piece of white cardstock. Lay a cardstock on a scoring board and create a few fold lines on it.


Now color a cardstock with Distress Oxide pad.


To add some texture, spray the cardstock with water and emboss it with a lumber folder.


Left and right paste a patterned paper and cut the background with a square die. The size of the square is 4.9 x 4.9" (12,5 x 12,5 cm).
Unfortunately, the relief becomes slightly flattened while cutting with a die. It would be better to use a paper cutter.


Cut out a napkin and a strip of white cardstock. Stamp a sentiment.


Completed card.


Have a nice day.
Janja