Showing posts with label Sandcastle. Show all posts

Wednesday, May 12, 2021

I Shore Love You!

Hello!  This is Sukie and today I have a project to share for my design team post.  My card features several dies from the new Slimline die release.  These dies make slimline cards so quick and simple to create!

My card base was cut with the Nested Stitched Rectangles Slimline die set.  I used a cloud stencil to create the puffy cloud background.  I left the bottom portion of my card alone since I knew it would be covered up.  I used the Hills Slimline for the sand border and the Clouds Slimline for the 2 sets of clouds.  The Sandcastle was cut with white card stock and shaded with some Oxide Inks.

The next step in my design process was to cover the bottom portion of my card base with the sandy hill.  The splattered paint adds a bit of interest to the sand.
Next, I layered the set of clouds on top portion of my card base.  The addition of the white cloud border breaks up all of the blue in the background.

The sandcastle was affixed on top of the sandy hill as the focal point of my card.  This die cut is so detailed and was perfect for finishing off the beachy scene!

The sentiment was stamped on a hand cut flag and was affixed between the sandcastle and clouds.
Here are the die sets used on my card, available in store:

Thursday, August 27, 2020

Sand Castles

 Hello Scrapping Cottage Friends

It is Pam sharing some creative tips today!

I have another fun beach themed card for you.  Who doesn't love the beach right!  The only part of the beach that bugs me is sand everywhere!! Even in places you never dreamed of.  But the sound of the ocean, the cool water,  and the warm breezes really out number the sand complaint! Anyway I am using the Sandcastle die today and I hope you enjoy this card as much as I enjoyed making it!

Background Photo by xiaokang Zhang on Unsplash

Design Steps:
1.  Use the Sandcastle die and cut the pieces out of a Sand DP, Dark Brown Card Stock, Silver and white.  Use TH's inks to shade the pieces 
2.  Color the bucket and flag red, the star fish yellow and shade the shells.  Glue together with a fine tip glue
3.  Use a piece of Sand DP and a piece of Sky DP.  Cut the hill in the sand and then lay the sand on top of the sky and cut with the Double Stitched Rectangle die second from the largest
4.  Glue the sand to the bottom of the Sky DP
5.  Cut a piece of white textured card stock 4 x 5 1/4.  Then glue the beach rectangle to the center of the white textured card stock.  Stamp the sentiment in black as shown
6.  Using dimensional dots pop the castle to the sand as shown.  Your card is complete

CottageCutz Products

I really hope you are enjoying your summer.  I can't believe it is almost over! Time just seems to fly especially when you are creating!
Blessings
Pam

Friday, July 31, 2020

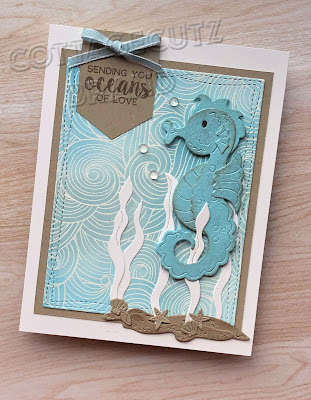
Oceans of Love

Happy Friday!  It's Jeanne today with a soft, seashore inspired card.  This card uses dies from the Pirates & Sea Creatures release as well as a die from the new Beach & Tropical release.  I was originally inspired by a card I saw on Pinterest.  And as often happens, that was just a jumping off point for my final design.  I was also inspired by the sand/blue/white color combination we so often see in ocean and beach decor.  I kept my color palette very simple for this card
I'll start with the background of the card.  I used my Misti to stamp a large (6 x 6 inch) background stamp in Versamark ink and then I heat embossed it in white.
Next I used three colors of blue Distress Oxide inks to blend an ocean backdrop.
Using the largest of the Wacky Stitched Rectangle dies I cut a panel from the embossed sheet and adhered this to a piece of Crumb Cake cardstock.
I have a tool which allows me to cut a mat from 1/16 to about 1/2 or 3/4 inches.  Here I used the 1/8 inch mark to get a nice border.
I adhered this to a white A2 card base.

Next I worked on the seahorse and ocean bed.  I cut the seahorse from Cool Caribbean cardstock and used Crumb Cake ink to shade the edges.
After assembling him I used a Nuvo Shimmer pen (similar to Wink of Stella) to add sparkle.  I covered him two times.
I used the Tropical Fish and Sandcastle dies to cut the seaweed, sand and shells.
I glued down the sand and seaweed leaving one piece glued just at the bottom so that it could be entwined with the seahorse.  I used foam dots to pop him up off the card.
The sentiment was stamped in Crumb Cake ink and I cut the point with scissors.  I decided to add a small bow at the top.
I added a few crystal drops as "bubbles".  In this photo you can see the detail of the die and the shimmer on the seahorse.

I hope you enjoyed the card today be sure to stop by the online store where the Pirates & Sea Creatures and the new Beach & Tropical releases are on sale for a limited time.

Dies used:


Thanks for stopping by today.  I hope you have a fun and creative weekend!