Showing posts with label Safari Adventure Gang. Show all posts

Monday, August 28, 2023

Say YES to New Adventures

Hello CottageCutz friends!

Kris here, sharing some Monday inspiration with you!  


DESIGN STEPS:

1.  I started with an A2 side-folding card in Crumb Cake cardstock.  

2.  Next I cut a piece of Pecan Pie cardstock at 5-1/4" x 4" and die cut an oval using the Pierced Oval Set.  I then used a stencil to emboss that layer, then brushed Distress Oxide ink lightly over the embossed parts.


3.  I cut a piece of jungle patterned paper a bit smaller than the top layer and glued it to the center of my card front.  

4.  Then I added foam tape to the back of top layer and adhered to card front.


5.  Next, I die cut the Safari Adventure Gang and Safari Cruiser with Banner from white cardstock and colored all the pieces with Copic markers and Distress inks. 


6.  I stamped a sentiment onto the Pecan Pie cardstock in Versamark and embossed in white.  I layered it onto a blue c.s. that I inked with Distress inks and fishtailed the ends.  I then adhered it with foam tape.  

7.  I tucked the giraffe under the oval frame as well as some of the leaves and glued the rhino and rest of the leaves on top.  


PRODUCTS:


Thanks for looking today!  I hope you are inspired to get crafty with your favorite CottageCutz dies. 

~Kris


Monday, August 14, 2023

Hello Crocodile

Hello crafty friends!

It's Kris here to share some Monday inspiration with you! 


For my card today, I combined 2 challenges from Splitcoast Stampers:

Our very own DT Leader here at CottageCutz, Mary Marsh, was the Color Hostess for CC960 and I LOVE this pretty combo, so I played along:


I actually substituted the Lost Lagoon with Just Jade (closest I had to it)

and then I also played with this week's sketch challenge -- turned vertically


I had the idea to make the front a split diagonal fold card, so the focal image is only attached to the upper left of card front.  INSIDE you get the upper left half of card to write or stamp your message ☺


Design Steps:

I started by cutting my top folding A2 card base (4-1/4" x 11" - scored at 5-1/2"

I then opened the card and cut diagonally from the top right corner (at score line) down to the bottom left corner.

I then cut (4) different patterned papers at 4" x 5-1/4" -- although I only used 3 of them.  I just couldn't decide which I wanted.  Then cut all of them in half diagonally.  

*Tip:  use the other halves to make a 2nd card!


I then cut the green patterned paper in half (line up the SHORT edge and cut at 2") as shown.


Next, I repeated that process with the pink/white/green striped pattern then attached all 3 pieces as shown below.


I then die cut the largest of the Nested Stitched Doily dies, and the Crocodile from white cardstock.

I die cut the Tropical Bouquet from Bubble Bath and Berry Burst cardstocks.

I die cut the Crocodile and [leaves from the] Safari Adventure Gang from Just Jade and Mossy Meadow cardstock.


I glued just half of the white doily circle to the top (left) of card front, and then popped the Croc in middle with foam dots.  This allowed me to tuck the flowers and leaves in under and around him (some I glued, some I popped up with more foam dots).  

I decided to die cut the Hello w/ Shadow from the Bubble Bath and Berry Burst and glued to left right corner (which is inside the card!  ☺


I would be done, however I was not following a tutorial on this, and noticed this style of card does not stand on it's own for displaying ... SO, I remedied that by adding a "kick stand" to the back of my card.

I used the left-over triangle piece from my card base, and trimmed it down to 2-3/4" x 3-1/2" and scored it at 3/4" as shown.


I should probably also tell you, that if you glue this now to the middle back of your card, it still won't stand well because the front is "top heavy" with all the die cuts.  SO... to remedy this, I turned the piece so the 3/4" score line is horizontally at the bottom, then I measured 1/2" in from the top right corner, placed a mark, then with scissors, I trimmed from the bottom right corner up to that 1/2" mark.  


I glued the tab to the back of card to that the bottom of tab is flush with bottom of card.  That slight angle allows the card to tilt back a li'l bit and counters the heaviness of card front.  ☺  Win-Win!!!


PRODUCTS USED:


I hope you enjoyed this tutorial!  I really enjoy working with the cute CottageCutz dies!  

For more inspiration and tutorials, see our YouTube channel here.  Happy Crafting!

~Kristine


Monday, August 07, 2023

Oh No Kitty w/ Pop Up

Hey crafty friends!

It's Kris here to share some Monday inspiration with you!  I've got an interactive card for someone under the weather or has had an injury -- it's sure to make them *SMILE*  Featured on my card is Oh No Kitty, First Aid KitOuch w/ Tooth, and the giraffe from Safari Adventure Gang!


**I got the idea for this particular interactive feature from a crafty gal I follow on IG:  Srushti Patil (@srushtipatil on Instagram) and it was meant to be an interactive album page, but as you can see, I've used it as a fun element inside my card.  I've changed up the measurements (to inches) to make it easier.  I hope you'll give it a try!

DESIGN STEPS:

I started by cutting all my base card elements:  

Grey cardstock:
---(Card Base)  8-1/2" x 5-1/2" scored at 4-1/4" 
---(inside cover mechanism) 2-1/2" x 4-1/2" - scored at 1/2" and 1" on one end
---(pop out mechanism) 1-5/8" x 7-1/2"
---(pop out image panels, x2) 2-1/8" x 2-1/2" 
---(left inside panel) 2-1/2" x 3-3/4" (not pictured below)

Pink/white patterned paper #1 (gingham):
---(front of card)  5-1/4" x 4"
---(inside cover mechanism)  1/4" x 2-1/4"
---(left inside panel) 2-1/4" x 3-1/2" (not pictured below)

Grey/white patterned paper:
---(inside layers x 2)  5-1/4" x 4"

Pink/white patterned paper #2: 
---(pop out image panels)  1-7/8" x 2-1/4"

White cardstock:
---(inside cover mechanism)  2-1/4" x 3-1/4"


1.  Adhere the pink gingham paper to the front of card and the grey/white patterned layers (2) to the inside of your card. 

2.  Adhere the white cardstock to the largest portion of the inside cover mechanism.  Glue the narrow pink/white patterned strip between the 2 score lines of cover mechanism.  (see photo below)

3.  Adhere the 2 pink/white image panels to the 2 grey image panel mats.  Set aside.


4.  With the pop out mechanism (1-5/8" x 7-1/2") vertical in front of you, measure and mark w/ pencil  at 3/8" and 1" across the top and bottom.  Draw a line both lines vertically.

5.  Turn mechanism so that the 3/8" tab is at the top horizontally, and measure and place a mark at 2-1/2" and 5" across top and bottom, draw lines vertically to connect as shown below.

6.  Along the bottom line (at 1" line) measure and place a mark at 3-1/8" and 4-3/8" as shown below.


7.  Using the photo below for reference, Draw diagonal lines from corner to those marks you just drew.


8.  Cut away the 4 corner sections as shown in photo below by scribbles.


9.  SCORE along the bold lines in photo below (the diagonal lines and 2 horizontal lines)  


10.  Push in on the diagonal score lines which will cause the mechanism to fold like this:

11.  Open it back up.  With the 3/8" tab at the top, apply glue to the outer arms as shown.  Be sure NOT to add glue clear up to the diagonal line... try to stop with the edge of the tab.   

12.  With the image panels horizontal, line up the TOPS of them with the top edge of the glued arms.


13.  Pull the 2 panels together so they overlap, and turn mechanism over and apply glue to the back section as shown.  Turn it right side up and position it into the center fold of card.  

**TIP:  It helps to lift the left side of card to form a 90 degree angle so that you make sure not to go over the score line.  


14.  Add glue to the angled portion on top --- be sure not to get glue on the scored tab!  Close the card and rub fingers over the mechanism to adhere. 


15.  Open card up flat and fold the 3/8" flap down.  Apply glue to tab and attach the short edge of cover (not the tabbed end) so the edge lines up with the edge of tab.


16.  Apply glue to the far right tab as shown and tuck it under to adhere.


Mechanism is done!!  Time to decorate!!

Die cut the following:
Oh No Kitty from grey and white cardstock
First Aid Kit from white cardstock
Ouch! from Ouch w/ Tooth
 the giraffe from Safari Adventure Gang from white c.s.
Hugs w/ Shadow from both pink and white c.s.
the 2-3/4" Stitched Squares die from pink patterned paper
the 3-1/8" Nested Scalloped Square die from white c.s.

I colored the white die cuts with Distress Oxide inks and a blending brush.


I thought it'd be cute to take this giraffe's temperature with the thermometer from First Aid Kit.  ☺


I hope you enjoyed this pictorial and will give it a try!  

Have a CRAFT-tastic week!

~Kristine


Friday, April 30, 2021

Interactive Slimline Birthday Card

Happy Friday!  It's Jeanne today and I have a fun, interactive card featuring the new Slimline dies and dies from the Safari release. Both releases are on sale right now for a limited time at the online store.  The interactive part of this card are the peeking windows from the Lift Flap Slimline die that allow for a surprise.  In fact, this card does not even open up - the "inside" of the card is under the windows!

To start, I cut a lion, zebra and baby gorilla along with leaves and sentiment from the Safari release dies.  I cut oval Windows Slimline die set and stamped my sentiment on that.

I set this all aside to construct the card itself. 

After picking some safari themed paper I adhered it to a light weight cardstock using a self adhesive sheet.  I wanted to use this for my flaps but the paper was too thin and had a pattern on the back.  By adhering these together it gives the flaps a bit of weight and a solid back side.

Using the largest Nested Rectangle I cut a card base from brown cardstock.  Since this card doesn't open like a traditional card, this IS my card - it will not be glued to side or top opening base.  I used the third largest rectangle to cut a white panel for underneath my window flaps.  This rectangle is just slightly smaller than the Lift Flap panel.

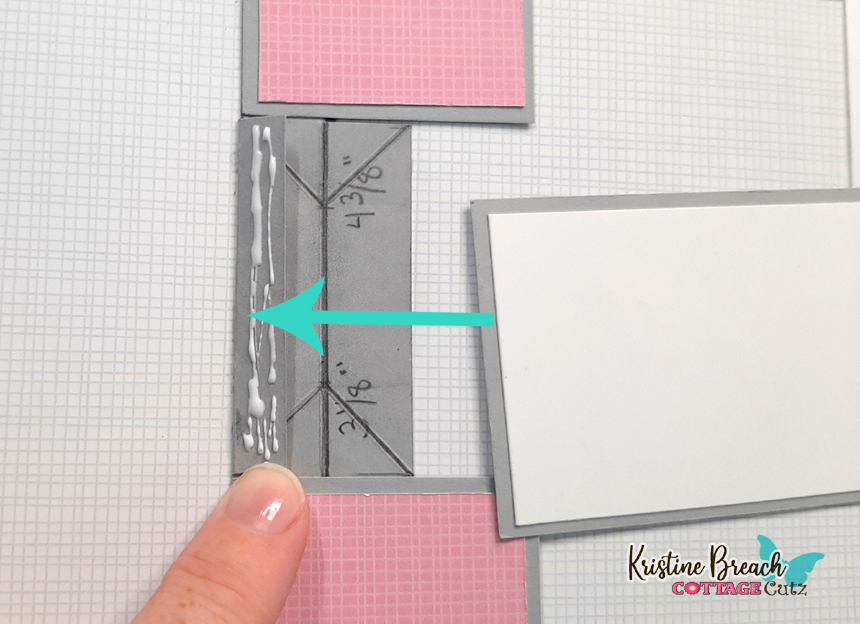
Using coordinating paper, I cut two 2 1/2 inch squares for behind my top and bottom windows and glued those to the white panel.  To get them in place I drew very light pencil lines where the window opening would be.  I also used this to place my "Happy Birthday" sentiment.  I used a slightly off-kilter sentiment so if it weren't lined up perfectly, it wouldn't matter.

I stacked the panels and glued them to the card base.

When gluing the elements to the flaps take care not to overlap the hinge side.  You can have elements hang off the outer edges and the windows will still open.  

The lion is popped up using foam dots.

The other two animals are glued to the the top and bottom inside windows. 

Finally, I added some bronze "photo corners" to my flaps panel.

I hope you've enjoyed my card today.  Interactive cards are always delightful to give (and receive.)  These Lift Flaps can be adapted to any theme to make your card extra fun!

Dies Used:


 Thanks for stopping by!  I hope you have a fun and creative weekend!