Showing posts with label Rufus the Hound. Show all posts

Tuesday, December 18, 2018

Cards with pets

Hi, Janja is here.
Christmas is almost here and we all probably ended up with our Christmas cards.
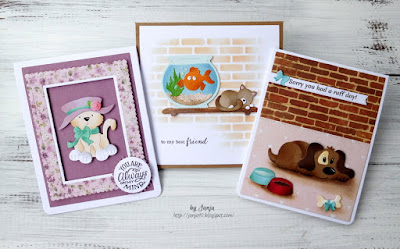
Today, I prepared three cards with some new dies from Pets release.


- white card base: 4.25 x 5.35" (10,7 x 13,9 cm), folded
- kraft card base: 5.3 x 5.3" (13,5 x 13,5 cm), folded
- colored card stock
- different ink pads
- plastic stencil: brick wall
- double-sided sticky tape, double-sided foam tape, foam pads, glue
- glossy accents


Start this card by cutting a fish, bowl and cat. 
I used colored card stock. For greater depth, I used different ink pads. On the picture is missing a shelf that I cut out later.


Use a plastic stencil brick wall for the background.
Cut the background to size 5 x 5" (12,7 x 12,7 cm). Paste it with a double-sided sticky tape to the card base. Stamp a sentiment. 
Attach the fish bowl and cat to the shelf with foam pads. 
Use glossy accents for air bubbles.


-------------------

Cut out all the pieces with the die - Rufus The Hound. I used the die - Fireplace with Accessories for small bows.


Cut two patterned papers of this size: 4 x 5.2" (10 x 13,2 cm) and 4 x 2.9" (10 x 7,3 cm). I printed the sentiment in Word. 


For the final touch, draw a shadow around the dog with a brush. Apply a glossy accents to the water in a bowl.


------------------------

Cut out and assemble Miss Kitty. 


Prepare background and two frames. Cut out two circles and stamp a sentiment. Attach frame and Miss Kitty to card base as shown using double-sided foam tape. 
Finally, add a little pearl to the flower.


Have a nice day.


Saturday, December 08, 2018

Rufus Says I'm Sorry (new die)

Hello Scrapping Cottage friends! Thanks for taking the time to stop and visit with us today. It's Mary Marsh here bringing you the Saturday edition of the Blog. 
The Pet release from Black Friday is still on sale at 30% off so you still have a chance to pick up some really cute dies. The team sampled cards using these dies here, here, here and here. Just in case you missed them.

And, today I have another card to show you using the Rufus the Hound die. When I saw this die and those sweet puppy eyes, I immediately thought of a card to say "I'm sorry". So that's the direction I took with my card today. Let's get started with some details on how I created it.

Step 1: I cut Rufus out using 2 different shades of brown cardstock. I used a black Copic multiliner and a white gel pen for his eyes. I also cut 2 of the dog bones with a confetti white and a brown cardstock.
I looked for some fun papers to go along with this cute little hound. I decided on this circle patterned paper, and I coordinated it a soft yellow and a teal to pick up the colors in the paper.

card base: 4 1/4" x 5 1/2"
patterned paper layer: 4 1/8" x 5 3/8"
teal layer: 1" x 5 3/8"
For the oval frames I used the 3rd largest CottageCutz cross stitched oval die and the 3rd largest oval from the basic set.
On the oval where Rufus is laying I stamped my first sentiment. Since it's a cling stamp I used my Stamp-a-ma-jig to get the placement straight and where I wanted it. I did the same for the smaller oval where I stamped "I'm Sorry". This oval is the smallest from the cross stitched set. I used a teal ink.
I thought some background splatters would add interest on the image panel.
Now that everything is cut and stamped, I am ready to start card assembly. I started with the card base and patterned paper.
Attached the ovals with double sided tape and with Rufus I used dimensional adhesive. To complete my card, I laid his dog bones on the card just for some added interest. 
Well, that's it for me for this week. I hope I have give you an idea for a way to use this new die. See you next Saturday!

dies I used to create card: