Showing posts with label Princess Cake. Show all posts

Saturday, June 08, 2019

Fairy Tale Birthday

Hello Scrapping Cottage friends! Thanks for taking the time to stop and visit with us today. It's Mary Marsh here bringing you the Saturday edition of the Blog. 

We have released the new Magical Garden dies. There are 14 new designs and they are currently on sale at 25% off.
If you love fairies, fairy gardens, gnomes and flowers, you will love these dies. We will have several group posts to jump start your creativity starting next week. In the meantime, check out this little teaser from Jeanne using  the Mushroom Fairy Garden and the Fairy Garden Flowers dies.

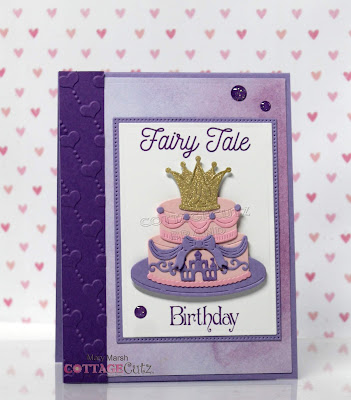
Today, I am featuring the Princess Cake die. This one is from the Magical Fantasy collection of dies. I wanted the cake to be the center of attention on this card so I kept my design on the simple side. Let's get started with some details on how I created it.

Step 1: I was looking for a more clean and simple layout for this card. When I checked out the Splitcoaststampers Wednesday sketch challenge #752, it was just what I was looking for. The beauty of any sketch is that you can always bump it up a notch with designer paper, ribbon and embellishments. I stuck pretty much to the sketch layout this time.
Step 2:  I selected my card colors based off the designer paper I chose to use. I bought a pack of watercolor papers at Hobby Lobby a few weeks ago. The colors are perfect for all the cards I have been creating using the Magical Fantasy dies.
Light Purple Card Base: 4 1/8" x 5 1/4"
Designer Paper Layer: 3 7/8" x 5 1/8"
White Image Panel: 2nd largest rectangle die (2 11/16" x 3 11/16")
Light Purple Layer:  2nd largest pierced rectangle die (2 7/8" x 3 7/8")

Next, I cut the princess cake. I used 2 shades of pink and a light purple. The princess crown I cut in a metallic gold. I liked all the sparkle for a cake topper.
I stamped the sentiment on the white image panel. I only wanted the words Write Your Own Fairy Tale and Happy Birthday. Since both of the sentiments had more words that what I wanted to use, I taped off the portion that I didn't want and inked up the remainder. Used my MISTI just in case I need to ink the stamp a 2nd time. But, today with the grape ink once was sufficient.
Step 3: I am ready to start card assembly. Attached the designer paper to the card base using double sided tape. For element 2 of the sketch, I cut a 3/4" piece of grape cardstock and embossed it with hearts.
Added the cake to the white panel using dimensional adhesive.
Added the image panel to the card base using double sided tape. The sketch layout was to have the image panel a little further down on the card base. I decided to center this panel. To finish off my card, I decided to use a few glitter enamel dots.

Well, that's it for me for this week. See you next Saturday.

dies I used to create card:


Saturday, May 18, 2019

Princess Cake


Happy Saturday!

It is Pam sharing with you on the blog today.  Mary and I just switched places for the week.  So her post will be on Thursday.

I have another birthday card for you today.  I am using one of the dies from our new whimsical release called Princess Cake!

Designer Steps:

 1.  Cut out all of the pieces in white card stock using the Princess Cake die
 2.  Use your favorite makers to color the cake pieces.  I used my Copic Markers

 3.  Assemble the card
 4.  Cut out the oval shape using white card stock and the Nested Stitched Eyelet Oval die.  Pop the cake to the oval
 5.  Using silver glitter card stock and the Princess Cake die cut out the crown and the little circle embellishment.  Glue them to the card as shown
6.  Cut out the Happy Birthday using pink and purple DP and the Happy Birthday die
7.  You can cut out the large scallop easel card using your Circuit or a large 5 inch scallop die.  I used 2 different types of coordinating DP for the background both inside and out.


CottageCutz Products


We appreciate you stopping by!  Make sure to take some time out of your day to get crafty!
Blessings
Pam

Thursday, April 18, 2019

DT Samples w/Spring & Magical Fantasy Release dies (Day 2)

Hello Scrapping Cottage Friends! Thanks for taking the time to stop and visit today. We are sampling DT cards from our Spring release and also our new Magical Fantasy release.

There are 27 new designs in the Magical Fantasy release. And for a limited time the individual dies are on sale at 25% off. We want to give your some ideas for your own card making. So let's get started with our samples for today.

Card 1:  Our first sample today is Pam MacKay. Her whimsical card is featuring the new Magic Dragon die. The background sky is created with distress oxide inks to give the dragons a perfect flying spot. This card of encouragement would be a great one for a young boy. Maybe they are starting a new sport or even trying out for a school play.  It would be a big boost in their confidence to know they are being supported. And the sentiment is so fitting.
Card 2:  Our next sample is from Anja Zurga. She also created a card of encouragement and her lovely card is featuring the Spring Teapot and Cups die. These beautifully detailed dies are ideal for a friend who is a tea lover. The longer length of the card makes it just right to show off the tea images as well as the patterned paper.
Card 3: Our last sample for today is from Jeanne Knobbe. She used the oh so precious Princess Cake + The Fairytale Birthday dies to create a sweet birthday card for a young girl. And what could be better than a princess cake, to celebrate a birthday of a little princess. Any little girl would love to get this card. Her card is so bright and cheerful with a great choice in designer paper and then she matched the cake colors to the paper.
Well that's our samples for today. I hope the team has given you some fresh ideas for a way to use the dies. Stop by the Blog again tomorrow for more team samples.

dies used to create cards: