Showing posts with label Pierced Oval set. Show all posts

Monday, December 04, 2023

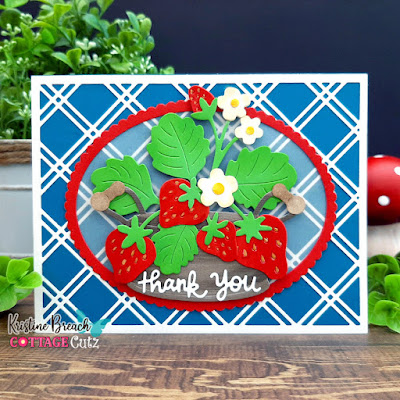
Strawberries in Tub

Welcome CottageCutz friends!

Kris here with a sweet card that is very easy to recreate using our Black Friday Release.  The individual dies are 30% off!!  


Dies I used:

Design Steps:


I die cut and colored my elements as shown above. I added some gold accents to the seeds on my strawberries.

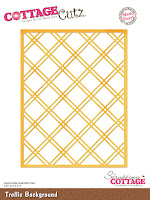
My card base is cut from Pretty Peacock at 4-1/4" x 11" and scored at 5-1/2".  I then glued my Trellis background onto card front. 

I die cut the largest Scalloped Oval from Poppy Parade and from vellum.  I then die cut the largest Stitched Oval inside of the red oval to make a frame and glued it on top of the vellum oval, then onto card front, as shown.


I added my strawberries in the tub to the middle of my oval with foam dots, then added the "thank you" sentiment to tub.


For the inside, I die cut the largest Stitched Rectangle from white and the large strawberry from the Sentiment, Thank You Berry Much die.


I taped the white panel to the inside center and offset the strawberry as shown.


Here's the front again.


Don't forget to check out our YouTube channel for lots more tutorials and giveaways!

Happy Crafting friends!

~Kristine

Thursday, August 31, 2023

Frankie's Night Out

Hello Friends,

It is Pam sharing with you today!

I am doing another Halloween card for today's crafty share.  This card is featuring the Trick or Treat Frankie die.  Frankie's balloon puts a smile on my face! I like Halloween cards with bright colors and fun sentiments.


Design Steps:  

1.  Using the Trick or Treat Frankie die cut out the pieces in the following colors of card stock: yellow, orange, green, black, white, dark gray, and purple (I colored his nose with a Copic marker to make it stand out a little more)
2.  Assemble Frankie using a fine tip fast drying glue
3.  The card base is a gate fold.  Cut a piece of black card stock 8 1/2 x 5 1/2.  Score at 2 1/8 then fllip the card over and score at 2 1/8 again
4.  Using the Double Stitched Oval die (Second from the largest) cut out a piece of spider DP.  Using the Pierced Oval die (Second from the largest) cut out a piece of black card stock.  Cut out 2 purple panels 2 x 5 3/8.  Cut out 2 DP panels 1 7/8 x 5 1/4
5.  Glue the purple panels to the front of the black card base and then add the DP panels

6.  Glue the Spider DP oval to the black oval. Glue Frankie to the lower half of the oval as shown above

7.  Place glue on the left side of the Frankie oval making sure you are only getting glue on the left front panel.  Use the Stitched Alphabet die and cut out EEK in black.  Then glue to the top of the oval again making sure you don't put glue on the part of the K that is hanging over the right panel

8. I used a piece of purple on the inside measuring 4 1/8 x 5 3/8 and glued a piece of white on top measuring 4 x 5 1/4.  I then added the Happy Halloween sentiment and your card is complete


We have more inspiration on our YouTube Channel check it out HERE

Thanks so much for stopping by!  And I will see you next Thursday.

Blessings and Take Care


Monday, August 28, 2023

Say YES to New Adventures

Hello CottageCutz friends!

Kris here, sharing some Monday inspiration with you!  


DESIGN STEPS:

1.  I started with an A2 side-folding card in Crumb Cake cardstock.  

2.  Next I cut a piece of Pecan Pie cardstock at 5-1/4" x 4" and die cut an oval using the Pierced Oval Set.  I then used a stencil to emboss that layer, then brushed Distress Oxide ink lightly over the embossed parts.


3.  I cut a piece of jungle patterned paper a bit smaller than the top layer and glued it to the center of my card front.  

4.  Then I added foam tape to the back of top layer and adhered to card front.


5.  Next, I die cut the Safari Adventure Gang and Safari Cruiser with Banner from white cardstock and colored all the pieces with Copic markers and Distress inks. 


6.  I stamped a sentiment onto the Pecan Pie cardstock in Versamark and embossed in white.  I layered it onto a blue c.s. that I inked with Distress inks and fishtailed the ends.  I then adhered it with foam tape.  

7.  I tucked the giraffe under the oval frame as well as some of the leaves and glued the rhino and rest of the leaves on top.  


PRODUCTS:


Thanks for looking today!  I hope you are inspired to get crafty with your favorite CottageCutz dies. 

~Kris


Monday, August 21, 2023

Paper Pieced Pumpkin

Hello friends!  

It's Kris sharing with you today this easy-to-make pumpkin card for your inspiration!


I was inspired by some other die-cut and punched pumpkin cards on Pinterest and thought I'd give it a go with some cute Fall-themed papers and of course I got creative with my CottageCutz dies! 

CUTTING & SCORING:

Dove White Cardstock:
•  5-1/2" x 8-1/2" and scored at 4-1/4"
• 3-7/8" x 5-1/8"
• die cut Thanks w/ Shadow (shadow)

Pecan Pie Cardstock (brown):
• 5-1/4" x 4"
• die cut Thanks w/ Shadow (shadow)
• die cut Fence & Grass (fence)

Patterned Papers (Doodlebug Designs: Pumpkin Spice):
• (5)  die cut the 3rd smallest of the Pierced Oval set
• die cut (2) of the large leaves from the Flowers 4x6 die
*Tip... I just cut a piece li'l bit larger than the leaf w/ scissors first then die cut just the leaf
• die cut Thanks w/ Shadow (thanks)
• die cut Fence & Grass (grass)

DESIGN STEPS:

1.  First, I stamped "for all you do" in an olive green in the top right corner of my white layer.


2.  I assembled my pumpkin using foam strips between each of the top 2 layers.


3.  I hand cut a stem for my pumpkin and added some lines with a marker.  I then ran some twine thru a button and glued it to the top over the leaves.  


4.  Next, I decided I wanted more texture on the white layer, so I ran it thru with a lattice embossing folder.  I then smoothed it out with my bone folder, just over my stamped sentiment so it would be easier to read. ☺


5.  I cut apart my fence and grass as shown below so there are 3 slats and 2.


6.  I added my pumpkin with foam strips between the fence.

7.  I offset my brown "thanks" shadow behind the white and then glued my "Thanks" on top and added to the top left corner of card.  Done!


Thanks for looking!  I hope you're inspired to create something CUTE with your CottageCutz dies! 

♡ Kristine