Showing posts with label Nested Stitched Rectangles Slimline. Show all posts

Friday, March 01, 2024

Hippity Hoppity Easter Express

Happy Friday friends!

It's Kris sharing with you today. It's the first day of March, which means there's  30 more days til Easter!  I have a few more Easter cards to make and today's turned out super cute, in my humble opinion. ☺  This slimline features the Bunny Express Engine and Bunny Express Carrot Cars along with the Spring Sentiments from the Spring 2022 release.  


Design Steps:

My card base is 4" x 9" (folded).  My next layer (SU! Berry Burst) is cut at 3-3/4" x 8-3/4" (I actually cut it 1/16" shy of those figures, but if you don't like working in 16th inches, you can easily round up to 3/4")

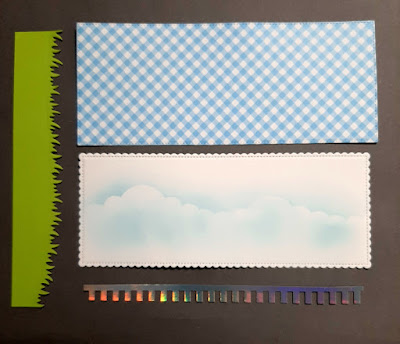
Next, I die cut a piece of blue/white gingham paper (Divinity Designs Polka Dots & Gingham)  using the largest of the Nested Stitched Rectangles Slimline set.  And for my main focal panel, I die cut a piece of white cardstock using the largest of the Scalloped Stitched Rectangles Slimline set.  I then sponged some clouds with Tumbled Glass Distress Oxide ink. 

I cut a piece of (SU! Granny Apple Green) at 1-1/2" x 7-15/16" and I die cut the top with a die from the Grass Slimline set. 

I die cut a piece of iridescent cardstock using the Picket Fence Slimline die and then trimmed it as shown in the photo below to look like train tracks. 


I layered all those pieces onto my card base.

Next, I die cut all of my Easter elements from white cardstock and colored with Copic markers and then I assembled them.  I popped the train onto the track with foam dots and I glued the sentiment to the top.  


I love the font and how the ending letters include bunny ears! 


Thanks so much for looking today!  I hope you are inspired to create something CUTE with your favorite CottageCutz dies ☺

~Kristine


Head over to Cottage Cutz and do a little shopping today!

Get Social With Cottage Cutz

Saturday, November 27, 2021

S'more Fun

Hello CottageCutz friends! Thanks for taking the time to stop and visit with us today. It's Mary Marsh here bringing you the Saturday edition of the Blog.

IT'S NEW RELEASE TIME! Our annual Black Friday release is in the store, and you can pick it up at a great bundle price of only $49.95 or the individual dies at a 30% savings. There are 14 ever so cute new designs that can be used year round for your cardmaking. 

We are also having a Black Friday blowout sale with savings of up to 85% on selected dies. So shop early for the best selections. The sale ends Friday,  December 3. 

Today for your viewing pleasure, I have a design featuring several of the Campin' Out dies. I made a birthday card for the 4 year old next door. We were over a couple of months ago sitting around their firepit and making s'mores. Maddie just loved us being there and talked non-stop for 3 hours. So I thought a card with a fire and marshmallows would be a cute card for her. 

Design Steps:

I decided to make a nighttime card in the slimline design. I found some perfect designer paper for the background. It already had the night sky and stars on it. I cut it from the largest Nested Stitched Rectangles Slimline die. The card base is white and measures the same size as the designer paper. 

white card base: 3 1/2" x 8 1/2"
designer paper: 3 1/2" x 8 1/2"
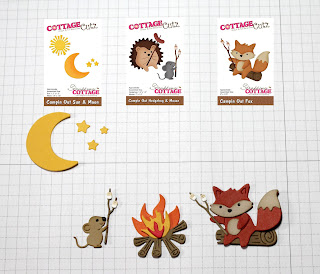
Next, I cut the images. I used the Campin' Out FoxCampin' Out Hedgehog and Mouse and the Campin' Out Sun & Moon.
 
For the next step, I used the Hills Slimline die to cut a slope for the ground. I stamped the sentiment in chocolate chip ink. 
Now that all the elements are prepared, I am ready to start card assembly. I attached the slope with double sided tape and the images with dimensional adhesive. 
I thought the card looked like it needed something else so I cut a tree from the Campin' Out Trees die. Took some white acrylic paint and splattered it around the card, added a few more yellow stars and some sparkle with clear wink of stella. 
And, that's my sample for this week. I hope I have given you an idea for another way to use these new dies. See you next Saturday!

Reminder: The CottageCutz You Tube Channel is up and running again. We have new videos every Wednesday. Plus there is a giveaway on the channel. Details on the channel. Check it out here.

Dies I used to create card:


Monday, August 16, 2021

Sea You Soon!

Hello and Happy Monday!  This is Sukie and today I'm sharing an underwater card. Today's card features both Cottage Cutz dies and Lil' Bluebird Designs products.

The background for my card was created with the Waves and Nested Stitched Rectangles slimline die sets.  I used a variety of Oxide Ink colors to create the sand and waves on my card.  The waves and sand were splattered with some water and the sand was also splattered with some paint. I watercolored the images from the Under the Sea stamp set and used the die set to cut them out.  The images were nestled amongst the waves.  The bubbles and sentiment were heat embossed directly on my card.
Here are the products used to create my card:

Sunday, August 08, 2021

Sparkly Sheep

Hi!

It's Anja here for my Sunday post. While I'm still waiting for the new slimline dies and stamp sets to arrive, I'm still making cards with cute Country Farm release dies. This time I made a card with sparkly Sheep. 

For this card I used:

- Cottage Cutz dies (Curly Sheep & Lamb, Scalloped Stitched Rectangle Slimline, Nested Stitched Rectangles Slimline),

- Distress Inks,

- white card stock for die cuts,

- black pen, 

- white ink,

- embossing ink,

- sentiment stamp,

- acrylic block,

- heat gun,

- white embossing powder,

- sparkle brush marker,

- Perfect Pearls powder,

- brush,

- water spritzer,

- adhesive foam pads,

- paper glue. 


First I cut and colored the sheep and the lamb. 

Next I cut the scalloped rectangle and embossed the sentiment on top using the white powder.  

Then I colored the rectangle with Distress Inks. 

After that I sprinkled Perfect Pearls mixed with water over the paper. I used the heat gun to dry it. 

I cut another rectangle piece for the card base. I glued the colored rectangle on top of it and added the sheep and the lamb. I used adhesive foam pads to adhere it. Last I used a sparkle marker to add some shine to both the sheep and the lamb. And my card was done.


And that's all from me for today. Before I go I want to invite you to The Scrapping Cottage online store to check the new Lil' Bluebird Designs release.
 
Have a nice week and see you again on Sunday.

Anja Z.


Cottage Cutz dies I used: